> ## Documentation Index
> Fetch the complete documentation index at: https://docs.cognigy.com/llms.txt
> Use this file to discover all available pages before exploring further.
# Genesys
Updated in 4.64
 The Genesys Endpoint enables you to connect your AI Agent to the [Genesys Cloud CX platform](https://apps.mypurecloud.de/) using a [Genesys Bot Connector](https://help.mypurecloud.com/articles/about-genesys-bot-connector/).
## Prerequisites
* Access to [Genesys Cloud](https://apps.mypurecloud.de/).
* Activate the Genesys Endpoint on the Cognigy.AI side:
* If you have a SaaS installation, contact Cognigy technical support.
* If you have an on-premises installation, specify the following feature flags:
* `FEATURE_USE_GENESYS_BOT_CONNECTOR_ENDPOINT_WHITELIST="organization1,organization2"`. To enable the Genesys Endpoint for all organizations in your installation, use `*` instead of a list of organizations.
* `FEATURE_ENABLE_AGENT_ASSIST_WORKSPACE_GENESYS_CREDENTIALS_WHITELIST="organization1,organization2"`. Add this feature flag to use Genesys [Notifications APIs](https://developer.genesys.cloud/notificationsalerts/notifications/notifications-apis) with Agent Copilot. To enable this feature for all organizations within the Genesys Endpoint in your installation, use `*` instead of a list of organizations.
## Generic Endpoint Settings
Learn about the generic Endpoint settings available for this Endpoint on the following pages:
* [Endpoints Overview](/ai/agents/deploy/endpoints/overview)
* [Data Protection & Analytics](/ai/agents/deploy/endpoints/data-protection-and-analytics)
* [Real-Time Translation Settings](/ai/agents/deploy/endpoints/real-time-translation-settings)
* [Transformer Functions](/ai/for-developers/transformers/overview)
* [Copilot](/agent-copilot/configure/copilot-section)
## Specific Endpoint Settings
| Parameter | Description |
| ------------ | ------------------------------------------------------------------------------------------------------------------------------------------------------------------------------------------------------------------ |
| Verify Token | A verification token for connecting the Cognigy Genesys Endpoint to the Genesys Bot Connector. This token needs to be generated on the Cognigy.AI side and can consist of letters, numbers, and punctuation marks. |
## How to Set Up
### Setup on the Cognigy.AI Side
1. In the left-side menu of the Project, go to **Deploy > Endpoints**.
2. On the **Endpoints** page, click **+ New Endpoint**.
3. In the **New Endpoint** section, do the following:
1. Select the **Genesys** Endpoint type.
2. Add a unique name.
3. Select a relevant Flow from the list.
4. In the **Configuration Information** section, copy the Endpoint URL and save it for later use in Genesys.
5. Activate the **Enable Endpoint** setting.
6. In the **Genesys Bot Connector Setup** section, in the **Verify Token** field, create a verification token for connecting the Cognigy Genesys Endpoint to the Genesys Bot Connector. The token can consist of letters, numbers, and punctuation marks. Copy this token for later use in Genesys. Save changes.
### Setup on the Genesys Cloud CX Side
1. Open the Genesys Cloud interface, click **Menu** in the upper-left corner and go to **IT and Integrations > Integrations**.
2. Click **Add Integration** in the upper-right corner.
3. On the **Genesys Bot Connector** card, click **Install**. Assign a unique name to your integration.
4. On the **Configuration** tab, navigate to the **Properties** section.
5. In the **Bot Connector Handle Utterance URI** field, enter the Endpoint URL value you saved earlier from the Cognigy.AI setup.
6. In the **Credentials** section, click **Configure** in the **Genesys Bot Connector connection secret** card.
7. Click **+ Add Credential Field** and enter the following credentials:
* **newKey Key** — use `verify-token` as the name.
* **newKey** — enter the token created earlier in the **Verify Token** field on the Cognigy.AI side.
8. Click **Confirm**, then **Save**.
9. On the **Details** tab, click **Copy Integration ID** and save this ID for later use.
Your integration will be listed among integrations.
1. Open the [API Explorer interface](https://developer.genesys.cloud/devapps/api-explorer) in the Genesys Developer Tools. Make sure you are logged in by using the **Account Selection** list in the upper-right corner.
2. In the **API Operation Filter**, enter `botconnector`, then select **PUT** in the **HTTP Verb Filter**.
3. Click the `PUT /api/v2/integrations/botconnector/{integrationId}` operation, then click the **Reading Mode** toggle to deactivate it.
4. Fill in the **integrationId** field under **Path Parameters** with the integration ID that you copied and saved earlier.
5. In the **Request Body** editor under **Query Parameters**, enter the following JSON:
```json theme={null}
{
"chatBots": [
{
"id": "",
"name": "Cognigy.AI Bot",
"versions": [
{
"version": "1",
"supportedLanguages": ["en-us"],
"intents": [
{
"name": "Success",
"slots": {
"processedTimestamp": {
"name": "processedTimestamp",
"type": "integer"
}
}
}
]
}
]
}
]
}
```
The `id` field must contain a UUID, which you can create using an [online UUID generator](https://www.uuidgenerator.net/version4).
The Genesys Endpoint enables you to connect your AI Agent to the [Genesys Cloud CX platform](https://apps.mypurecloud.de/) using a [Genesys Bot Connector](https://help.mypurecloud.com/articles/about-genesys-bot-connector/).
## Prerequisites
* Access to [Genesys Cloud](https://apps.mypurecloud.de/).
* Activate the Genesys Endpoint on the Cognigy.AI side:
* If you have a SaaS installation, contact Cognigy technical support.
* If you have an on-premises installation, specify the following feature flags:
* `FEATURE_USE_GENESYS_BOT_CONNECTOR_ENDPOINT_WHITELIST="organization1,organization2"`. To enable the Genesys Endpoint for all organizations in your installation, use `*` instead of a list of organizations.
* `FEATURE_ENABLE_AGENT_ASSIST_WORKSPACE_GENESYS_CREDENTIALS_WHITELIST="organization1,organization2"`. Add this feature flag to use Genesys [Notifications APIs](https://developer.genesys.cloud/notificationsalerts/notifications/notifications-apis) with Agent Copilot. To enable this feature for all organizations within the Genesys Endpoint in your installation, use `*` instead of a list of organizations.
## Generic Endpoint Settings
Learn about the generic Endpoint settings available for this Endpoint on the following pages:
* [Endpoints Overview](/ai/agents/deploy/endpoints/overview)
* [Data Protection & Analytics](/ai/agents/deploy/endpoints/data-protection-and-analytics)
* [Real-Time Translation Settings](/ai/agents/deploy/endpoints/real-time-translation-settings)
* [Transformer Functions](/ai/for-developers/transformers/overview)
* [Copilot](/agent-copilot/configure/copilot-section)
## Specific Endpoint Settings
| Parameter | Description |
| ------------ | ------------------------------------------------------------------------------------------------------------------------------------------------------------------------------------------------------------------ |
| Verify Token | A verification token for connecting the Cognigy Genesys Endpoint to the Genesys Bot Connector. This token needs to be generated on the Cognigy.AI side and can consist of letters, numbers, and punctuation marks. |
## How to Set Up
### Setup on the Cognigy.AI Side
1. In the left-side menu of the Project, go to **Deploy > Endpoints**.
2. On the **Endpoints** page, click **+ New Endpoint**.
3. In the **New Endpoint** section, do the following:
1. Select the **Genesys** Endpoint type.
2. Add a unique name.
3. Select a relevant Flow from the list.
4. In the **Configuration Information** section, copy the Endpoint URL and save it for later use in Genesys.
5. Activate the **Enable Endpoint** setting.
6. In the **Genesys Bot Connector Setup** section, in the **Verify Token** field, create a verification token for connecting the Cognigy Genesys Endpoint to the Genesys Bot Connector. The token can consist of letters, numbers, and punctuation marks. Copy this token for later use in Genesys. Save changes.
### Setup on the Genesys Cloud CX Side
1. Open the Genesys Cloud interface, click **Menu** in the upper-left corner and go to **IT and Integrations > Integrations**.
2. Click **Add Integration** in the upper-right corner.
3. On the **Genesys Bot Connector** card, click **Install**. Assign a unique name to your integration.
4. On the **Configuration** tab, navigate to the **Properties** section.
5. In the **Bot Connector Handle Utterance URI** field, enter the Endpoint URL value you saved earlier from the Cognigy.AI setup.
6. In the **Credentials** section, click **Configure** in the **Genesys Bot Connector connection secret** card.
7. Click **+ Add Credential Field** and enter the following credentials:
* **newKey Key** — use `verify-token` as the name.
* **newKey** — enter the token created earlier in the **Verify Token** field on the Cognigy.AI side.
8. Click **Confirm**, then **Save**.
9. On the **Details** tab, click **Copy Integration ID** and save this ID for later use.
Your integration will be listed among integrations.
1. Open the [API Explorer interface](https://developer.genesys.cloud/devapps/api-explorer) in the Genesys Developer Tools. Make sure you are logged in by using the **Account Selection** list in the upper-right corner.
2. In the **API Operation Filter**, enter `botconnector`, then select **PUT** in the **HTTP Verb Filter**.
3. Click the `PUT /api/v2/integrations/botconnector/{integrationId}` operation, then click the **Reading Mode** toggle to deactivate it.
4. Fill in the **integrationId** field under **Path Parameters** with the integration ID that you copied and saved earlier.
5. In the **Request Body** editor under **Query Parameters**, enter the following JSON:
```json theme={null}
{
"chatBots": [
{
"id": "",
"name": "Cognigy.AI Bot",
"versions": [
{
"version": "1",
"supportedLanguages": ["en-us"],
"intents": [
{
"name": "Success",
"slots": {
"processedTimestamp": {
"name": "processedTimestamp",
"type": "integer"
}
}
}
]
}
]
}
]
}
```
The `id` field must contain a UUID, which you can create using an [online UUID generator](https://www.uuidgenerator.net/version4).
6. Click **Execute Request**.
To create a digital bot flow in Architect, configure the inbound message flow:
1. Open the Genesys Cloud interface, click **Menu** in the upper-left corner and go to **Orchestration > Architect**.
2. Hover over the  icon on the **Flows** tab and select **Inbound Message**.
3. Click **+ Add** in the upper-left corner. The **Create 'Inbound Message Flow'** dialog box opens. In the **Name** field, enter a unique name for the inbound message flow.
4. From the **Division** list, select the division in which to place the flow.
5. Click **Create Flow**. The flow's configuration page opens. To configure a flow, click **Edit**.
6. Go to the **Toolbox** section, enter `Call Bot Connector` in the search field and drag the action to the messaging flow editor.
7. In the right-side **Call Bot Connector** panel, fill in the following fields:
* **Bot Integration** — select the integration you created earlier.
* **Bot Name** — select the bot you created earlier.
* **Bot Version** — select the bot version you created earlier.
8. In the **Toolbox** section, enter `Send Response` in the search field. Then, drag the action to the messaging flow editor and drop it below the **Success** action. Drag another **Send Response** action below the **Failure** action.
9. In the **Message Body** of the **Send Response** action below **Success**, enter `success message` and select **Literal** from the list next to the field. In the **Send Response** action below **Failure**, enter `fail message` and select **Literal** from the list next to the field.
10. Below the **Send Response** actions, place the [Transfer to ACD](https://help.mypurecloud.com/articles/transfer-acd-action/) action to transfer an interaction to a queueing system.
11. In the **Queue** field of the **Transfer to ACD** action, select the queue to which you want to transfer the interaction.
icon on the **Flows** tab and select **Inbound Message**.
3. Click **+ Add** in the upper-left corner. The **Create 'Inbound Message Flow'** dialog box opens. In the **Name** field, enter a unique name for the inbound message flow.
4. From the **Division** list, select the division in which to place the flow.
5. Click **Create Flow**. The flow's configuration page opens. To configure a flow, click **Edit**.
6. Go to the **Toolbox** section, enter `Call Bot Connector` in the search field and drag the action to the messaging flow editor.
7. In the right-side **Call Bot Connector** panel, fill in the following fields:
* **Bot Integration** — select the integration you created earlier.
* **Bot Name** — select the bot you created earlier.
* **Bot Version** — select the bot version you created earlier.
8. In the **Toolbox** section, enter `Send Response` in the search field. Then, drag the action to the messaging flow editor and drop it below the **Success** action. Drag another **Send Response** action below the **Failure** action.
9. In the **Message Body** of the **Send Response** action below **Success**, enter `success message` and select **Literal** from the list next to the field. In the **Send Response** action below **Failure**, enter `fail message` and select **Literal** from the list next to the field.
10. Below the **Send Response** actions, place the [Transfer to ACD](https://help.mypurecloud.com/articles/transfer-acd-action/) action to transfer an interaction to a queueing system.
11. In the **Queue** field of the **Transfer to ACD** action, select the queue to which you want to transfer the interaction.
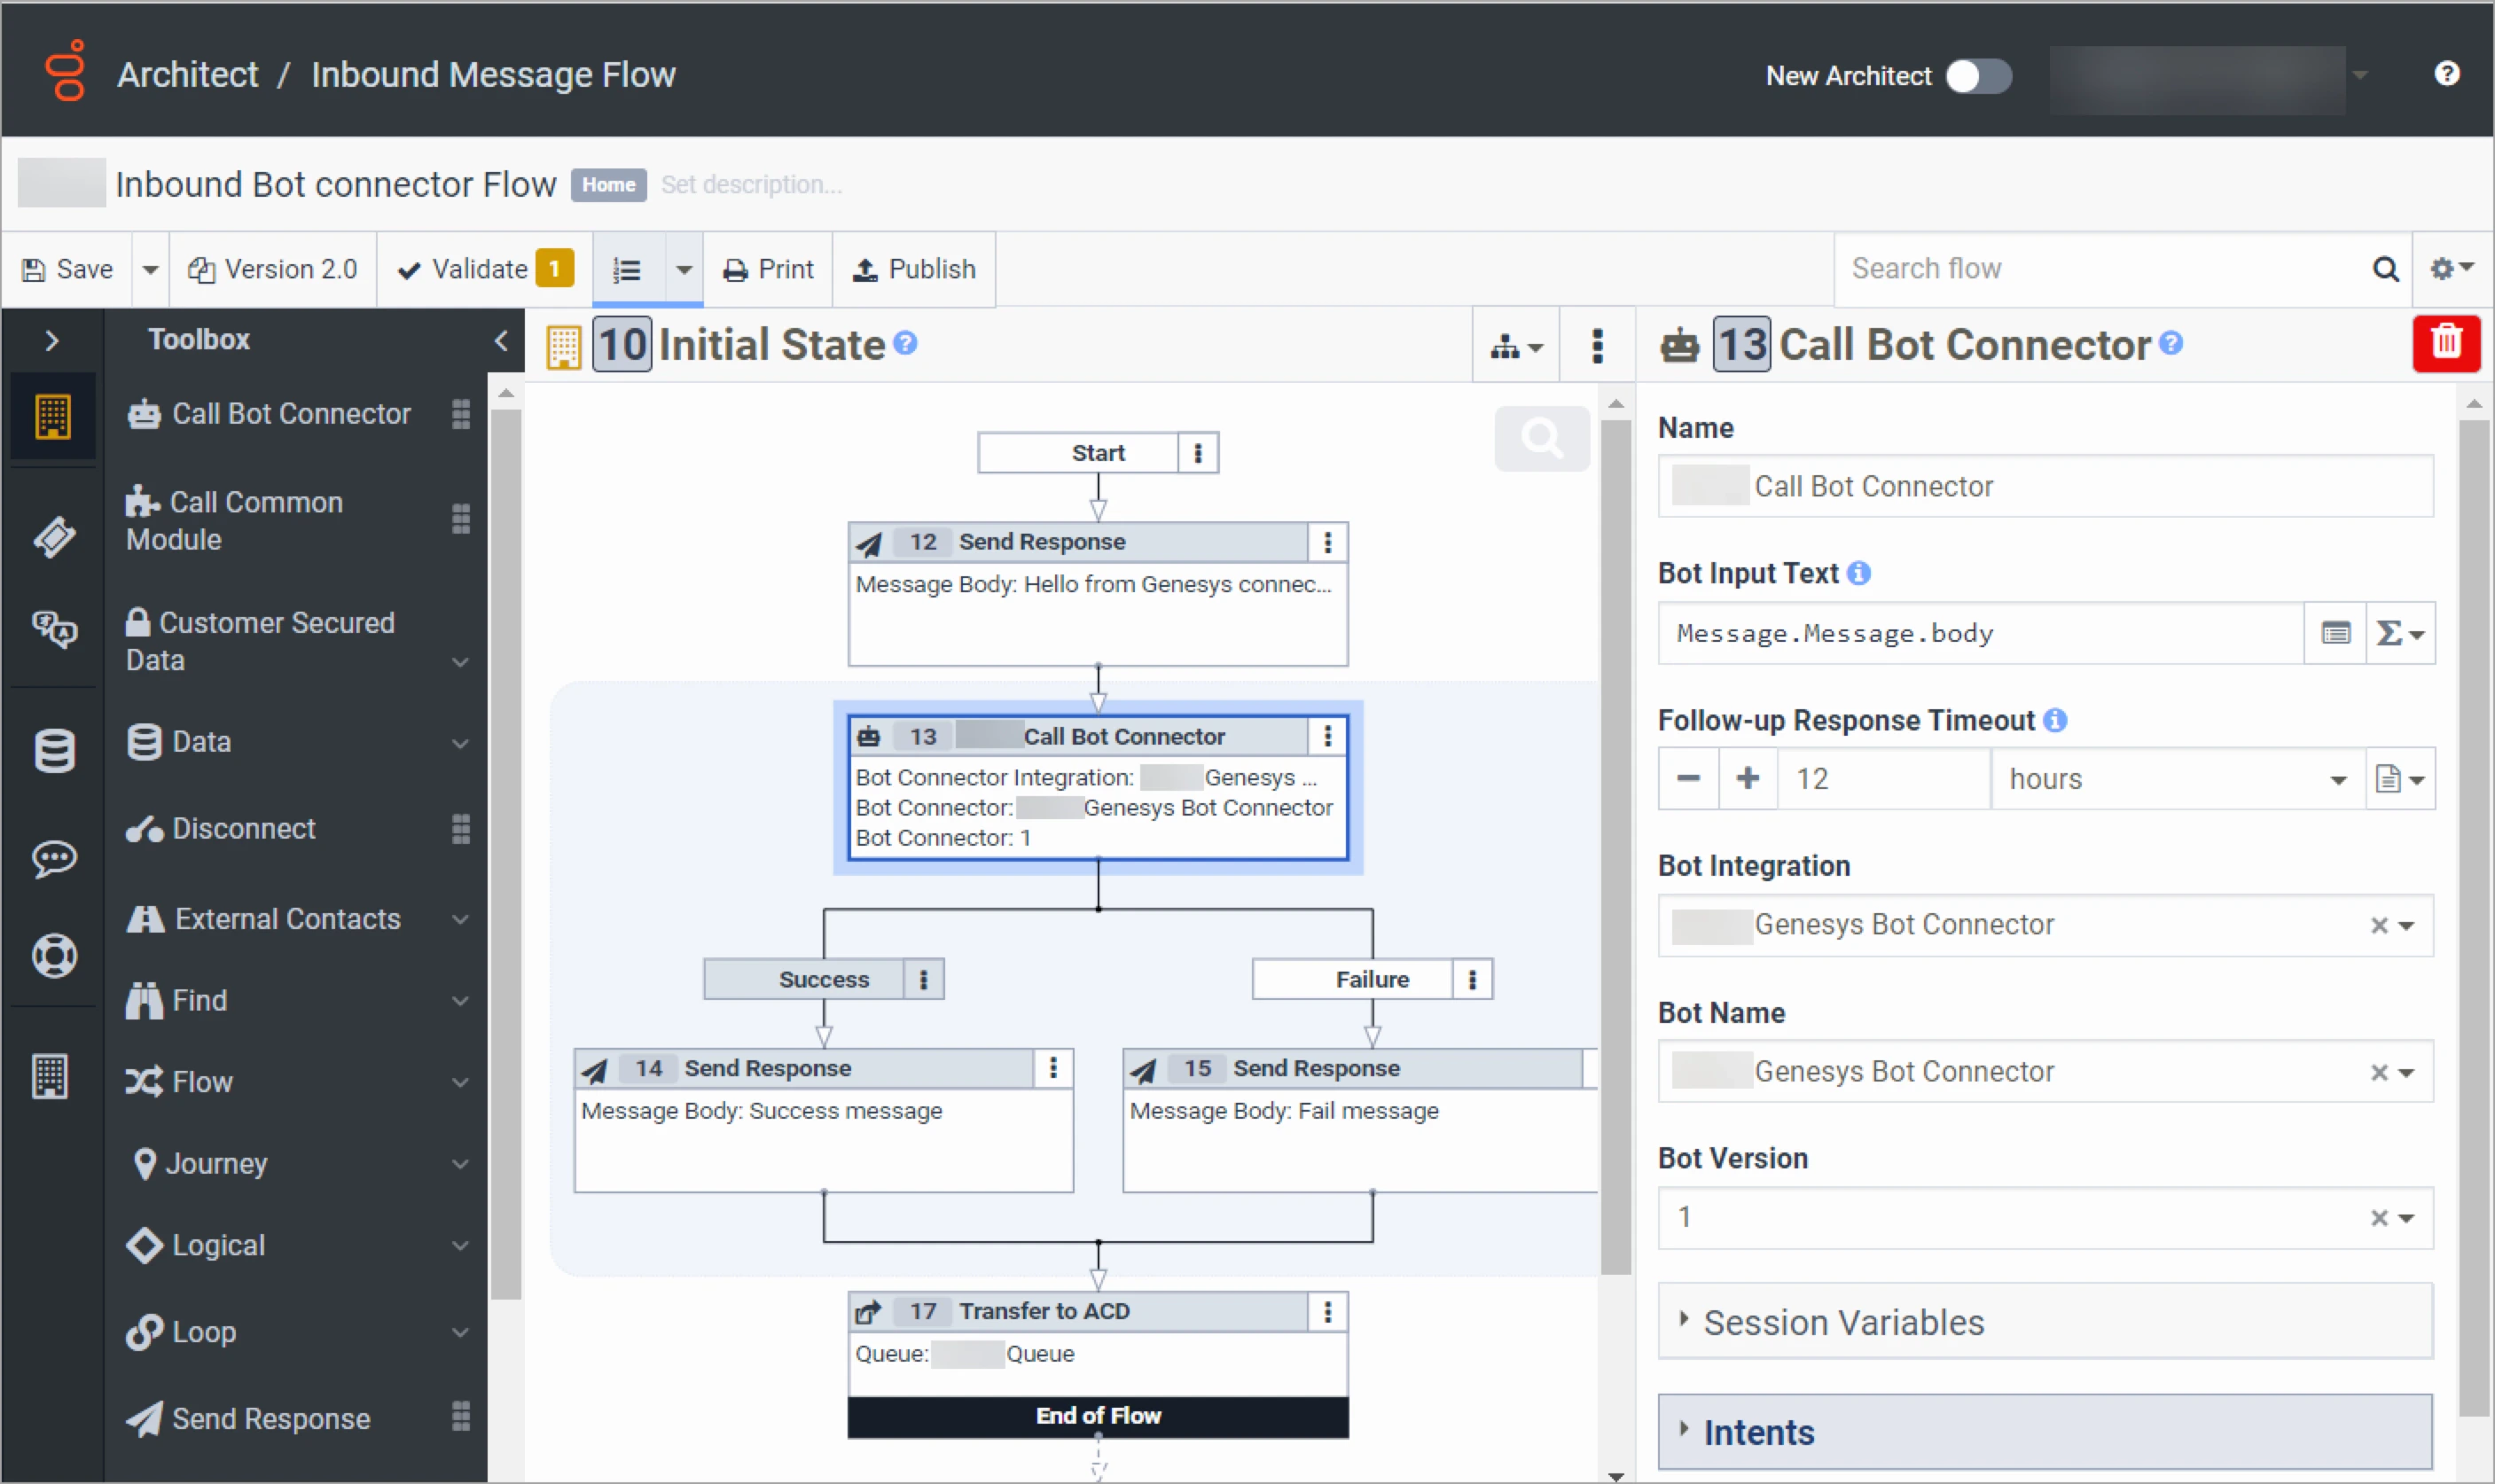 12. In the upper-left corner, click **Save**, then **Publish**.
After creating your inbound message flow, you will see this flow in the architect list.
To learn more about designing the flow, see [Configure Inbound Message Flow](https://help.mypurecloud.com/articles/inbound-message-flows/) settings.
To create a new version of a messenger configuration and a messenger deployment, follow these steps:
1. Go to **Digital and Telephony > Message > Messenger Configurations** and click **+ New Setup**.
2. In the **Channel Setup** step, configure the following:
* **Name** — enter a unique configuration name reflecting your bot integration.
* **Choose a Digital Channel you want to set up** — select **Messaging**. Click **Next**.
3. *(Optional)* In the **Appearance** step, configure the appearance of the chat widget. Click **Next**.
4. In the **Behavior** step, configure the following:
* *(Optional)* In the **Messaging Configuration** section, set the behavior of the chat widget.
* In the **Language Support** section, set how the chat widget handles different languages:
* **Select your Supported Languages** — select UI languages and customize text labels. Browser language determines the user's language.
* **Select Default Language** — select the default language for cases when the browser language isn't detected or isn't in the list. Click **Next**.
5. In the **Review Step**, review your messenger configuration, then click **Publish Configuration**.
1. In the left-side menu, click **Messenger Deployments** and click **+ New Deployment**.
2. In the **Name** field, enter a unique deployment name that corresponds to your messenger configuration.
3. Click the **Select your Configuration** button, select the message configuration you created, the configuration version, and click **Change Assignment**.
4. In the **Restrict domain access** section, select **Allow all domains** or specify trusted domains where the Messenger can run.
5. From the **Select your Architect Flow** list, select a published inbound message flow to trigger the bot behavior or connect users with agents.
6. Click **Publish Deployment**. The **Deployment Options** section is displayed.
7. In the **Deploy your snippet** section, click **Copy to Clipboard** to copy the embedding code snippet. You will use this snippet to embed the Messenger in your website. After deploying the snippet, any future changes to the configuration and deployment will be applied automatically.
8. To test the AI Agent, visit [CodeSandbox](https://codesandbox.io/) and select a default **HTML** project. Paste the copied code snippet into the `` element of the HTML document.
To check the AI Agent's performance, access the installation that your server administrator has deployed.
### (Optional) Activate Agent Copilot
If you want to use [Agent Copilot](/agent-copilot/overview) and [Notifications APIs](https://developer.genesys.cloud/notificationsalerts/notifications/notifications-apis) within the Genesys integration, create credentials on the Genesys Cloud CX side and configure the **Copilot** settings in the Endpoint.
To configure credentials, follow these steps:
1. In the left-side menu, select **IT and Integrations > OAuth**, then click **+ Add Client**.
2. On the **Add New Client** page, configure the following:
* **App Name** — enter a unique name for the client.
* **Grant Types** — select **Client Credentials**. Click **Next**.
3. In the **Roles** list, activate the corresponding role for the client. Click **Next**.
4. In the **Token Duration in seconds** field, enter the token expiration time. Click **Next**.
5. Click **Generate New Client Secret**, then **Confirm**.
6. Copy the Client ID and Client Secret, save them for future use, and click **Finish**. Confirm that you copied the Client ID and Client Secret in the dialog box.
1. In the left-side menu, select **Authorized Applications**.
2. In the upper-right corner, click **+ Authorize a Client**.
3. In the **Authorize Client** window, enter the Client ID that you copied previously and click **Authorize Client**.
4. *(Optional)* In the **Users that can use this application** section, select which user roles can access the application.
5. In the **Scope** section, select the scopes of the application. Click **Authorize**.
To configure the Agent Copilot workspace settings, follow these steps:
1. In the **Genesys Endpoint settings**, navigate to the **Copilot** section.
2. Configure Agent Copilot by creating an [Agent Copilot config](https://api-trial.cognigy.ai/openapi#post-/v2.0/agentassistconfigs) and adding a Flow. For more information, refer to the [Agent Copilot documentation](/agent-copilot/overview).
3. Set up Genesys Cloud Credentials:
* **Connection Name** — create a unique name for your connection.
* **oAuth2Url** — enter the login URL for Genesys Cloud customers, which varies by region, such as `mypurecloud.de` for Germany. You can use the base domain like `mypurecloud.com` or `cac1.pure.cloud`, omitting the `apps.` or `login.` part. For more information on Genesys Cloud regions, refer to [AWS regions for deployment](https://help.mypurecloud.com/articles/aws-regions-for-genesys-cloud-deployment/).
* **oAuth2ClientId** — enter the Client ID that you generated on the Genesys Cloud CX side.
* **oAuth2ClientSecret** — enter the Client Secret that you generated on the Genesys Cloud CX side.
* **oAuth2Scope** — enter `*`. This system field is only necessary for authorizing the application.
4. Click **Create**, then **Save**.
## What's Next?
Now you can configure Say, Question, and Optional Question Nodes by selecting the [Genesys](/ai/agents/develop/node-reference/basic/say) channel in the Node Editor settings. It's important to create messages that are compatible with the Genesys Endpoint, as the Genesys channel supports a [limited set of output types](/ai/agents/deploy/endpoints/content-conversion).
12. In the upper-left corner, click **Save**, then **Publish**.
After creating your inbound message flow, you will see this flow in the architect list.
To learn more about designing the flow, see [Configure Inbound Message Flow](https://help.mypurecloud.com/articles/inbound-message-flows/) settings.
To create a new version of a messenger configuration and a messenger deployment, follow these steps:
1. Go to **Digital and Telephony > Message > Messenger Configurations** and click **+ New Setup**.
2. In the **Channel Setup** step, configure the following:
* **Name** — enter a unique configuration name reflecting your bot integration.
* **Choose a Digital Channel you want to set up** — select **Messaging**. Click **Next**.
3. *(Optional)* In the **Appearance** step, configure the appearance of the chat widget. Click **Next**.
4. In the **Behavior** step, configure the following:
* *(Optional)* In the **Messaging Configuration** section, set the behavior of the chat widget.
* In the **Language Support** section, set how the chat widget handles different languages:
* **Select your Supported Languages** — select UI languages and customize text labels. Browser language determines the user's language.
* **Select Default Language** — select the default language for cases when the browser language isn't detected or isn't in the list. Click **Next**.
5. In the **Review Step**, review your messenger configuration, then click **Publish Configuration**.
1. In the left-side menu, click **Messenger Deployments** and click **+ New Deployment**.
2. In the **Name** field, enter a unique deployment name that corresponds to your messenger configuration.
3. Click the **Select your Configuration** button, select the message configuration you created, the configuration version, and click **Change Assignment**.
4. In the **Restrict domain access** section, select **Allow all domains** or specify trusted domains where the Messenger can run.
5. From the **Select your Architect Flow** list, select a published inbound message flow to trigger the bot behavior or connect users with agents.
6. Click **Publish Deployment**. The **Deployment Options** section is displayed.
7. In the **Deploy your snippet** section, click **Copy to Clipboard** to copy the embedding code snippet. You will use this snippet to embed the Messenger in your website. After deploying the snippet, any future changes to the configuration and deployment will be applied automatically.
8. To test the AI Agent, visit [CodeSandbox](https://codesandbox.io/) and select a default **HTML** project. Paste the copied code snippet into the `` element of the HTML document.
To check the AI Agent's performance, access the installation that your server administrator has deployed.
### (Optional) Activate Agent Copilot
If you want to use [Agent Copilot](/agent-copilot/overview) and [Notifications APIs](https://developer.genesys.cloud/notificationsalerts/notifications/notifications-apis) within the Genesys integration, create credentials on the Genesys Cloud CX side and configure the **Copilot** settings in the Endpoint.
To configure credentials, follow these steps:
1. In the left-side menu, select **IT and Integrations > OAuth**, then click **+ Add Client**.
2. On the **Add New Client** page, configure the following:
* **App Name** — enter a unique name for the client.
* **Grant Types** — select **Client Credentials**. Click **Next**.
3. In the **Roles** list, activate the corresponding role for the client. Click **Next**.
4. In the **Token Duration in seconds** field, enter the token expiration time. Click **Next**.
5. Click **Generate New Client Secret**, then **Confirm**.
6. Copy the Client ID and Client Secret, save them for future use, and click **Finish**. Confirm that you copied the Client ID and Client Secret in the dialog box.
1. In the left-side menu, select **Authorized Applications**.
2. In the upper-right corner, click **+ Authorize a Client**.
3. In the **Authorize Client** window, enter the Client ID that you copied previously and click **Authorize Client**.
4. *(Optional)* In the **Users that can use this application** section, select which user roles can access the application.
5. In the **Scope** section, select the scopes of the application. Click **Authorize**.
To configure the Agent Copilot workspace settings, follow these steps:
1. In the **Genesys Endpoint settings**, navigate to the **Copilot** section.
2. Configure Agent Copilot by creating an [Agent Copilot config](https://api-trial.cognigy.ai/openapi#post-/v2.0/agentassistconfigs) and adding a Flow. For more information, refer to the [Agent Copilot documentation](/agent-copilot/overview).
3. Set up Genesys Cloud Credentials:
* **Connection Name** — create a unique name for your connection.
* **oAuth2Url** — enter the login URL for Genesys Cloud customers, which varies by region, such as `mypurecloud.de` for Germany. You can use the base domain like `mypurecloud.com` or `cac1.pure.cloud`, omitting the `apps.` or `login.` part. For more information on Genesys Cloud regions, refer to [AWS regions for deployment](https://help.mypurecloud.com/articles/aws-regions-for-genesys-cloud-deployment/).
* **oAuth2ClientId** — enter the Client ID that you generated on the Genesys Cloud CX side.
* **oAuth2ClientSecret** — enter the Client Secret that you generated on the Genesys Cloud CX side.
* **oAuth2Scope** — enter `*`. This system field is only necessary for authorizing the application.
4. Click **Create**, then **Save**.
## What's Next?
Now you can configure Say, Question, and Optional Question Nodes by selecting the [Genesys](/ai/agents/develop/node-reference/basic/say) channel in the Node Editor settings. It's important to create messages that are compatible with the Genesys Endpoint, as the Genesys channel supports a [limited set of output types](/ai/agents/deploy/endpoints/content-conversion).