> ## Documentation Index
> Fetch the complete documentation index at: https://docs.cognigy.com/llms.txt
> Use this file to discover all available pages before exploring further.
# Getting Started with Voice AI Agents
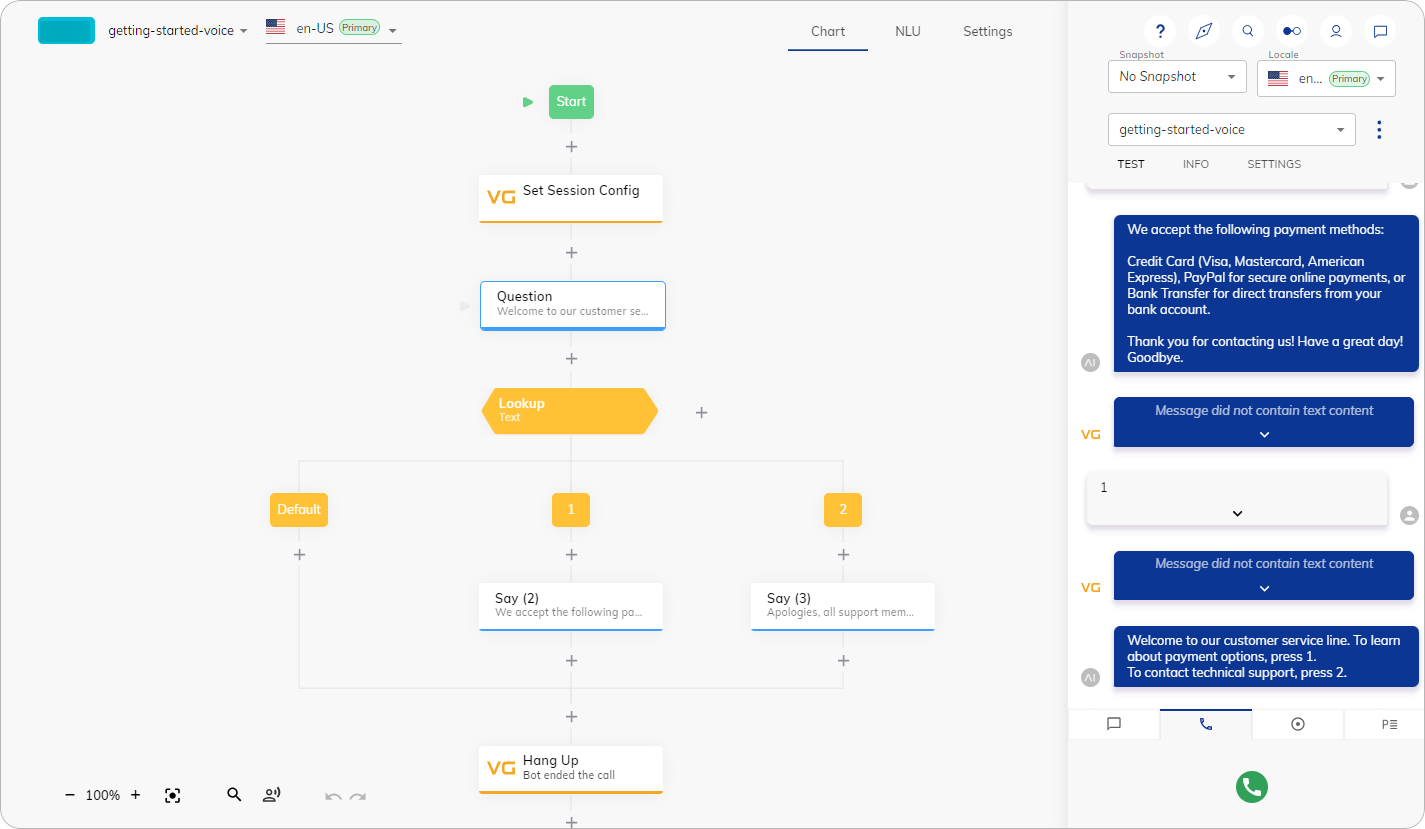
In this tutorial, you will learn how to create a voice AI Agent that uses dial logic. Dial logic lets users select options by pressing the corresponding numbers on a dial pad. This way, the voice AI Agent can guide users through predefined paths based on users' choices.
## Prerequisites
* You need to have access to a Cognigy.AI account.
* One of the following speech provider credentials is required for testing a voice AI Agent: Microsoft Azure Speech Services, Google Speech Services, or Amazon Polly.
## Add Speech Provider Credentials
To add credentials for a speech provider, follow these steps:
After adding credentials for the speech provider, you can create your first voice agent.
## Build a Voice AI Agent
To build a voice AI Agent, follow these steps:
1. In the left-side menu of the Project, go to **Build > Flows**.
2. Create a new Flow by clicking **+ New Flow** in the upper-right corner.
3. In the **New Flow** window, do the following:
* **Name** — add a unique name, for example, `Getting Started`.
* **Description** — add a relevant description, for example, `Getting Started Guide for voice agent`.
4. Click **Create**.
1. In the Flow editor, click **+** and select **Extensions > VG**.
2. Create a new Node by selecting **Set Session Config** from the list. The Node appears in the Flow editor.
3. Left-click the **Set Session Config** Node to open the Node editor.
4. In the Node editor, go to the **DTMF** section.
5. In the DTMF section, activate the **Capture DTMF Signals** setting and remove `#` from the **DTMF Submit Digit** field.
6. Click **Save** Node.
1. Below the Set Session Config Node, add a Question Node.
2. In the Question Node editor, configure the following settings:
* From the **Question Type** list, select **Number**.
* From the **Output Type** list, select **Text**.
* In the **Text** field, enter the following sentences:`Welcome to our customer service line. To learn about payment options, press 1. To contact technical support, press 2.`
3. Click **Save Node**.
1. Below the Question Node, add a Lookup Node.
2. In the Lookup Node editor, select the **Text** type and click **Save Node**.
1. Click the **Case** Node. In the **Value** field, specify `1`, then click **Save Node**.
2. Below the **Case** Node, add a Say Node.
3. In the Say Node editor, go to the Text field and in specify the following sentences: `We accept the following payment methods:Credit Card (Visa, Mastercard, American Express), PayPal for secure online payments, or Bank Transfer for direct transfers from your bank account. Thank you for contacting us! Have a great day! Goodbye.`
4. Click **Save Node**.
5. Click the second **Case** Node. In the **Value** field, specify `2`.
6. Below the second **Case** Node, add a Say Node.
7. In the Say Node editor, go to the Text field and in specify the following sentences: `Apologies, all support members are busy. Try to contact us later. Thank you for your patience.`
8. Click **Save Node**.
1. At the end of the Flow, add a Hang Up Node.
2. Click **Save Node**.
Once the voice agent is created, you can test it using the Interaction Panel.
## Test your Voice AI Agent
To test your voice AI Agent, follow these steps:
1. In the existing Flow, open the Interaction Panel by clicking  **Chat with your Agent** in the upper-right corner of the page. The Interaction panel appears on the right side of the Flow Editor.
2. Initiate a call by clicking
**Chat with your Agent** in the upper-right corner of the page. The Interaction panel appears on the right side of the Flow Editor.
2. Initiate a call by clicking  **> Start Call** at the bottom of the Interaction Panel.
3. Listen to the message from the voice agent and then select either number 1 or 2 on the dial pad
**> Start Call** at the bottom of the Interaction Panel.
3. Listen to the message from the voice agent and then select either number 1 or 2 on the dial pad  located in the bottom-right corner of the Interaction Panel.
4. The voice agent will respond with a voice message according to the number you selected, and then finish the conversation. If you want to listen to a specific voice output again, hover your cursor over the message in the Interaction Panel and click **Voice Preview**.
located in the bottom-right corner of the Interaction Panel.
4. The voice agent will respond with a voice message according to the number you selected, and then finish the conversation. If you want to listen to a specific voice output again, hover your cursor over the message in the Interaction Panel and click **Voice Preview**.
 To deploy your Flow in production, you will need to create a Voice Gateway Endpoint and set up a SIP Trunk provider.
For these steps, refer to the [Voice Gateway](/voice-gateway/overview) documentation.
## What's Next?
* Familiarize yourself with the core concepts of building AI Agents, such as [Projects](/ai/agents/develop/projects-and-flows/projects), [Flows](/ai/agents/develop/projects-and-flows/overview), [Nodes](/ai/agents/develop/node-reference/overview), and [CognigyScript](/ai/platform-features/cognigyscript).
* Enhance your AI Agent's performance with AI features, such as [NLU](/ai/platform-features/nlu/overview), [LLMs](/ai/agents/develop/gen-ai-and-llms/llms) and [Generative AI](/ai/agents/develop/gen-ai-and-llms/generative-ai), as well as [Knowledge AI](/ai/agents/develop/knowledge-ai/overview).
* Explore [test](/ai/agents/test/interaction-panel/overview) and [deploy](/ai/agents/deploy/endpoints/overview) features.
* Connect your AI Agent to the [contact center](/ai/escalate/handovers).
To deploy your Flow in production, you will need to create a Voice Gateway Endpoint and set up a SIP Trunk provider.
For these steps, refer to the [Voice Gateway](/voice-gateway/overview) documentation.
## What's Next?
* Familiarize yourself with the core concepts of building AI Agents, such as [Projects](/ai/agents/develop/projects-and-flows/projects), [Flows](/ai/agents/develop/projects-and-flows/overview), [Nodes](/ai/agents/develop/node-reference/overview), and [CognigyScript](/ai/platform-features/cognigyscript).
* Enhance your AI Agent's performance with AI features, such as [NLU](/ai/platform-features/nlu/overview), [LLMs](/ai/agents/develop/gen-ai-and-llms/llms) and [Generative AI](/ai/agents/develop/gen-ai-and-llms/generative-ai), as well as [Knowledge AI](/ai/agents/develop/knowledge-ai/overview).
* Explore [test](/ai/agents/test/interaction-panel/overview) and [deploy](/ai/agents/deploy/endpoints/overview) features.
* Connect your AI Agent to the [contact center](/ai/escalate/handovers).