> ## Documentation Index
> Fetch the complete documentation index at: https://docs.cognigy.com/llms.txt
> Use this file to discover all available pages before exploring further.
# Getting Started with AI Agents
> Follow this step-by-step guide to create your first AI Agent with persona, tools, and knowledge in Cognigy.AI.
 ## What are Agentic AI Agents?
An [Agentic AI Agent](/ai/agents/overview) is advanced conversational intelligence powered by a Large Language Model
(LLM),
designed to operate autonomously while adapting dynamically in real time to context, persona, and instructions.
Unlike traditional intent- or rule-based systems,
these AI Agents go beyond scripted responses — demonstrating flexibility,
problem-solving capabilities, and proactive decision-making.
In this guide, you will create a Logistics AI Agent to answer general questions and assist with parcel inquiries.
Configure the necessary LLMs for language and embeddings, for example, OpenAI GPT-4o and ada-002, to enable your AI Agent.
Go to **Build > AI Agents**, set the name, for example, `Peter Parcel`, description, avatar, and speaking style. Optionally, assign knowledge and configure security. Click **Create** to test.
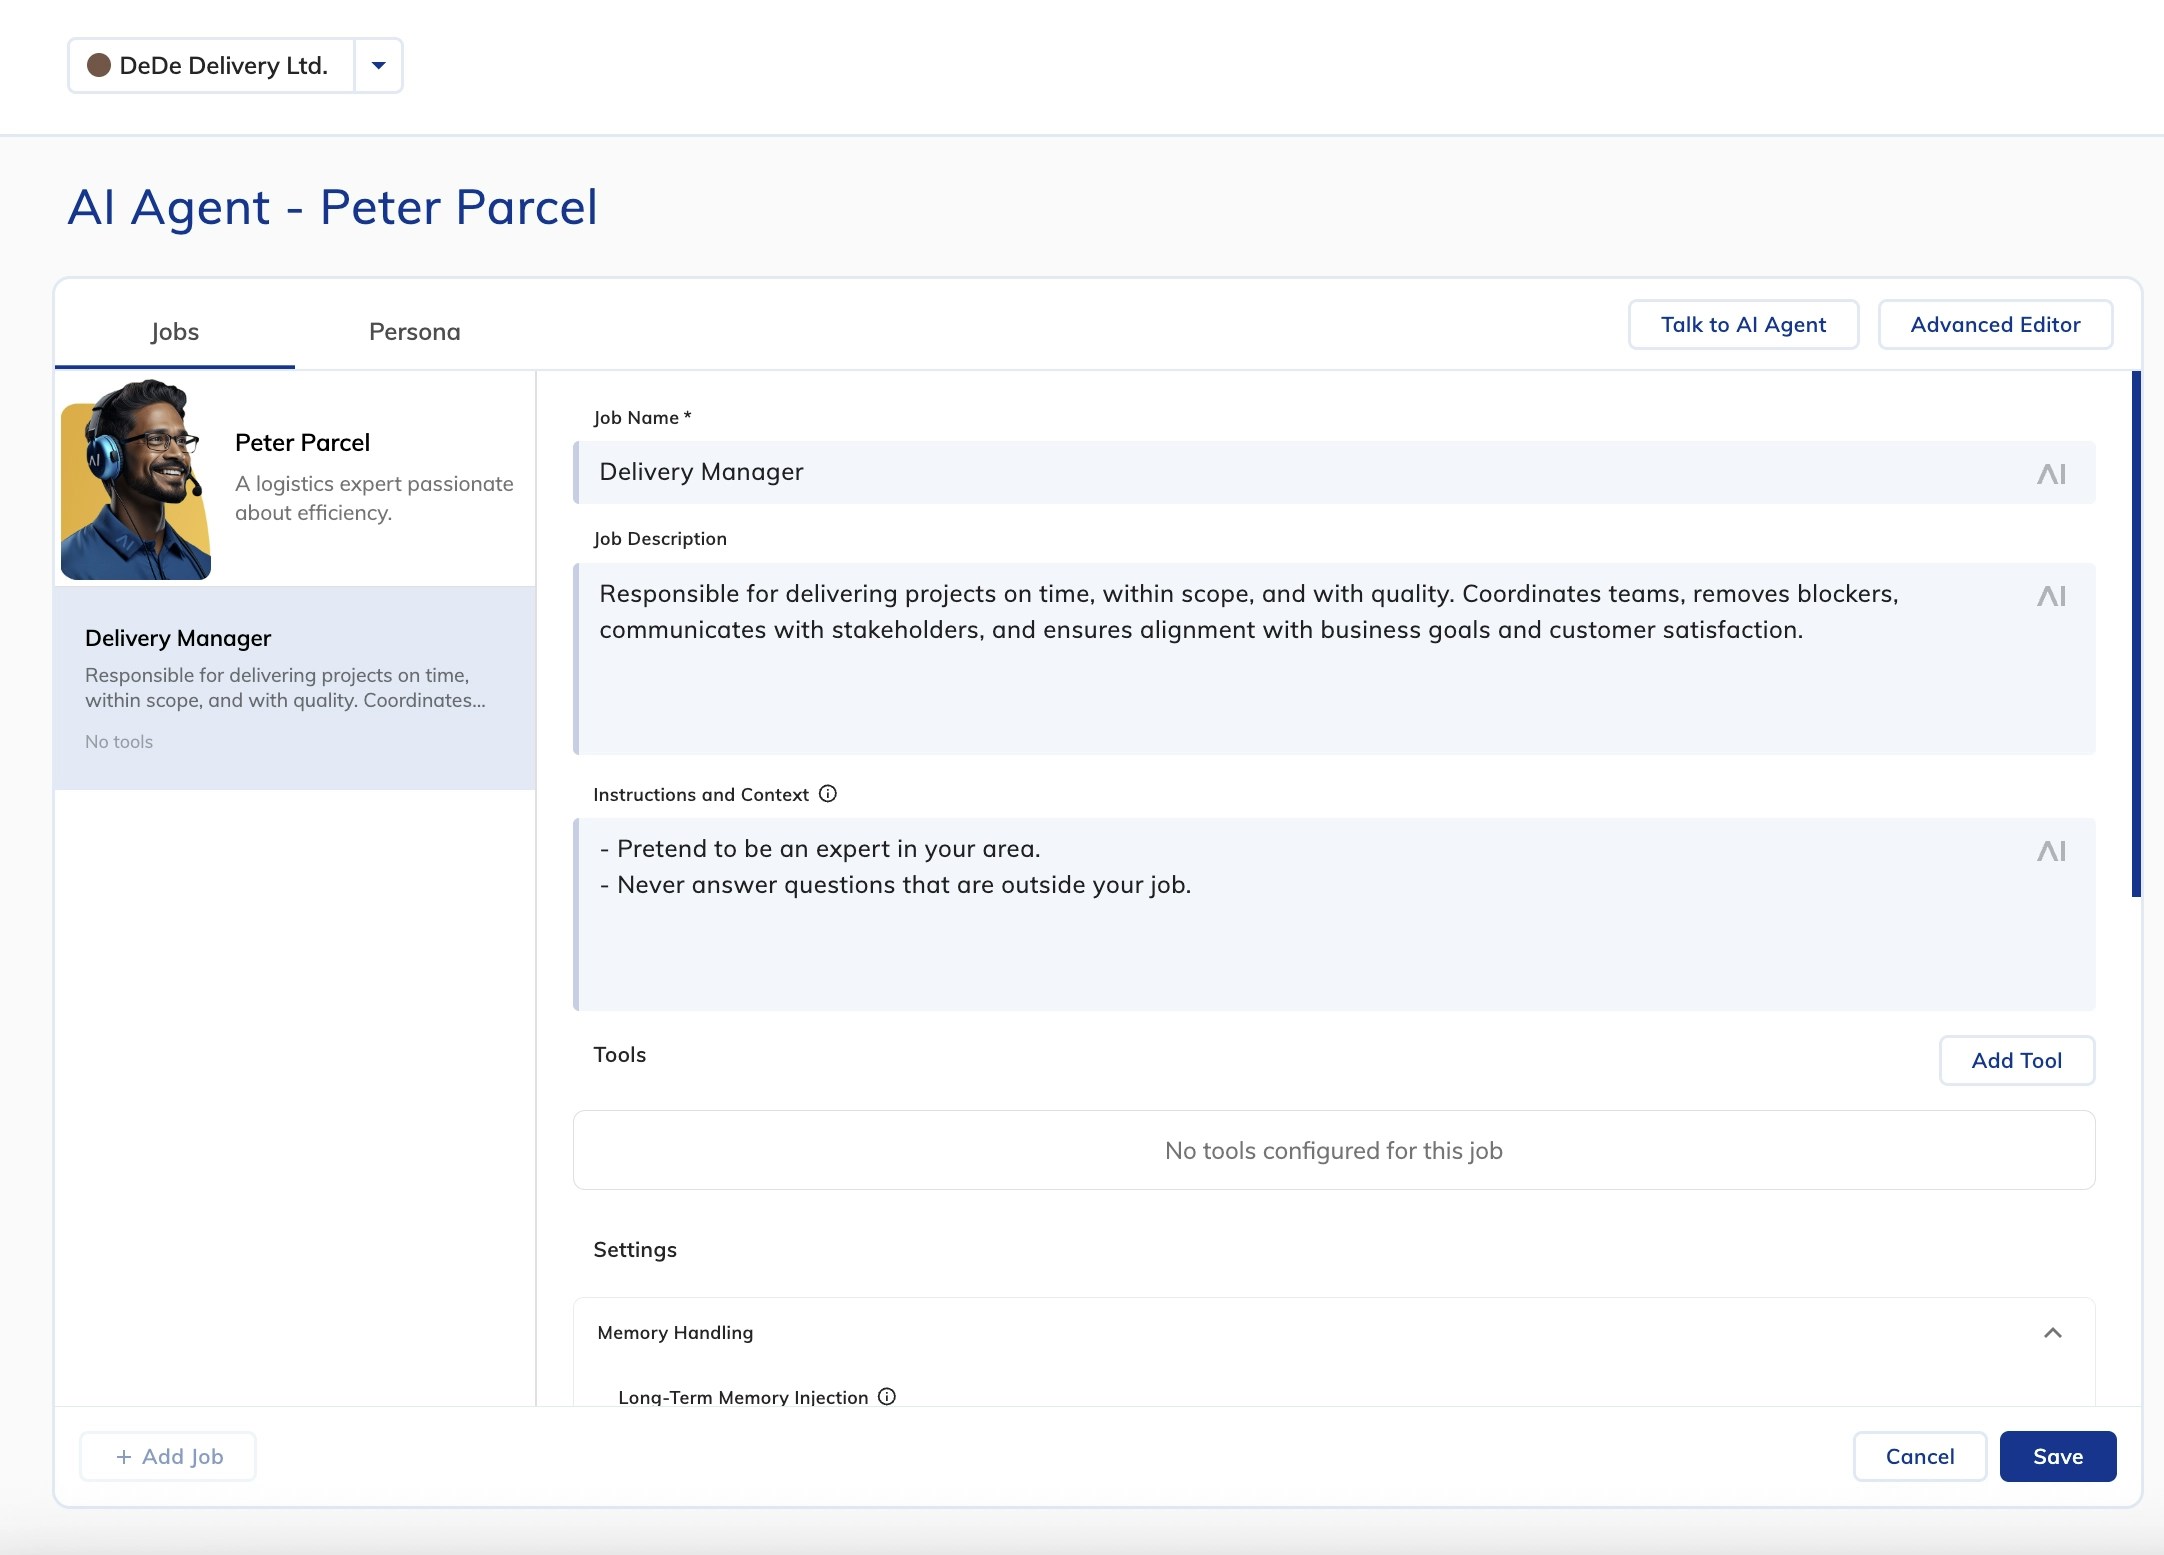
On the **Jobs** tab, define the job title, for example, `Delivery Manager`, description, and instructions.
## What are Agentic AI Agents?
An [Agentic AI Agent](/ai/agents/overview) is advanced conversational intelligence powered by a Large Language Model
(LLM),
designed to operate autonomously while adapting dynamically in real time to context, persona, and instructions.
Unlike traditional intent- or rule-based systems,
these AI Agents go beyond scripted responses — demonstrating flexibility,
problem-solving capabilities, and proactive decision-making.
In this guide, you will create a Logistics AI Agent to answer general questions and assist with parcel inquiries.
Configure the necessary LLMs for language and embeddings, for example, OpenAI GPT-4o and ada-002, to enable your AI Agent.
Go to **Build > AI Agents**, set the name, for example, `Peter Parcel`, description, avatar, and speaking style. Optionally, assign knowledge and configure security. Click **Create** to test.
On the **Jobs** tab, define the job title, for example, `Delivery Manager`, description, and instructions.
 Upload documents in Knowledge AI, then assign the knowledge to your AI Agent in its configuration to improve company-specific responses.
In the **Tools** section, click **Add Tool > Regular Tool**. Set Tool ID (for example, `track_parcel`) and parameters (for example, `tracking_code`).
Upload documents in Knowledge AI, then assign the knowledge to your AI Agent in its configuration to improve company-specific responses.
In the **Tools** section, click **Add Tool > Regular Tool**. Set Tool ID (for example, `track_parcel`) and parameters (for example, `tracking_code`).
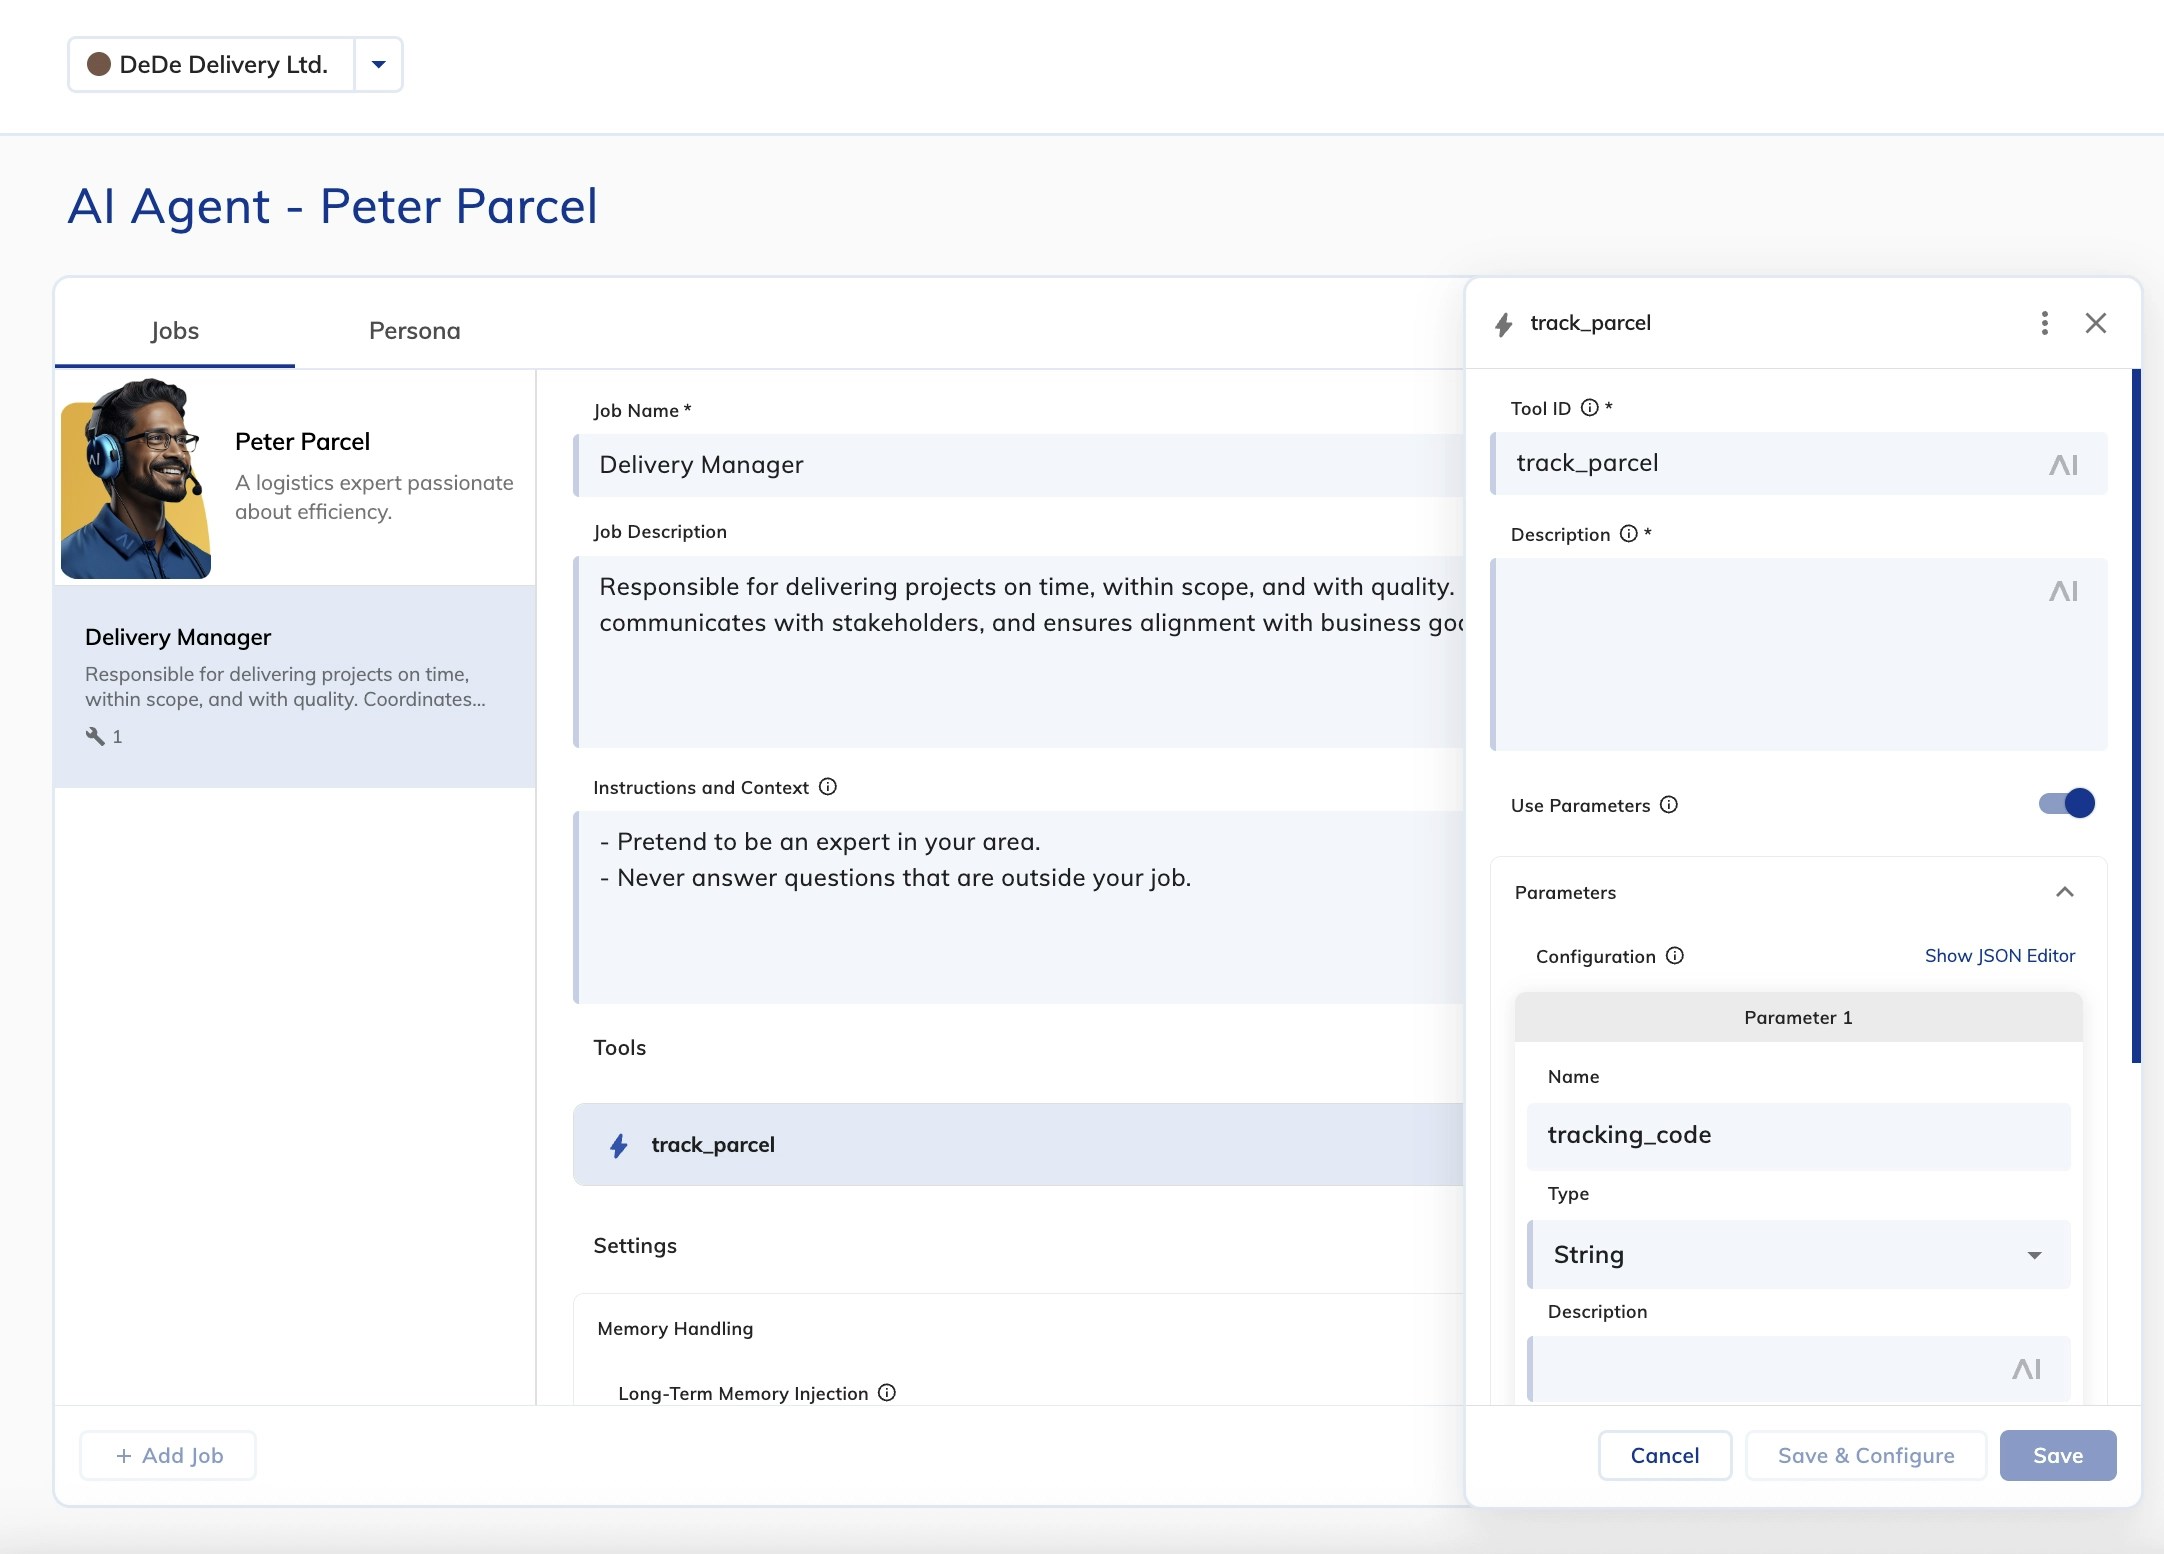 Configure memory settings to personalize interactions and retain user details.
To configure short-term memory, in the **Memory Handling** section, set **Long-Term Memory Injection** to **Inject full Contact Profile**.
Configure memory settings to personalize interactions and retain user details.
To configure short-term memory, in the **Memory Handling** section, set **Long-Term Memory Injection** to **Inject full Contact Profile**.
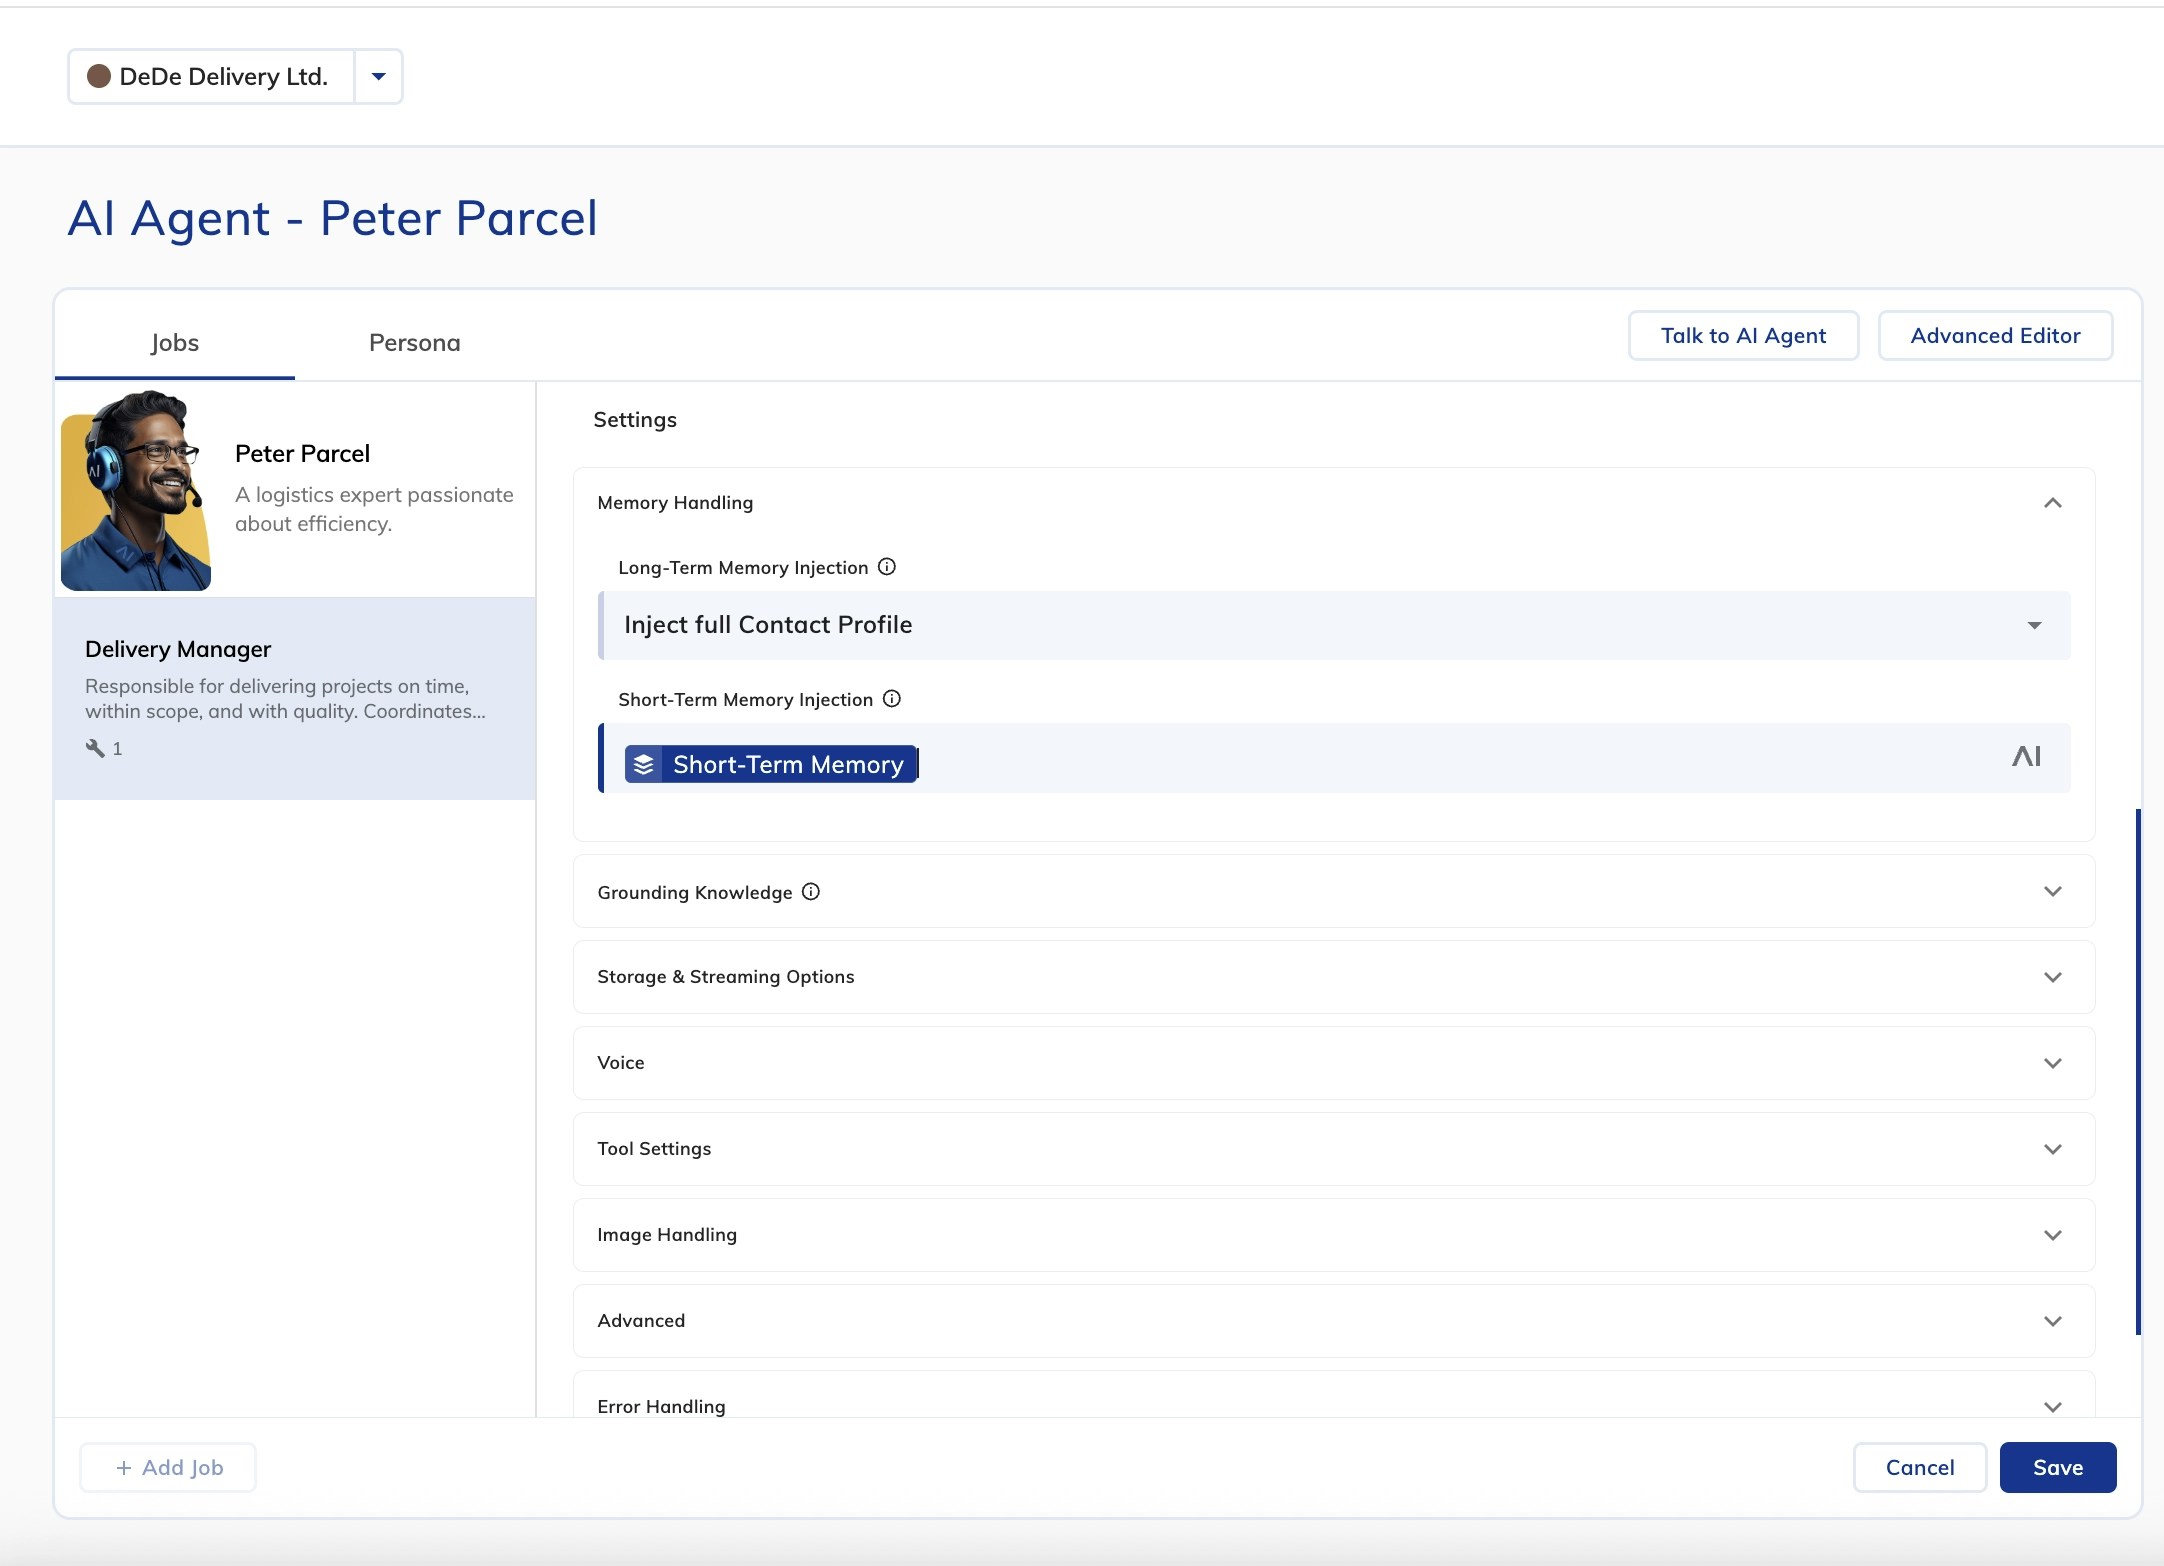 In the **Image Handling** section, activate **Process Images**. Enable **Attachment Upload** in the Webchat v3 Endpoint settings. Ensure a storage provider like AWS or Azure is set.
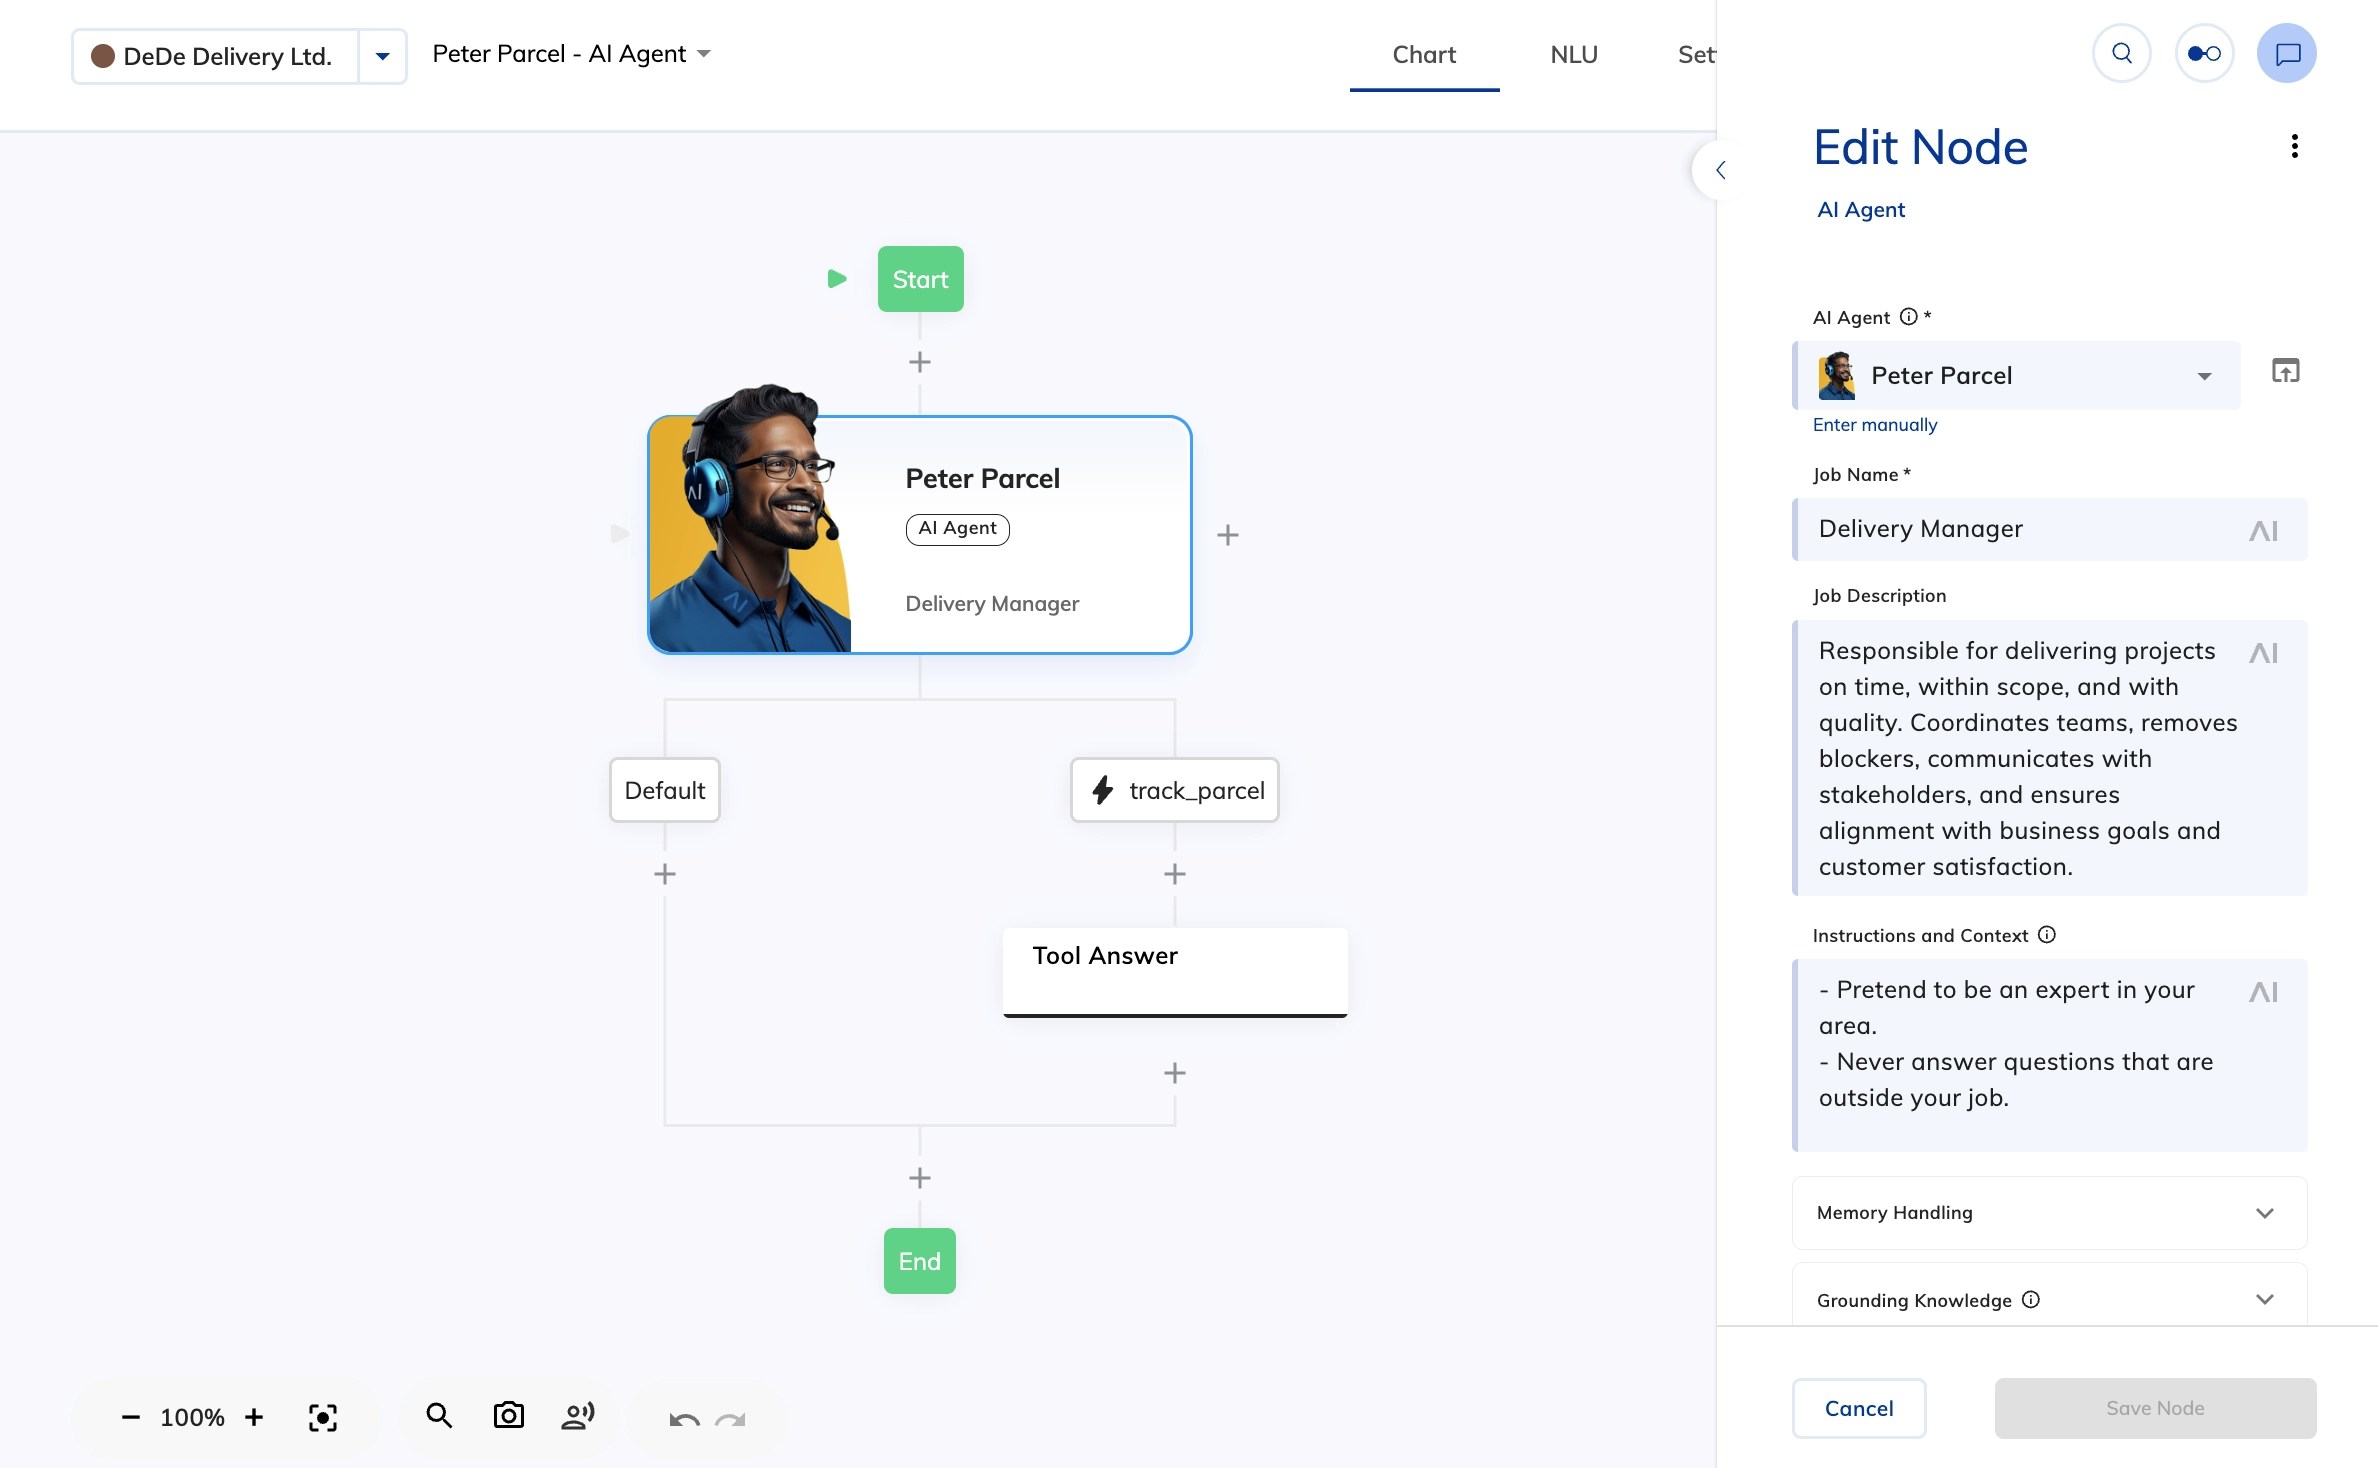
Open **Advanced Editor** to view and edit all Nodes controlling AI Agent responses.
In the **Image Handling** section, activate **Process Images**. Enable **Attachment Upload** in the Webchat v3 Endpoint settings. Ensure a storage provider like AWS or Azure is set.
Open **Advanced Editor** to view and edit all Nodes controlling AI Agent responses.
 [Cognigy.AI Endpoints](/ai/agents/deploy/endpoint-reference/overview) allow AI Agents to interact with external users via chat and voice channels.
Deploy an AI Agent via Webchat:
1. Go to **Deploy > Endpoints**.
2. Add a new Endpoint and link it to the Flow.
3. Click **Open Demo Webchat** to test the AI Agent.
## What's Next?
1. Try [creating AI Agents tailored to your business needs](/ai/agents/develop/manage-ai-agents#create-from-scratch) or [hire one from the Job Market](/ai/agents/develop/manage-ai-agents#hire-from-the-job-market).
2. [Add the AI Agent to your Flow](/ai/agents/develop/projects-and-flows/overview) and [create a set of tools](/ai/agents/develop/node-reference/ai/ai-agent) for your AI Agent to operate.
3. For a deeper dive into Agentic AI, visit the [Cognigy Help Center](https://support.cognigy.com/hc/en-us/articles/17346581840796-Getting-Started-with-AI-Agents).
[Cognigy.AI Endpoints](/ai/agents/deploy/endpoint-reference/overview) allow AI Agents to interact with external users via chat and voice channels.
Deploy an AI Agent via Webchat:
1. Go to **Deploy > Endpoints**.
2. Add a new Endpoint and link it to the Flow.
3. Click **Open Demo Webchat** to test the AI Agent.
## What's Next?
1. Try [creating AI Agents tailored to your business needs](/ai/agents/develop/manage-ai-agents#create-from-scratch) or [hire one from the Job Market](/ai/agents/develop/manage-ai-agents#hire-from-the-job-market).
2. [Add the AI Agent to your Flow](/ai/agents/develop/projects-and-flows/overview) and [create a set of tools](/ai/agents/develop/node-reference/ai/ai-agent) for your AI Agent to operate.
3. For a deeper dive into Agentic AI, visit the [Cognigy Help Center](https://support.cognigy.com/hc/en-us/articles/17346581840796-Getting-Started-with-AI-Agents).