> ## Documentation Index
> Fetch the complete documentation index at: https://docs.cognigy.com/llms.txt
> Use this file to discover all available pages before exploring further.
# Simulator
Updated in 2026.14
*Simulator* is an LLM-powered tool in Cognigy.AI that allows users to model and test full conversational scenarios for LLM-based AI Agents.
Use the Simulator to mimic user interactions in controlled environments and evaluate the performance, behavior, and reliability of AI Agents through metrics displayed on the Simulator Dashboard. In contrast to Playbooks, which follow predefined test paths, the Simulator uses Generative AI to create dynamic, realistic conversations.
The Simulator contains the following components:
* **Scenarios** — define personas, missions, and success criteria for testing AI Agents.
* **Simulation Runs** — simulate scenarios to evaluate the performance of AI Agents.
* **Simulations** — the compilation of multiple simulation runs displaying different AI Agent behaviors in the same scenario. Each simulation run provides unique test outcomes for analysis. Additionally, you can automate testing by scheduling periodic simulations, and ensure continuous validation of your AI Agent's performance and reliability.
The Simulator is primarily designed for testing LLM-based AI Agents, but it can also be used with any Flow, with some restrictions.
 ## Key Benefits
* **Realistic End-to-End Testing**. Simulate full conversations, from greetings to resolutions. Use multiple personas to test how your AI Agent handles different user personas and Scenarios.
* **Simulations Across Multiple Interfaces**. Run simulations via the Simulator or the Interaction Panel and view all simulated conversations in the Conversations Explorer, Simulator, or Interaction Panel for quick outcome review.
* **Early Issue Detection and Optimization**. Detect gaps, edge cases, and quality issues before deployment to improve reliability and deliver a better user experience.
* **Faster, Automated QA**. Automatically test AI Agents across environments, ensuring high coverage and consistent quality.
* **Scheduled Simulations**. Schedule simulations to automate periodic tests at a specified frequency. Regular testing helps ensure that new deployments work as expected.
## Prerequisites
* To start a simulation, you need an LLM that supports the [AI Agent Node feature](/ai/agents/develop/node-reference/ai/ai-agent).
* To generate scenarios automatically, you need to:
* Configure an LLM for [design-time features](/ai/agents/develop/gen-ai-and-llms/generative-ai#design-time-generative-ai-features). Select the platform-provided LLM or another model that [supports design-time features](/ai/agents/develop/gen-ai-and-llms/model-support-by-feature).
* Ensure that your Project includes a Flow with an [AI Agent Node](/ai/agents/develop/node-reference/ai/ai-agent).
## Restrictions
* You can't run simulations using Snapshots in the Interaction Panel.
* The following features aren't supported:
* Voice interactions. The Simulator only supports text-based conversations.
* Handovers to human agents. The Interaction Panel will show the message `Agent Handover is not supported in the Interaction Panel, please use the Webchat or another channel`.
## Limitations
* The maximum number of scenarios per Project is 100. You can change this limit as follows:
* For SaaS installations, contact [Cognigy technical support](/help/get-help).
* For on-premises installations, assign a new limit to the `MAX_SIMULATIONS_PER_PROJECT` environment variable in `values.yaml`.
* The maximum number of runs per simulation is 150.
* The maximum number of success criteria per scenario is 10.
* The maximum number of CSV transcripts you can upload at a time is 10.
* You can set only 1 schedule per scenario.
## How the Simulator Works
## Key Benefits
* **Realistic End-to-End Testing**. Simulate full conversations, from greetings to resolutions. Use multiple personas to test how your AI Agent handles different user personas and Scenarios.
* **Simulations Across Multiple Interfaces**. Run simulations via the Simulator or the Interaction Panel and view all simulated conversations in the Conversations Explorer, Simulator, or Interaction Panel for quick outcome review.
* **Early Issue Detection and Optimization**. Detect gaps, edge cases, and quality issues before deployment to improve reliability and deliver a better user experience.
* **Faster, Automated QA**. Automatically test AI Agents across environments, ensuring high coverage and consistent quality.
* **Scheduled Simulations**. Schedule simulations to automate periodic tests at a specified frequency. Regular testing helps ensure that new deployments work as expected.
## Prerequisites
* To start a simulation, you need an LLM that supports the [AI Agent Node feature](/ai/agents/develop/node-reference/ai/ai-agent).
* To generate scenarios automatically, you need to:
* Configure an LLM for [design-time features](/ai/agents/develop/gen-ai-and-llms/generative-ai#design-time-generative-ai-features). Select the platform-provided LLM or another model that [supports design-time features](/ai/agents/develop/gen-ai-and-llms/model-support-by-feature).
* Ensure that your Project includes a Flow with an [AI Agent Node](/ai/agents/develop/node-reference/ai/ai-agent).
## Restrictions
* You can't run simulations using Snapshots in the Interaction Panel.
* The following features aren't supported:
* Voice interactions. The Simulator only supports text-based conversations.
* Handovers to human agents. The Interaction Panel will show the message `Agent Handover is not supported in the Interaction Panel, please use the Webchat or another channel`.
## Limitations
* The maximum number of scenarios per Project is 100. You can change this limit as follows:
* For SaaS installations, contact [Cognigy technical support](/help/get-help).
* For on-premises installations, assign a new limit to the `MAX_SIMULATIONS_PER_PROJECT` environment variable in `values.yaml`.
* The maximum number of runs per simulation is 150.
* The maximum number of success criteria per scenario is 10.
* The maximum number of CSV transcripts you can upload at a time is 10.
* You can set only 1 schedule per scenario.
## How the Simulator Works
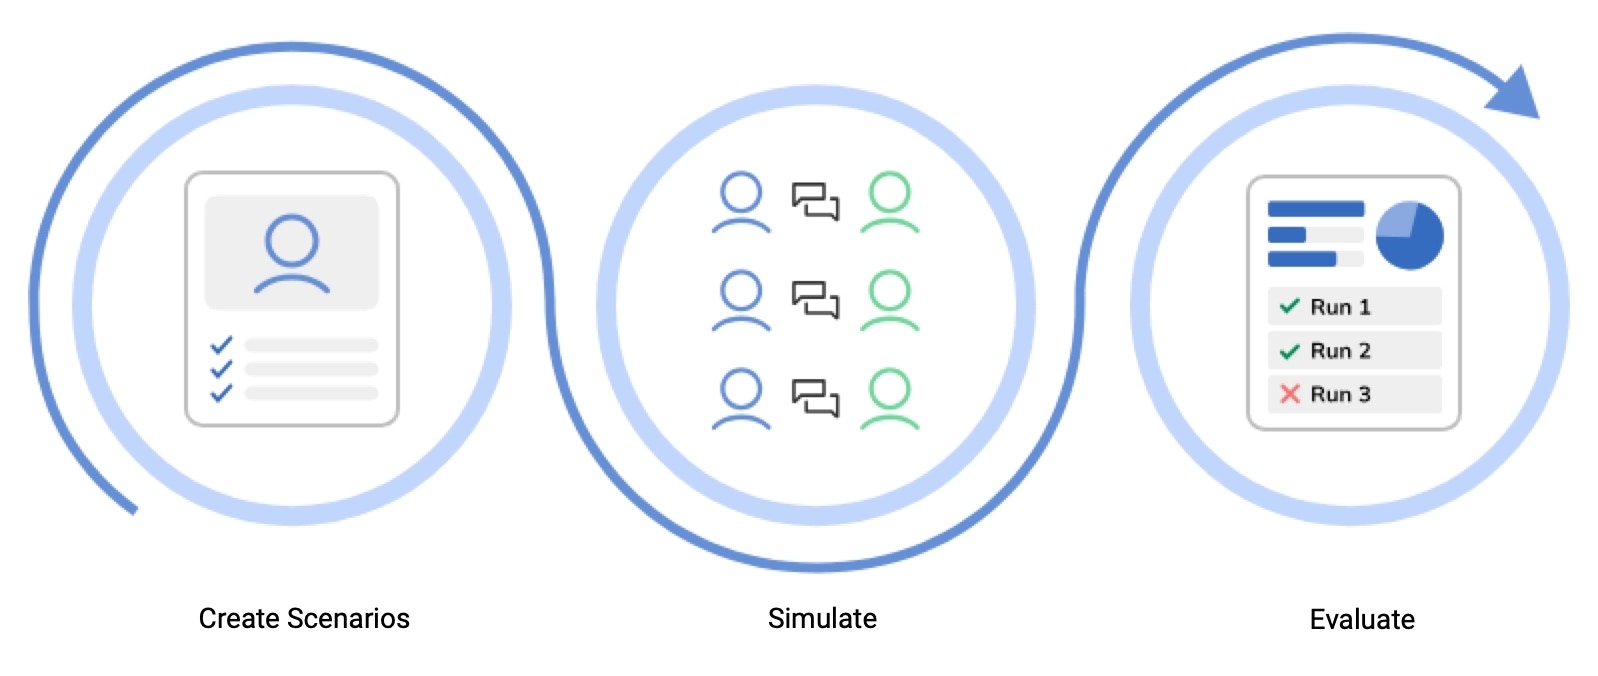 1. **Create a scenario**. Set the persona, mission, and success criteria.
2. **Simulate**. Start the simulation and let the AI Agent interact with the persona you created. Run the simulation multiple times to gather more accurate insights.
3. **Evaluate**. View key metrics on the Simulation dashboard, such as complete success rate, average sentiment, and number of turns. You can then adjust the Flow logic, training data, or system prompts based on the results. Rerun simulations to verify improvements.
## Working with Simulations
In the Simulator, you can create a scenario automatically or manually. Alternatively, you can create a scenario from a transcript in the [Conversations Explorer](/insights/explorers/conversations).
To create a scenario, follow these steps:
1. In your Project, go to **Test > Simulator** and click **+ New Scenario**.
2. In the **Generate from AI Agent** section, click **Generate**.
3. Fill in the following fields:
* **Flow** – select a Flow containing an AI Agent to base your scenario on. Ensure the Flow is already configured.
* **AI Agent Job Node** – select the AI Agent Node to be analyzed for scenario creation. The AI Agent Job Node must be already configured in the Flow.
4. Click **Generate**. Cognigy.AI generates a scenario based on the AI Agent Job Node configuration. Review the generated scenario and adjust it if necessary.
5. Select the generated persona description, mission, and success criteria. If necessary, edit them manually or automatically by clicking the **Regenerate text** button on the right-hand side of each field.
1. In your Project, go to **Test > Simulator** and click **+ New Scenario**.
2. Fill in the following fields:
* **Name** – enter the name of the scenario. The name should reflect the test scenario and focus area. Example: `Menu Exploration – Exotic Dish Focus`.
* **Persona Name** – enter the name of the persona to simulate. The name should reflect the user's role and context. Example: `Alex – The Curious Foodie`.
* **Persona Description** – enter the description of the persona. To simulate user behavior, define key attributes: customer segment, demographics, familiarity with technology and AI, and interaction style. Example: `An adventurous diner who loves trying new and exotic dishes. Asks detailed questions about ingredients, preparation methods, and flavor profiles`.
* **Mission** – enter the description of the persona's goal, which should be achieved within the simulation. This goal can involve testing the AI's ability to handle specific customer inquiries or tasks. Example: `Explore exotic menu options and get detailed recommendations for trying new dishes based on preferences`.
3. In the **Success Criteria** section, add metrics to evaluate the simulation's success:
* **Add Goal** – select a goal from the list of available goals. If you don't have any goals, you can [create a new one](/ai/agents/analyze/goals-and-tasks/goals). The goal should reflect the simulation's desired outcome. Example: `Receive personalized recommendations for exotic dishes`.
* **Add AI Judge** – generate or enter the action-oriented criteria to help determine whether the simulation was successful. They can include numeric results, for example, 90% accuracy, or specific objectives the AI Agent should achieve. Examples: `The Agent recommends exotic dishes based on user preferences, achieving 90% accuracy in matching user preferences.`, `Answers questions about ingredients`.
4. In the **Maximum Turns** slider, set the maximum number of back-and-forth messages (turns) allowed in a simulated conversation. Each turn consists of one user input and one AI Agent response. The default value is 15.
1. In your Project, go to **Test > Simulator** and click **+ New Scenario**.
2. In the **Create from Transcript** section, click **Generate**.
3. In the **Upload Conversation Transcripts** window, upload a conversation transcript in CSV format.
Before uploading the CSV file, ensure that it meets the following requirements:
The CSV must contain three columns, in this order:
1. `speaker` — the name of the person or system sending the message. Use consistent names such as `customer` for the end user and `bot` for the AI Agent.
2. `message` — the text of the message, enclosed in double quotes (`" "`).
3. `created_at` — the timestamp in ISO 8601 UTC format (`YYYY-MM-DDTHH:mm:ssZ`).
**Example:**
```csv theme={null}
speaker,message,created_at
customer,"Hello, I need help with my order.",2026-03-12T09:15:00Z
bot,"Good morning! Can you provide your order number?",2026-03-12T09:15:05Z
```
* Each transcript must contain at least 100 words, counting only the text in the `message` column. Words in the `speaker` and `created_at` columns aren't counted.
* The CSV file must include messages from both actors: customer and bot.
* The `created_at` column must follow chronological order.
* Each row must represent one message.
* Each message must be a complete sentence or meaningful utterance.
* Messages can include punctuation, emojis, or line breaks.
You can also create a scenario from an existing conversation transcript in the [Conversations Explorer](/insights/explorers/conversations#scenarios).
After creating a scenario, you can start a simulation manually or [schedule regular simulations](#schedule-simulations).
To start a simulation, follow these steps:
1. Click the scenario from the list to open the **Start Simulation** window.
2. In the **Start Simulation** window, configure the simulation:
* **Simulation Name** – enter the name of the simulation. The name should reflect the test scenario and focus area. Example: `Menu Exploration – Exotic Dish Focus`.
* **Snapshot** – select the [Snapshot](#schedule-simulations) for the simulation. Use this option to test a Flow from a specific version rather than the current one.
* **Flow** – select the Flow for the simulation.
* **Locale** – select the [Locale](/ai/platform-features/translation-and-localization/localization) for the simulation.
* **LLM** – select the model to manage the simulated conversation.
* **Number of Simulation Runs** – set how many times the simulation runs. The default value is 10. Use multiple simulation runs to test conversation variations.
3. *(Optional)* In the **Advanced Settings** section, configure additional parameters:
* **AI Agent Output Timeout** – set the maximum time the AI Agent has to respond to each user input during the simulation. The default value is 60,000 milliseconds. The minimum value is 20,000 milliseconds.
* **Custom Data Payload** – define a JSON object that is injected into every input message during a simulation. This parameter enables context-aware testing, for example, testing different user types, A/B scenarios, or personalized Flows, without changing the Flow itself. Examples of custom data payloads:
```json theme={null}
{ "userId": "u1001", "role": "admin" } // different user types
{ "testGroup": "A", "featureFlag": true } // A/B testing
{ "userName": "Emma", "preferredLanguage": "fr" } // personalized greeting
```
4. Click **Start Simulation**. Once the simulation starts, you'll be redirected to the simulation overview to view the real-time results. After creating the Project's first simulation, the Simulator Dashboard is added to the Simulator interface.
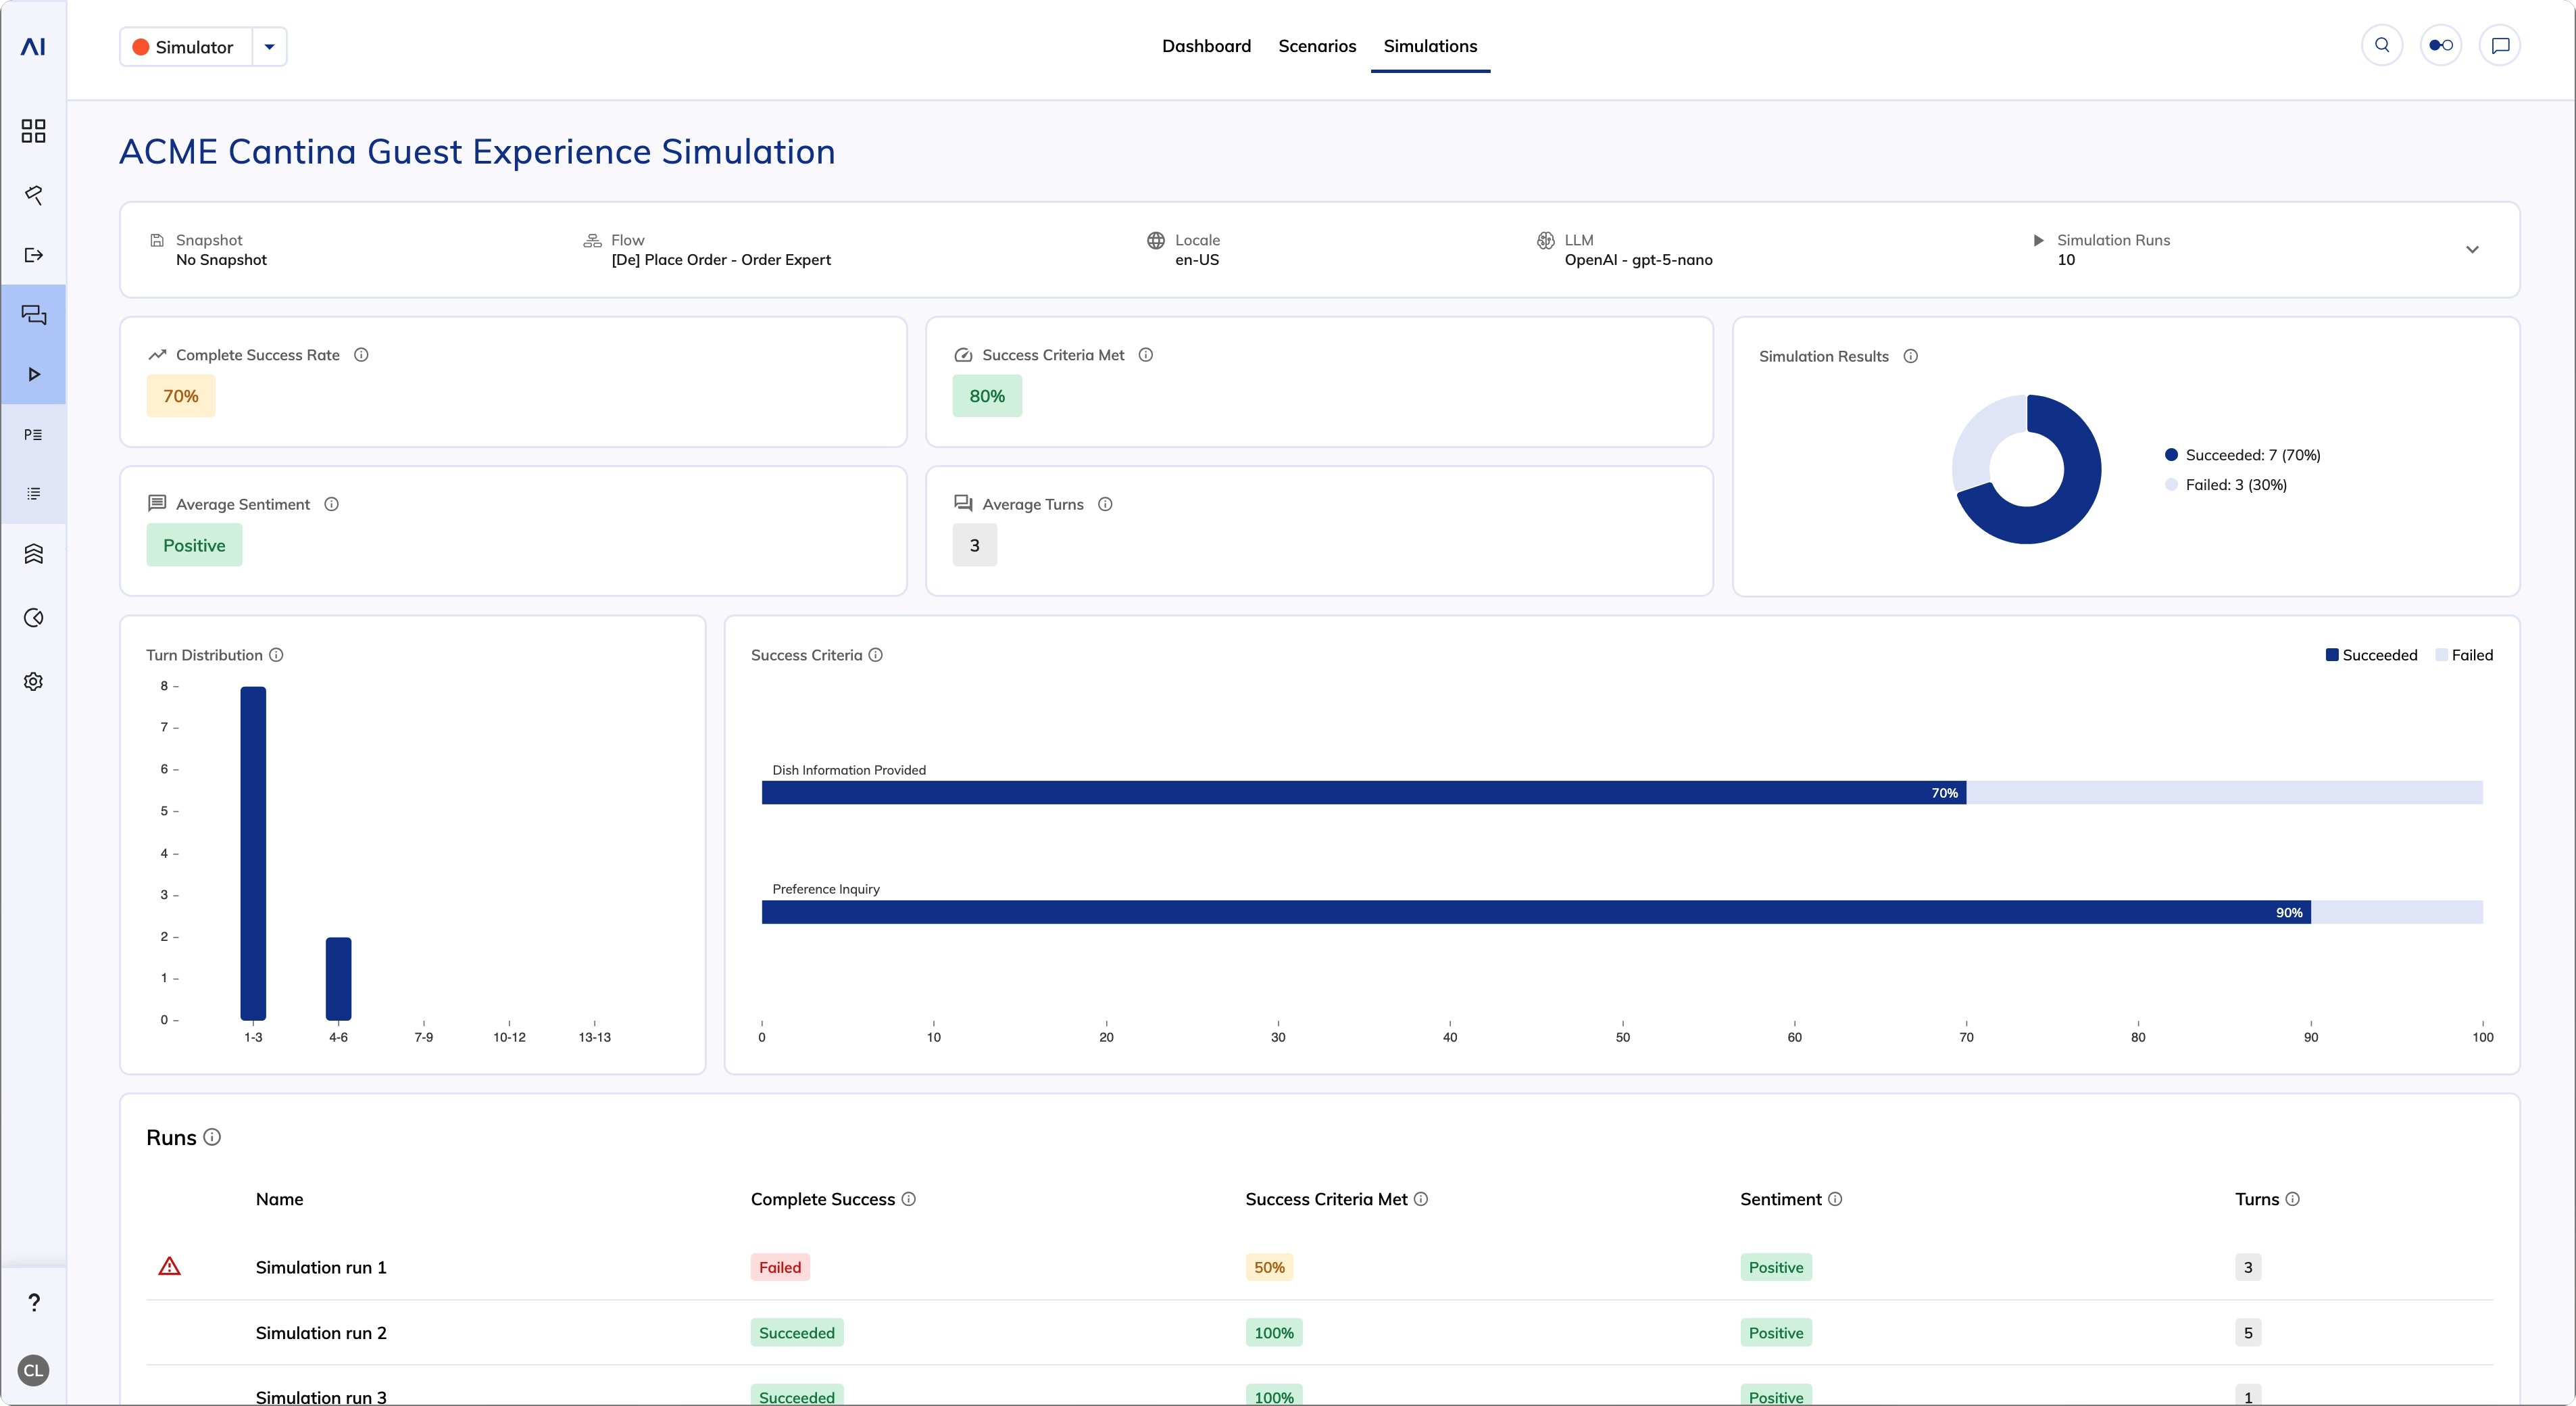
The simulation overview provides the following key metrics:
| **Chart** | **Description** |
| --------------------- | ----------------------------------------------------------------------------------------------------------------------------------------------------------------- |
| Complete Success Rate | Shows the percentage of simulation runs that met the success criteria. A higher success rate indicates better overall performance. |
| Success Criteria Met | Shows the percentage of success criteria met across all simulation runs. |
| Average Sentiment | Shows the average sentiment across all simulation runs. |
| Average Turns | Shows the average number of back-and-forth messages (turns) it took to complete a simulation run. Each turn consists of one user input and one AI Agent response. |
| Turn Distribution | Shows the frequency of turn counts within ranges. The horizontal axis represents turn count ranges, and the vertical axis shows the frequency for each range. |
| Success Criteria | Shows how often a success criterion was met across all simulation runs in percentage. |
| Simulation Results | Shows how many simulation runs succeeded and failed. A simulation succeeds if all success criteria are met. |
In the **Runs** table, find the simulation runs marked as `Failed` in the **Complete Success** column. Click a simulation run to open the simulated conversation in a panel on the right. In the right-side panel, hover over the `Failed` status next to the success criterion to see a tooltip explaining why the simulation run failed to meet the success criterion.
To filter simulation runs, click a bar or a slice on the charts that represents the data you want to investigate.
You can also view the simulated conversation in the [Conversations Explorer](/insights/explorers/conversations) by toggling on **Interaction Panel / Playbooks / Simulations** in the Endpoint filters.
Additionally, you can view key metrics, performance trends, and scheduled simulations across simulations in the [Simulator dashboard](/ai/agents/test/simulator/dashboard).
You can use the [Cognigy.AI Simulator API](/api-reference-simulator/) to create scenarios, run simulations, and retrieve results from simulations and simulation runs.
### Schedule Simulations
After you've [created a scenario](#1-create-a-scenario), you can schedule simulations to run automatically at a specified frequency.
To schedule a simulation, follow these steps:
1. Hover over the scenario for which you want to schedule a simulation and select
1. **Create a scenario**. Set the persona, mission, and success criteria.
2. **Simulate**. Start the simulation and let the AI Agent interact with the persona you created. Run the simulation multiple times to gather more accurate insights.
3. **Evaluate**. View key metrics on the Simulation dashboard, such as complete success rate, average sentiment, and number of turns. You can then adjust the Flow logic, training data, or system prompts based on the results. Rerun simulations to verify improvements.
## Working with Simulations
In the Simulator, you can create a scenario automatically or manually. Alternatively, you can create a scenario from a transcript in the [Conversations Explorer](/insights/explorers/conversations).
To create a scenario, follow these steps:
1. In your Project, go to **Test > Simulator** and click **+ New Scenario**.
2. In the **Generate from AI Agent** section, click **Generate**.
3. Fill in the following fields:
* **Flow** – select a Flow containing an AI Agent to base your scenario on. Ensure the Flow is already configured.
* **AI Agent Job Node** – select the AI Agent Node to be analyzed for scenario creation. The AI Agent Job Node must be already configured in the Flow.
4. Click **Generate**. Cognigy.AI generates a scenario based on the AI Agent Job Node configuration. Review the generated scenario and adjust it if necessary.
5. Select the generated persona description, mission, and success criteria. If necessary, edit them manually or automatically by clicking the **Regenerate text** button on the right-hand side of each field.
1. In your Project, go to **Test > Simulator** and click **+ New Scenario**.
2. Fill in the following fields:
* **Name** – enter the name of the scenario. The name should reflect the test scenario and focus area. Example: `Menu Exploration – Exotic Dish Focus`.
* **Persona Name** – enter the name of the persona to simulate. The name should reflect the user's role and context. Example: `Alex – The Curious Foodie`.
* **Persona Description** – enter the description of the persona. To simulate user behavior, define key attributes: customer segment, demographics, familiarity with technology and AI, and interaction style. Example: `An adventurous diner who loves trying new and exotic dishes. Asks detailed questions about ingredients, preparation methods, and flavor profiles`.
* **Mission** – enter the description of the persona's goal, which should be achieved within the simulation. This goal can involve testing the AI's ability to handle specific customer inquiries or tasks. Example: `Explore exotic menu options and get detailed recommendations for trying new dishes based on preferences`.
3. In the **Success Criteria** section, add metrics to evaluate the simulation's success:
* **Add Goal** – select a goal from the list of available goals. If you don't have any goals, you can [create a new one](/ai/agents/analyze/goals-and-tasks/goals). The goal should reflect the simulation's desired outcome. Example: `Receive personalized recommendations for exotic dishes`.
* **Add AI Judge** – generate or enter the action-oriented criteria to help determine whether the simulation was successful. They can include numeric results, for example, 90% accuracy, or specific objectives the AI Agent should achieve. Examples: `The Agent recommends exotic dishes based on user preferences, achieving 90% accuracy in matching user preferences.`, `Answers questions about ingredients`.
4. In the **Maximum Turns** slider, set the maximum number of back-and-forth messages (turns) allowed in a simulated conversation. Each turn consists of one user input and one AI Agent response. The default value is 15.
1. In your Project, go to **Test > Simulator** and click **+ New Scenario**.
2. In the **Create from Transcript** section, click **Generate**.
3. In the **Upload Conversation Transcripts** window, upload a conversation transcript in CSV format.
Before uploading the CSV file, ensure that it meets the following requirements:
The CSV must contain three columns, in this order:
1. `speaker` — the name of the person or system sending the message. Use consistent names such as `customer` for the end user and `bot` for the AI Agent.
2. `message` — the text of the message, enclosed in double quotes (`" "`).
3. `created_at` — the timestamp in ISO 8601 UTC format (`YYYY-MM-DDTHH:mm:ssZ`).
**Example:**
```csv theme={null}
speaker,message,created_at
customer,"Hello, I need help with my order.",2026-03-12T09:15:00Z
bot,"Good morning! Can you provide your order number?",2026-03-12T09:15:05Z
```
* Each transcript must contain at least 100 words, counting only the text in the `message` column. Words in the `speaker` and `created_at` columns aren't counted.
* The CSV file must include messages from both actors: customer and bot.
* The `created_at` column must follow chronological order.
* Each row must represent one message.
* Each message must be a complete sentence or meaningful utterance.
* Messages can include punctuation, emojis, or line breaks.
You can also create a scenario from an existing conversation transcript in the [Conversations Explorer](/insights/explorers/conversations#scenarios).
After creating a scenario, you can start a simulation manually or [schedule regular simulations](#schedule-simulations).
To start a simulation, follow these steps:
1. Click the scenario from the list to open the **Start Simulation** window.
2. In the **Start Simulation** window, configure the simulation:
* **Simulation Name** – enter the name of the simulation. The name should reflect the test scenario and focus area. Example: `Menu Exploration – Exotic Dish Focus`.
* **Snapshot** – select the [Snapshot](#schedule-simulations) for the simulation. Use this option to test a Flow from a specific version rather than the current one.
* **Flow** – select the Flow for the simulation.
* **Locale** – select the [Locale](/ai/platform-features/translation-and-localization/localization) for the simulation.
* **LLM** – select the model to manage the simulated conversation.
* **Number of Simulation Runs** – set how many times the simulation runs. The default value is 10. Use multiple simulation runs to test conversation variations.
3. *(Optional)* In the **Advanced Settings** section, configure additional parameters:
* **AI Agent Output Timeout** – set the maximum time the AI Agent has to respond to each user input during the simulation. The default value is 60,000 milliseconds. The minimum value is 20,000 milliseconds.
* **Custom Data Payload** – define a JSON object that is injected into every input message during a simulation. This parameter enables context-aware testing, for example, testing different user types, A/B scenarios, or personalized Flows, without changing the Flow itself. Examples of custom data payloads:
```json theme={null}
{ "userId": "u1001", "role": "admin" } // different user types
{ "testGroup": "A", "featureFlag": true } // A/B testing
{ "userName": "Emma", "preferredLanguage": "fr" } // personalized greeting
```
4. Click **Start Simulation**. Once the simulation starts, you'll be redirected to the simulation overview to view the real-time results. After creating the Project's first simulation, the Simulator Dashboard is added to the Simulator interface.
The simulation overview provides the following key metrics:
| **Chart** | **Description** |
| --------------------- | ----------------------------------------------------------------------------------------------------------------------------------------------------------------- |
| Complete Success Rate | Shows the percentage of simulation runs that met the success criteria. A higher success rate indicates better overall performance. |
| Success Criteria Met | Shows the percentage of success criteria met across all simulation runs. |
| Average Sentiment | Shows the average sentiment across all simulation runs. |
| Average Turns | Shows the average number of back-and-forth messages (turns) it took to complete a simulation run. Each turn consists of one user input and one AI Agent response. |
| Turn Distribution | Shows the frequency of turn counts within ranges. The horizontal axis represents turn count ranges, and the vertical axis shows the frequency for each range. |
| Success Criteria | Shows how often a success criterion was met across all simulation runs in percentage. |
| Simulation Results | Shows how many simulation runs succeeded and failed. A simulation succeeds if all success criteria are met. |
In the **Runs** table, find the simulation runs marked as `Failed` in the **Complete Success** column. Click a simulation run to open the simulated conversation in a panel on the right. In the right-side panel, hover over the `Failed` status next to the success criterion to see a tooltip explaining why the simulation run failed to meet the success criterion.
To filter simulation runs, click a bar or a slice on the charts that represents the data you want to investigate.
You can also view the simulated conversation in the [Conversations Explorer](/insights/explorers/conversations) by toggling on **Interaction Panel / Playbooks / Simulations** in the Endpoint filters.
Additionally, you can view key metrics, performance trends, and scheduled simulations across simulations in the [Simulator dashboard](/ai/agents/test/simulator/dashboard).
You can use the [Cognigy.AI Simulator API](/api-reference-simulator/) to create scenarios, run simulations, and retrieve results from simulations and simulation runs.
### Schedule Simulations
After you've [created a scenario](#1-create-a-scenario), you can schedule simulations to run automatically at a specified frequency.
To schedule a simulation, follow these steps:
1. Hover over the scenario for which you want to schedule a simulation and select  **> Schedule** on the right. The **Schedule Configuration** panel opens.
2. Configure the simulation and schedule settings on the tabs in the **Schedule Configuration** panel:
1) Configure the following:
* **Simulation Name** — enter the name of the simulation. The name should reflect the test scenario and focus area. Example: `Menu Exploration – Exotic Dish Focus`. The time and date are appended to the name after the simulation is finished. The full simulation name is displayed on the **Simulations** tab and Simulator dashboard.
* **Snapshot** — select the Snapshot for the simulation.
* **Flow** — select the Flow for the simulation.
* **LLM** — select the model to manage the simulated conversation.
2) *(Optional)* In the **Advanced Settings** section, configure additional parameters:
* **AI Agent Output Timeout** – set the maximum time the AI Agent has to respond to each user input during the simulation. The default value is 60,000 milliseconds. The minimum value is 20,000 milliseconds.
* **Custom Data Payload** – define a JSON object that is injected into every input message during a simulation. This parameter enables context-aware testing, for example, testing different user types, A/B scenarios, or personalized Flows, without changing the Flow itself. Examples of custom data payloads:
```json theme={null}
{ "userId": "u1001", "role": "admin" } // different user types
{ "testGroup": "A", "featureFlag": true } // A/B testing
{ "userName": "Emma", "preferredLanguage": "fr" } // personalized greeting
```
1. Toggle on **Enable Schedule** to activate the schedule.
2. Configure the following:
* **Frequency** — select from the following options:
* **Daily** — this option is selected by default.
* **Every 3 days**
* **Weekly**
* **Bi-weekly**
* **Monthly**
* **Time** — select the time when the simulation starts.
* **Next Scheduled Run** — shows the date and time of the next simulation, based on the **Frequency** and **Time** parameters.
* **Number of Simulation Runs** — set how many times the simulation runs. The default value is 10. Use multiple simulation runs to test conversation variations.
* **Email Notifications** — enter the email addresses to receive notifications about the simulation runs and press Enter.
To schedule a simulation, use the [`POST /simulations/{simulationReference}/schedules`](https://api-trial.cognigy.ai/testing/openapi#post-/simulations/-simulationReference-/schedules) request.
After saving the configuration, the schedule icon
**> Schedule** on the right. The **Schedule Configuration** panel opens.
2. Configure the simulation and schedule settings on the tabs in the **Schedule Configuration** panel:
1) Configure the following:
* **Simulation Name** — enter the name of the simulation. The name should reflect the test scenario and focus area. Example: `Menu Exploration – Exotic Dish Focus`. The time and date are appended to the name after the simulation is finished. The full simulation name is displayed on the **Simulations** tab and Simulator dashboard.
* **Snapshot** — select the Snapshot for the simulation.
* **Flow** — select the Flow for the simulation.
* **LLM** — select the model to manage the simulated conversation.
2) *(Optional)* In the **Advanced Settings** section, configure additional parameters:
* **AI Agent Output Timeout** – set the maximum time the AI Agent has to respond to each user input during the simulation. The default value is 60,000 milliseconds. The minimum value is 20,000 milliseconds.
* **Custom Data Payload** – define a JSON object that is injected into every input message during a simulation. This parameter enables context-aware testing, for example, testing different user types, A/B scenarios, or personalized Flows, without changing the Flow itself. Examples of custom data payloads:
```json theme={null}
{ "userId": "u1001", "role": "admin" } // different user types
{ "testGroup": "A", "featureFlag": true } // A/B testing
{ "userName": "Emma", "preferredLanguage": "fr" } // personalized greeting
```
1. Toggle on **Enable Schedule** to activate the schedule.
2. Configure the following:
* **Frequency** — select from the following options:
* **Daily** — this option is selected by default.
* **Every 3 days**
* **Weekly**
* **Bi-weekly**
* **Monthly**
* **Time** — select the time when the simulation starts.
* **Next Scheduled Run** — shows the date and time of the next simulation, based on the **Frequency** and **Time** parameters.
* **Number of Simulation Runs** — set how many times the simulation runs. The default value is 10. Use multiple simulation runs to test conversation variations.
* **Email Notifications** — enter the email addresses to receive notifications about the simulation runs and press Enter.
To schedule a simulation, use the [`POST /simulations/{simulationReference}/schedules`](https://api-trial.cognigy.ai/testing/openapi#post-/simulations/-simulationReference-/schedules) request.
After saving the configuration, the schedule icon  appears next to the scenario name on the **Scenarios** tab. Hover over the icon to view the next scheduled simulation.
## Example
This example shows how to create scenarios and run simulations using an AI Agent Flow. We'll work with Sophie, the Restaurant Guide from the [Job Market](/ai/agents/overview#job-market). Sophie assists users with dinner planning and restaurant recommendations.
1. Set up a Flow that uses Sophie as the AI Agent.
2. Set up three simulations with different personas to test various use cases:
| **Parameter** | **Value** |
| ------------- | ----------------------------------------------------------------------------------------------------------------------------------------------------------------------------------------------------------------------- |
| Scenario Name | Menu Exploration – Exotic Dish Focus |
| Persona Name | Alex – The Curious Foodie |
| Persona | An adventurous foodie in their late 20s who loves discovering new and exotic dishes. Tech-savvy and curious, Alex uses mobile apps and AI chat tools to explore unique menu items and expand their culinary experience. |
| Mission | Test the AI Agent's ability to recommend exotic dishes and assist Alex in placing an order or booking a table. |
| AI Judge |
appears next to the scenario name on the **Scenarios** tab. Hover over the icon to view the next scheduled simulation.
## Example
This example shows how to create scenarios and run simulations using an AI Agent Flow. We'll work with Sophie, the Restaurant Guide from the [Job Market](/ai/agents/overview#job-market). Sophie assists users with dinner planning and restaurant recommendations.
1. Set up a Flow that uses Sophie as the AI Agent.
2. Set up three simulations with different personas to test various use cases:
| **Parameter** | **Value** |
| ------------- | ----------------------------------------------------------------------------------------------------------------------------------------------------------------------------------------------------------------------- |
| Scenario Name | Menu Exploration – Exotic Dish Focus |
| Persona Name | Alex – The Curious Foodie |
| Persona | An adventurous foodie in their late 20s who loves discovering new and exotic dishes. Tech-savvy and curious, Alex uses mobile apps and AI chat tools to explore unique menu items and expand their culinary experience. |
| Mission | Test the AI Agent's ability to recommend exotic dishes and assist Alex in placing an order or booking a table. |
| AI Judge | - Accurately handle free-text menu queries
- Suggest complementary drinks after exotic dishes are added
- Recognize and add at least one manually named exotic dish
|
| **Parameter** | **Value** |
| ------------- | ------------------------------------------------------------------------------------------------------------------------------------------------------------------------------------------------------------------ |
| Scenario Name | Quick Reservation – Dietary Notes |
| Persona Name | Jordan – The Corporate Guest |
| Persona | Marketing manager at a nearby company, 35 years old, with short lunch breaks. Tech-savvy, uses AI tools frequently, and expects fast, concise communication. Prefers professional tone and minimal back-and-forth. |
| Mission | Test how well the AI Agent handles quick lunch queries and reservation requests under time constraints. |
| AI Judge | - Reservation completed with dietary requirements noted
- Minimal back-and-forth (1–2 exchanges)
- Confirmation provided in under 30 seconds
|
| **Parameter** | **Value** |
| ------------- | ------------------------------------------------------------------------------------------------------------------------------------------------------------------------------------------------------------------------------------------------ |
| Scenario Name | Family-Friendly Group Dinner |
| Persona Name | Maya – The Tourist Planner |
| Persona | A woman in her early 40s visiting from out of town, organizing a dinner for a group of 6, including kids. Familiar with basic chat tools, occasionally uses AI assistants. Communicates politely and needs detailed answers to plan confidently. |
| Mission | Evaluate how well the AI Agent handles group reservations and provides family-friendly recommendations. |
| AI Judge | - Group reservation successfully created
- At least one child-friendly menu item suggested
- Additional info (for example, parking, high chairs) proactively offered
|
3. Run simulations with the following settings:
| **Parameter** | **Value** |
| ------------------------- | ------------------------------------------------------------------------------------------------- |
| Snapshot | No Snapshot |
| Flow | Main-Dining Concierge |
| Locale | en-US |
| LLM | Default. Make sure the default model supports Generative AI capabilities such as text completion. |
| Number of Simulation Runs | 10 |
4. Check the results on the Simulation dashboard. Open each simulation run to review the outcomes. Pay attention to failed runs. For example, look at the simulation for the persona **Maya – The Tourist Planner**.
| Metric | Value | What It Means | Action Steps |
| --------------------- | -------- | ---------------------------------------------------------- | ------------------------------------------------------------------------------------------------------------------------------- |
| Complete Success Rate | 40% | 40% of the simulation runs met all success criteria. | Check the Flow for misunderstandings of user requests or missed information. |
| Success Criteria Met | 67% | Simulation runs met 67% of the success criteria in total. | Review which specific success criteria failed, then adjust the Flow logic or refine the success criteria definitions as needed. |
| Average Sentiment | Positive | Users show positive feelings. | No action is needed. |
| Average Turns | 9 | Average number of exchanges in the simulated conversation. | Track conversation length and ensure each turn effectively advances the conversation. |
## Troubleshooting
| **Issue** | **Description** | **How to Resolve** |
| ------------------------------ | ---------------------------------------------------------------- | ---------------------------------------------------------------------------------------------------------------------------------- |
| Simulation doesn't run | The simulation fails to start or shows an error. | Ensure all required fields (Flow, Locale, LLM, Number of Simulation Runs) are completed. Check system status on the **Logs** page. |
| Inaccurate result | The output doesn't match the expected behavior or test scenario. | Check your Flow version and Snapshot. Use the latest and most relevant setup for testing. |
| AI Agent responses not aligned | The AI Agent gives irrelevant, vague, or incorrect replies. | Review persona and mission definitions. Ensure the LLM supports the expected output style. |
When you use an Azure OpenAI LLM for simulations, you may receive the following error message:
`The response was filtered due to the prompt triggering Azure's content management policy.`
This error isn't caused by Cognigy.AI, it occurs because [Azure's content filter](https://learn.microsoft.com/en-us/azure/ai-foundry/openai/concepts/content-filter?view=foundry-classic) blocks the LLM prompt, also called system message, according to your subscription's safety policy. The LLM prompt includes your simulation settings, for example, personas, missions, and success criteria.
**Best Practices**
Azure's content filter blocks any content that it considers unsafe or ambiguous, including LLM prompts. The exact rules, scoring methods, or trigger terms used for the content filter aren't disclosed. However, they include best practices in their [system message documentation](https://learn.microsoft.com/en-us/azure/ai-foundry/openai/concepts/system-message?view=foundry-classic\&tabs=top-techniques#summary-of-best-practices). The following table shows issues and best practices while configuring the scenario.
| Issues | Best Practice | Examples and Recommendations |
| -------------------------------------------------------------- | ------------------------------------------------------------ | -------------------------------------------------------------------------------------------------- |
| The prompt lacks sufficient context. | Provide clear context and purpose to guide the model safely. | Enter persona description with at least 50 words. |
| References to personal or financial situations. | Keep a neutral, business-appropriate tone. | Use `Customer exploring labor options`, instead of `unemployed`. |
| Words implying personal finance. | Focus on professional skills, goals, and scenarios. | Use `payment upon delivery`, instead of `cash`. |
| Including self-referring instructions in the scenario content. | Use detailed, descriptive personas. | Use `They are comfortable navigating digital menus`, instead of `They often use this application`. |
| Personal framing without professional context. | Frame content around business use cases. | Use `A customer seeking assistance...`, instead of `A customer struggling with...`. |
**How to Resolve**
1. Review the simulation's persona, mission, and success criteria. Make sure they comply with [Azure's best practices](https://learn.microsoft.com/en-us/azure/ai-foundry/openai/concepts/system-message?view=foundry-classic\&tabs=top-techniques#summary-of-best-practices).
2. Ask your Azure OpenAI administrator to review the content filter settings for the environment you're using.
**Examples**
In the **Persona** parameter, you can influence the context the most. The examples in the following table show how to make sure the LLM prompt includes enough context.
| Accepted Persona
| Blocked Persona
|
| --------------------------------------------------------------------------------------------------------------------------------------------------------------------------------------------------------------------------------------------------------------------------------------------------------------------------------------------------------------------------------------------------------------------- | ------------------------------------------------------------------------------------- |
| `A customer who frequently uses online ordering platforms and is comfortable navigating digital menus and checkout processes. They communicate clearly when placing orders and prefer efficient interactions. This customer understands standard workflows, including item selection, delivery info entry, and payment options. They prefer payment at delivery and appreciate straightforward ordering experiences.` | `A cash-preferring customer who is unemployed and needs help with their application.` |
## More Information
* [Simulations in the Interaction Panel](/ai/agents/test/interaction-panel/simulation)
* [Conversations Explorer](/insights/explorers/conversations)
* [Contact Profiles](/ai/agents/analyze/contact-profiles)
* [Agentic AI](/ai/agents/overview)
* [Azure OpenAI Content Filtering](https://learn.microsoft.com/en-us/azure/ai-foundry/openai/concepts/content-filter?view=foundry-classic)
* [Azure OpenAI System Message Best Practices](https://learn.microsoft.com/en-us/azure/ai-foundry/openai/concepts/system-message?view=foundry-classic\&tabs=top-techniques#summary-of-best-practices)