Management UI
Introduction
The Cognigy Management UI is an additional product originally developed as a Cognigy internal tool for managing our own cloud installations. You need to install it in addition to our actual product in order to use it.
You can set up Management UI yourself if you have an on-premise Cognigy.AI installation. Otherwise, if you want to make changes in Management UI, contact technical support.
Many users don't know that Cognigy.AI is able to handle a multi-tenant scenario. These individual tenants are called organisations within Cognigy.AI.
An organisation has completely separated:
- projects
- users
- api- access and -keys
- contact profile schemas
- quotas & limits
With the use of organisations, you can use your own Cognigy.AI installation e.g. for multiple customers and separate their data in a safe manner. Although a new organisation can be created by using a special sort of internal API, we created an additional tool called the Cognigy Management UI. This is an additional product you can deploy in your cluster. It then lets you connect to your installation to inspect e.g. all organisations within your system.
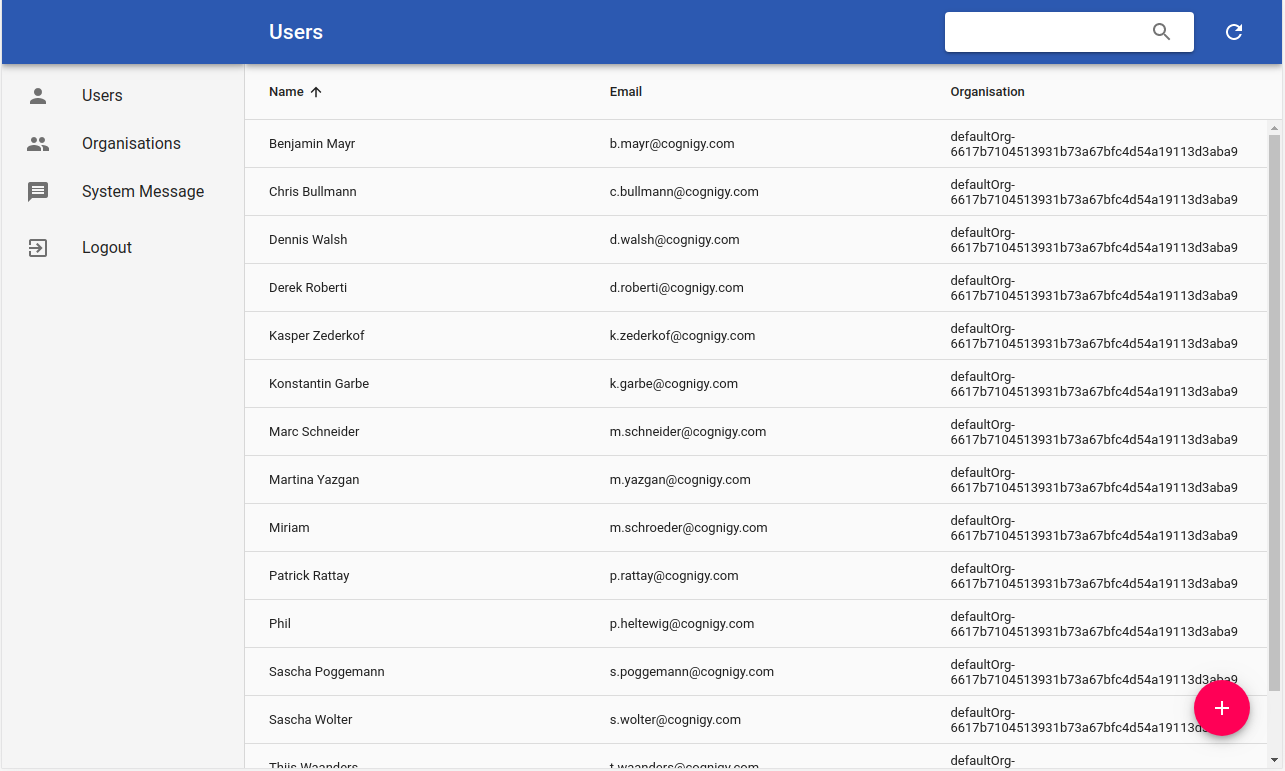
The following figure shows a screenshot of what this product looks like.
Usage
The usage of the Management UI is quite self-explanatory. We have global navigation on the left side, which allows you to switch between: - Users - Organisations - System Message
We will now have a look at the individual view and what can be done in there.
Users
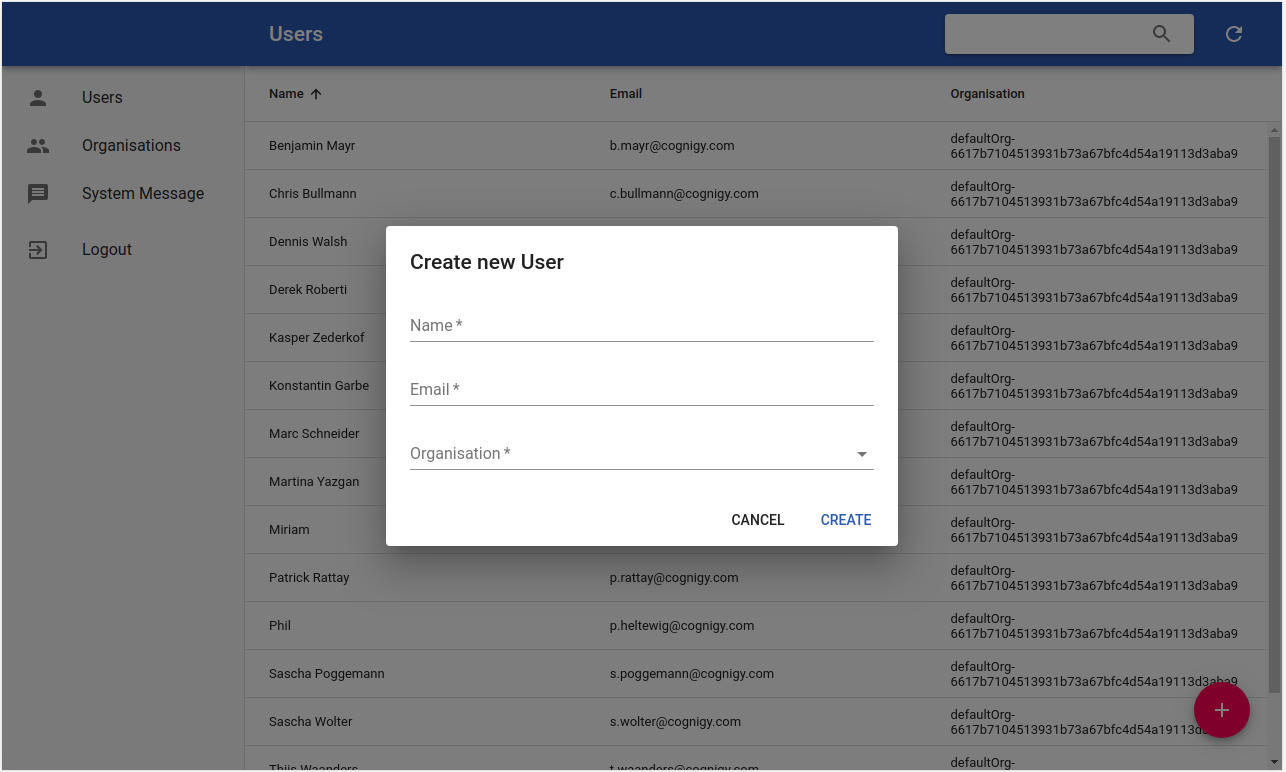
Here you can add new users to the system. A user needs to get assigned to an organisation, so you might need to create a new organisation first. To create a new user, click on the huge pink button on the right-bottom corner of the view. You will then see a dialog where you enter the:
- name
- select the organisation
![]() You can add a user (identified by an email address) to multiple organisations and how the user can log in for their organisation can be found on Login for Users in multiple organisation page
You can add a user (identified by an email address) to multiple organisations and how the user can log in for their organisation can be found on Login for Users in multiple organisation page
If you click on one of the already existing users, a details page opens and displays you certain information about the user. The most important things you can do here are:
- see general information
- see the users current roles
- see certain status information
- impersonate the user. This will forward to the actual product and login as if you were the selected user
- additional actions for the user are in the triple-dot icon on the right-top corner
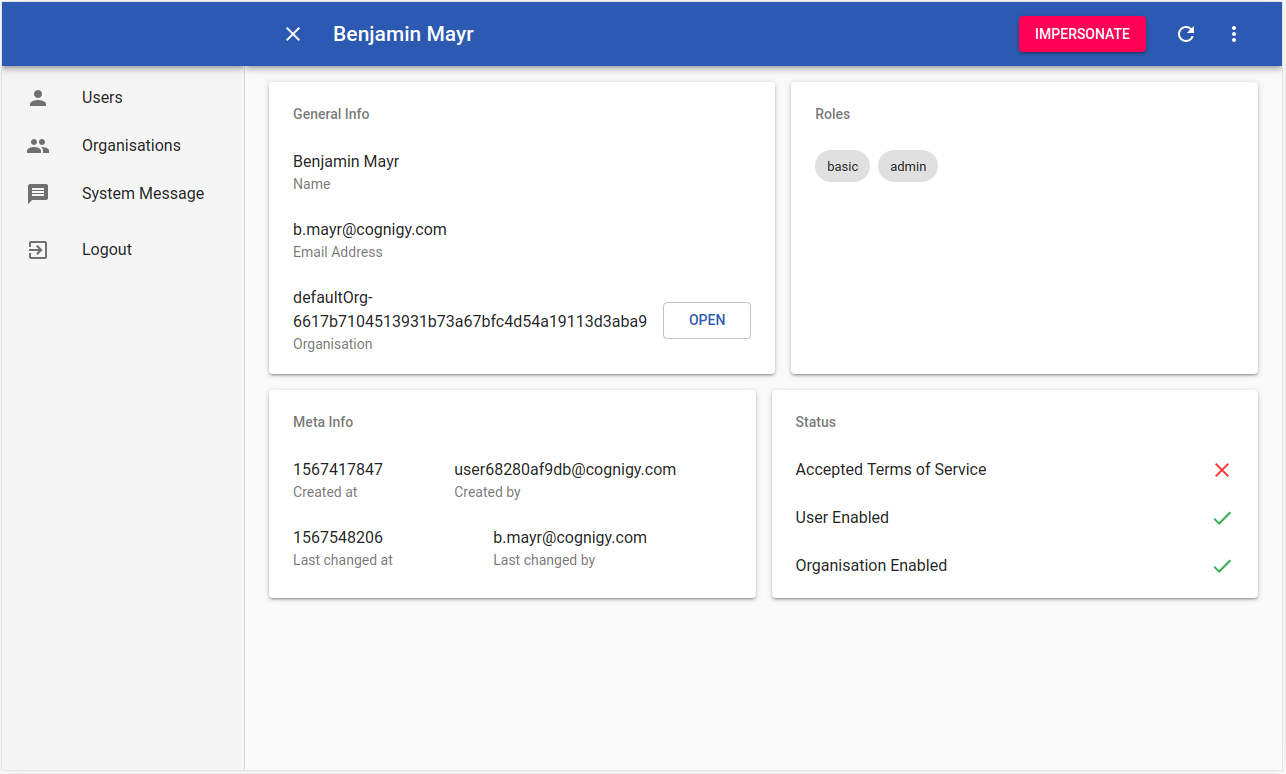
Impersonating a user
By impersonating a user, you can log in into the system as the users you have selected, without knowing the actual account password. Ensure that you log out after you have finished your work.
Organisations
This view presents all organisations that exist within the system. Each installation has at least one organisation that will be created automatically. This initial organisation is called defaultOrg-xxx. Have a look at the following figure.
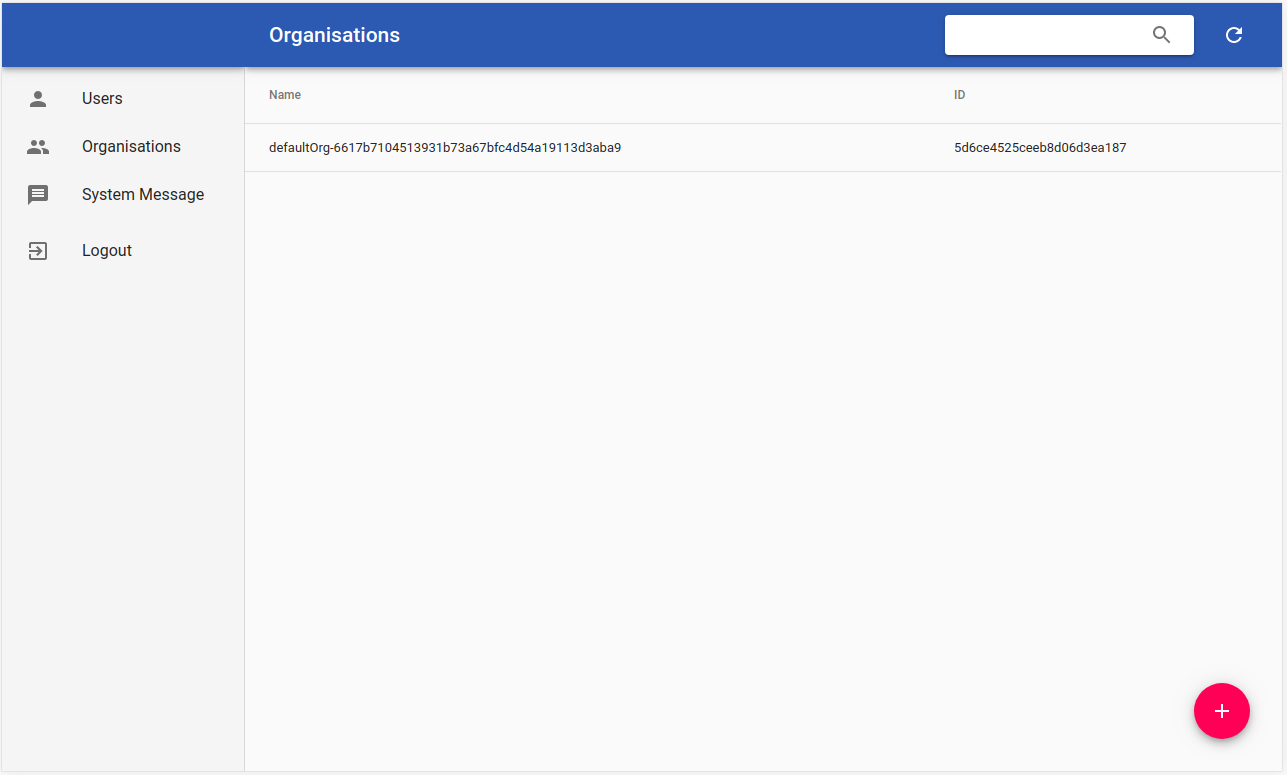
You can also create a new organisation or disable an already existing one.
System Message
If you have your own Cognigy.AI installation, you might want to schedule maintenance at a certain point. This is what you can use our System Message feature for. Select system message in the navigation on the left and click on the pink button to create a new system message.
Only one system message can exist at a time. Such a message has an actual message text and a valid until date. The message will be displayed on all UI clients as long as the message is valid. It will automatically varnish when it is expired.
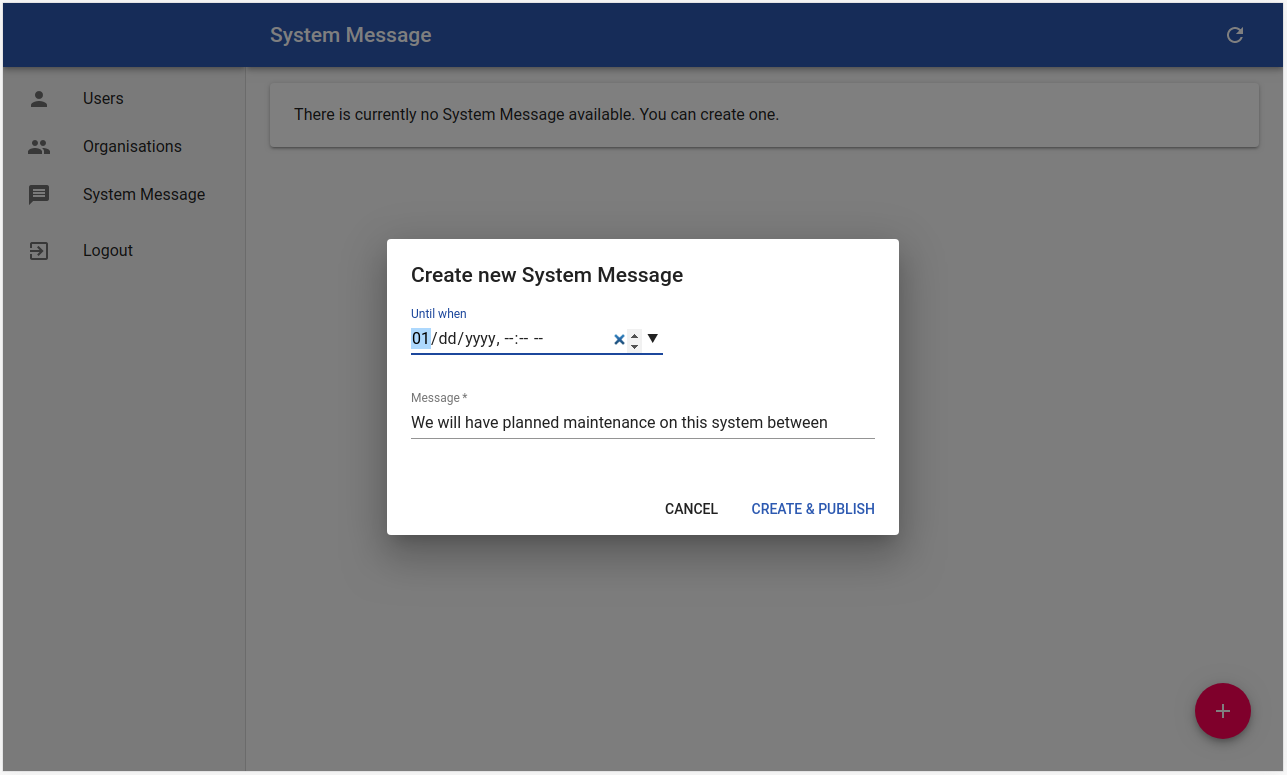
The system message will get displayed for all users - regardless of their organisation.
Quotas & Limits
With version 3.4.0 of Cognigy.AI, we have introduced quotas and limits on an organisation level. Larger customers with multiple organisations can use these quotas to limit what is possible within certain organisations. To configure limits, first select an organisation, open its details and click on the triple-dot button on the right-top corner.
In the menu, select Change Organisation Quotas.

You can currently configure the following quotas & limits:
| Attributes | Description |
|---|---|
| Max users | This is the maximum number of users that can be created within the organisation. |
| Max projects | The maximum number of projects that can be created within this organisation. |
| Max channels per project | The maximum number of different types of channels within a single project. A channel is e.g. an Alexa-Endpoint. If this is e.g. set to one, you can create an infinite number of Alexa Endpoints but will get an error once you try to e.g. create a Google Actions Endpoint in addition. It's the number of different types of channels that gets restricted |
| Max messages per day | This is currently a soft limit and will not do anything if projects go above it. We will introduce changes to this quota in the future. |
Setting a quota to 0 disables the quota.
Password Policy
It is also possible to configure the password policies of an organisation in the Management UI. To configure the password policy, first select an organisation and click on the triple-dot button on the right-top corner.
In the menu, select Change Password Policy.
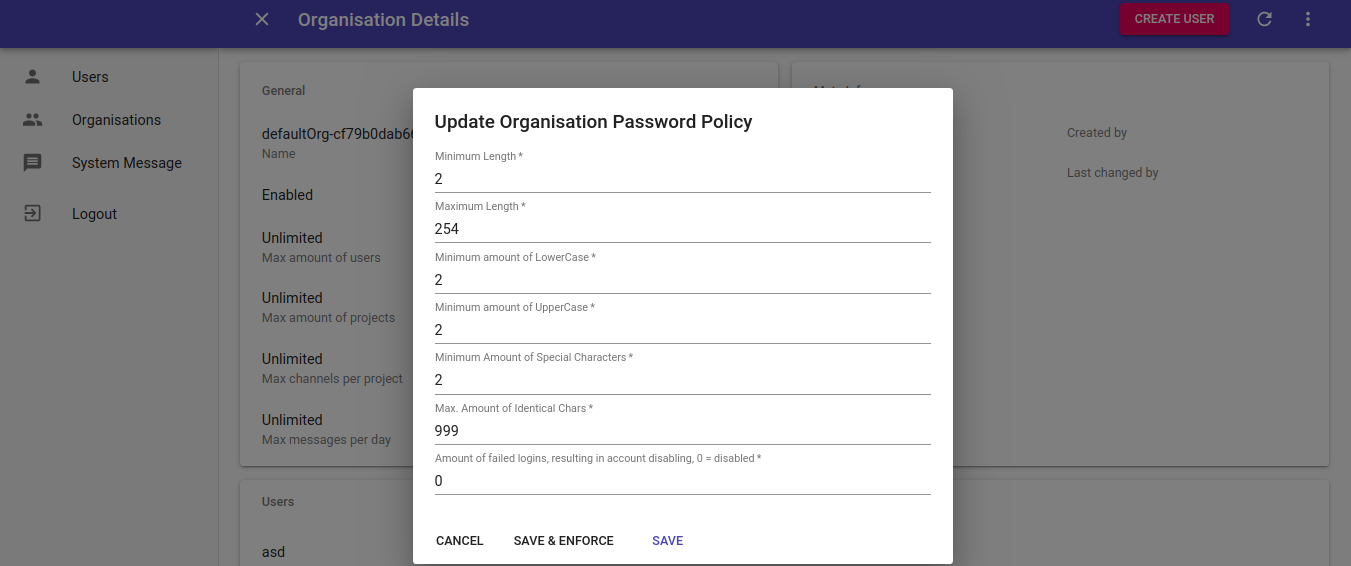
It is currently possible to configure the following attributes of the password policy:
| Attributes | Description |
|---|---|
| Minimum Length | The minimum number of characters the password needs to consist of. |
| Maximum Length | The maximum number of characters the password can consist of. |
| Minimum Amount of Lowercase | The minimum number of characters in the password which have to be lowercase. |
| Minimum Amount of Uppercase | The minimum number of characters in the password which have to be uppercase. |
| Minimum Amount of Special Characters | The minimum number of special characters in the password. |
| Maximum Amount of Identical Characters | The maximum numner of characters which can be identical in the password. |
| Amount of failed logins resulting in account disabling | Specifies how many times a user can attempt to log in before their account is disabled. Settings this to 0 means that the account will never be disabled. Disabled users can be enabled again in the Management UI. |
Clicking the Save & Enforce button results in all users of the organisation to get logged out. Upon re-logging they will be required to change their password.
Data Privacy Settings
![]() It is possible to set the data privacy settings of an organisation in the Management UI. To configure the data privacy settings, first select and organisation and then click on the triple-dot button on the right-top corner.
It is possible to set the data privacy settings of an organisation in the Management UI. To configure the data privacy settings, first select and organisation and then click on the triple-dot button on the right-top corner.
In the menu, select Change Data Privacy Settings
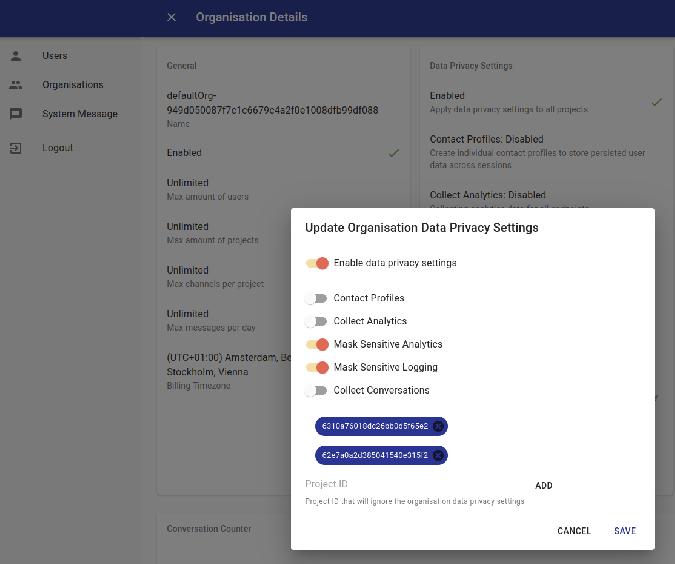
- Enable data privacy settings
Apply data privacy settings to all projects of this organisation
- Contact Profiles
Create individual contact profiles to store persisted user data across sessions
- Collect Analytics
Collecting analytics data for all endpoints
- Mask Sensitive Analytics
Mask all sensitive analytics data for all endpoints
- Mask Sensitive Logging
Mask all sensitive logging for all endpoints
- Collect Conversations
Collecting conversations history for all endpoints
- Ignore List
The projects will ignore the organisation data privacy settings and use the ones defined in the endpoint
Expiration Values (TTL) for Sensitive Data
It is possible to configure when certain sensitive data expires and is deleted from the system. In order to change this, first select an organisation and click on the triple-dot button on the right-top corner.
In the menu, select Change Expiration Values.
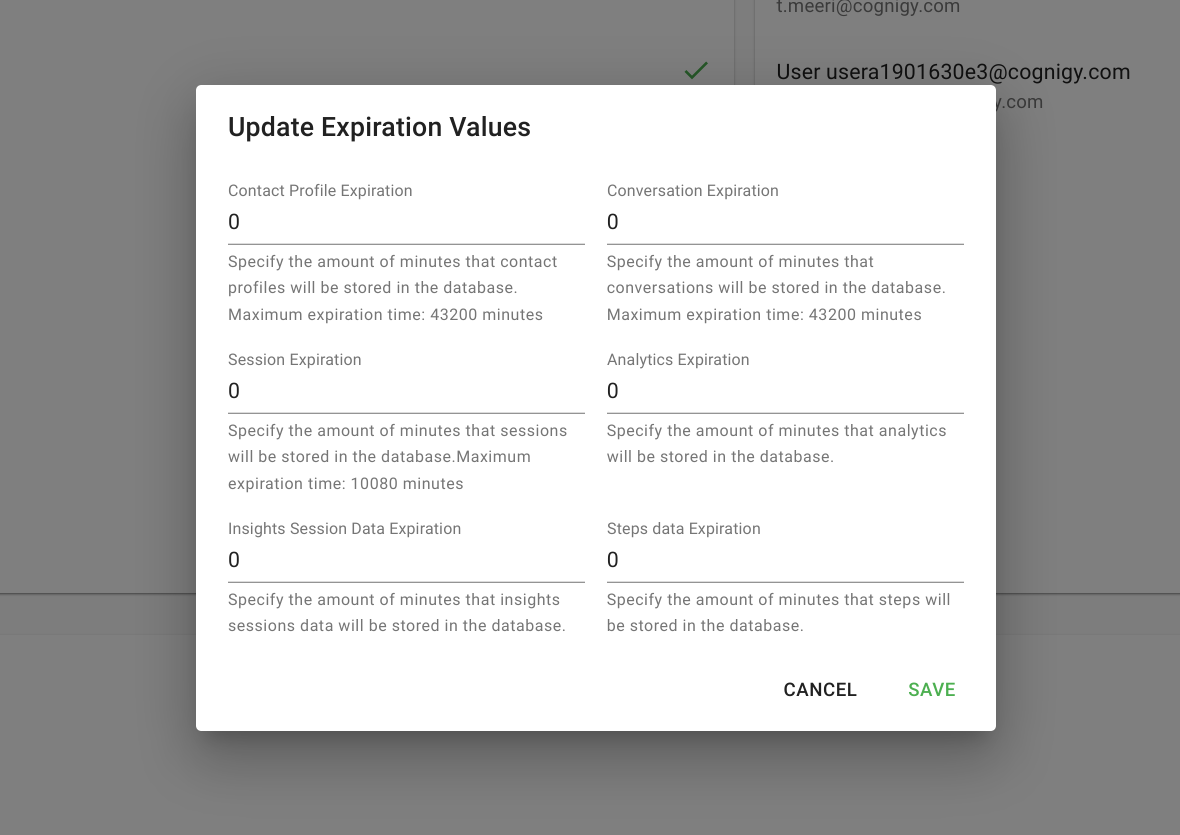
All the expiration values define how many minutes it takes from when the data was created until it expires. Setting an expiration value to 0 means that the data will never expire. It is possible to configure the expiration of the following data:
| Expiration value | Description |
|---|---|
| Contact Profiles Expiration | This expiration value determines the number of minutes from when a contact profile was last active in a conversation until it is deleted. |
| Session Expiration | This expiration value determines the number of minutes from when the last message in a session was sent until the session is deleted. This means that the expiration timer is reset on every new message in a session. The session expiration can also be configured in the individual Endpoints for some Endpoints. In case the value is also configured there, the smallest value will be used. |
| Conversation Expiration | This expiration value determines the number of minutes from when a conversation is created until it is deleted from the database. |
| Analytics Expiration | This expiration value determines the number of minutes from when the data of the Analytics is created until it is deleted from the database. |
| Insight's Session Data Expiration | This expiration value determines the number of minutes from when the data of Insight's Session is created until it is deleted from the database. |
| Steps Data Expiration | This expiration value determines the number of minutes from when the data of Steps is created until it is deleted from the database. |
For more information about data expiration in Insights, read Data Expiration in the Insights documentation.
It is also possible to set a server-wide maximum expiration time for all the sensitive data mentioned above. This is documented in the infrastructure documentation that is provided to customers upon installation.
Installation
Further information about installing the Cognigy Management UI can be found on the GitHub page, by contacting your Cognigy sales representative or by sending an email with your question to info@cognigy.com.