Step Explorer
The Step Explorer is an analytics tool in Cognigy Insights that lets you visualize how customers navigate through a conversation. You can explore the conversation steps and identify key paths, as well as points where customers disengage. This tool helps you evaluate and improve your virtual agent for better understanding, potentially increasing orders, bookings, or reducing support requests.
To open the Step Explorer, use one of the following options:
- Open the Cognigy.AI interface.
- In the left-side menu, select an Agent.
- Within the Agent interface, navigate to Insights using one of the following options:
- In the left-side Agent menu, select Insights.
- In the upper-right corner, click
 > Insights.
The Cognigy Insights Overview dashboard will be displayed by default.
- In the left-side menu, select Step Explorer.
- Open your Cognigy Insights interface.
- In the left-side menu, select Step Explorer.
The Step Explorer interface will be displayed. Each column on the Step Explorer page represents a Node or Intent annotated in the Cognigy.AI Flow.
Before you Begin
Differing from the Transcript Explorer and Message Explorer tools, the Step Explorer requires you to prepare data on the Cognigy.AI side to start gathering it. To do so, decide what you want to gather: Node data, Intent data, or both.
Annotate Nodes
To gather data on Nodes, you need to annotate them. This means providing descriptions of the actions to understand how the Node works and analyze its performance.
Node annotation helps you analyze customer reactions at specific stages of their interaction with a virtual agent. For instance, by examining customer reactions during the ordering process, you can identify issues such as cart abandonment and make improvements to streamline the process, resulting in improved customer satisfaction and conversion rates.
To annotate a Node, follow the steps below:
- Open the Cognigy.AI interface.
- In the left-side menu, select an Agent.
- Navigate to Build > Flows.
- Create a new Flow by clicking + New Flow in the upper-right corner or using an existing one.
- In the Flow editor, create a new Node by clicking + and selecting one from the list or using an existing one.
- Open the Node editor by clicking the Node you want to annotate.
- In the Node Editor, go to Settings > Analytics Step.
- In the Analytics Step field, enter a title for the Node's action. For example, if the Node is responsible for selecting multiple products, the step could be titled
Product Selection. - Click Save.
Annotate Intents
To gather data on Intents, you need to annotate them. This involves providing descriptions of the actions to understand how the Intent works and analyze its performance.
Intent annotation helps you analyze customer behaviors and preferences within specific steps, such as behaviors and preferences regarding their ordering patterns. This analysis enables you to understand which products or categories are more popular among customers and provides insights into their purchasing habits and trends.
To annotate an Intent, follow these steps:
- Open the Cognigy.AI interface.
- In the left-side menu, select an Agent.
- Navigate to Build > Flows.
- Create a new Flow by clicking + New Flow in the upper-right corner or use an existing one.
- In the upper-right corner of the Flow editor, select the NLU tab.
- In the Intents tab, create a new Intent by clicking + Create Intent or use an existing one.
- On the selected Intent page, go to Advanced > Analytics Step.
- In the Analytics Step section, provide a title that clearly represents the Intent's action. For example, if the Intent involves selecting a specific product type, such as Pizza, consider naming the step
Pizza Order,Pizza Selection, orPizza. - Click Save.
Test your Flow
To view the results on the Step Explorer page, test your virtual agent via the Interaction panel or the Demo Webchat.
Filter Steps
By default, the Step Explorer shows the Global Filters section at the top of the page.
You can filter sessions by using the following options:
To hide the Filter menu, click ![]() in the upper-right corner.
in the upper-right corner.
Global Filters
For more information, read the Global Filter documentation.
Additional Filters
You can use additional filters to refine your research.
To open the Additional Filters selection,
click more filters ![]() in the Global Filters section at the top of the Transcript Explorer page.
in the Global Filters section at the top of the Transcript Explorer page.
| Filter | Description |
|---|---|
| Message Rating | Select the rating criteria: - Positive — messages perceived positively. - None — messages with no sentiment. - Negative — messages perceived negatively. |
| Direction | Select one of the following directions: - Forward — the report begins with the first step of the session. - Backward — the report starts with the last step of the session. |
| Starting Step | Select the step where the analysis starts. |
| Contains Step | Select the steps you want to analyze. |
Exclude Filters
When you toggle the Negate option, all filters except the selected one will be analyzed.
For example, if you select only Webchat
in the Endpoint filter and Negate, all data except the Webchat Endpoint will be analyzed.
Reset Filters
To reset all filters, at the top of the page, click the Reset button on the right side of the Global Filters.
If the Reset button is not displayed,
click ![]() in the upper-right corner of the page.
in the upper-right corner of the page.
Step Overview
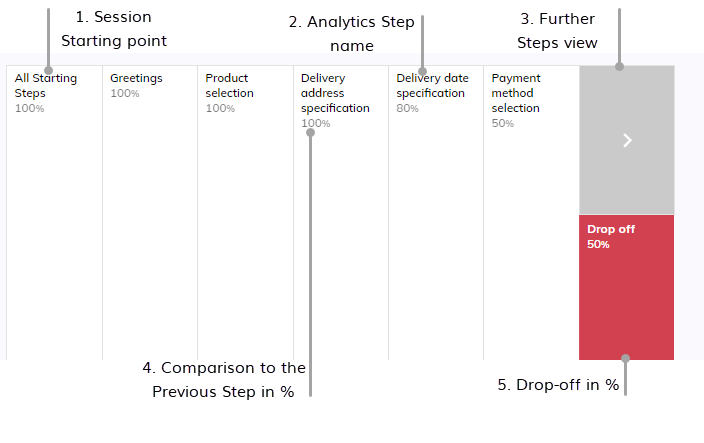
- All Starting Steps. The starting point of the session, when the user enters a session and starts interacting with the bot.
- Analytics Step Name. The name that you specified in the Node or Intent settings.
- Further Steps view. Next steps that follow a specific decision (step) in a session.
- % (From the previous step). The percentage of end users who reached this step compared to the previous step.
- Drop-off. The percentage of users who leave a step before finishing it.
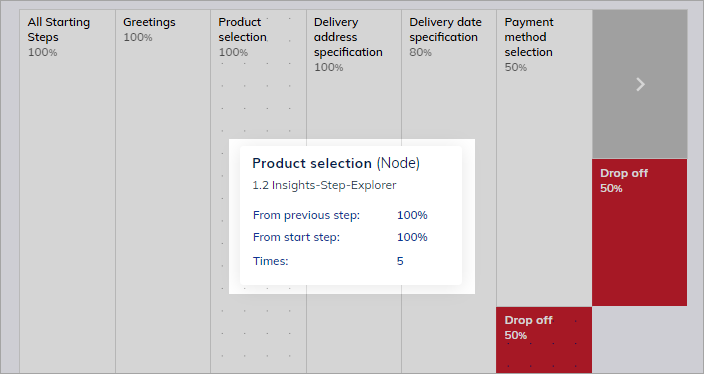
Step Details
To view step details, hover the cursor over the step on the Step Explorer page.
| Parameter | Description |
|---|---|
| Step name | Analytics Step name that you specified in the Node or Intent settings. |
| Flow Name | A Flow where the Note or Intent is used. |
| From previous step | The percentage of end users who reached this step compared to the previous step. |
| From end step | The percentage of end users who reached this step compared to the last step. |
| Times | The total number of end users who reached this step. |
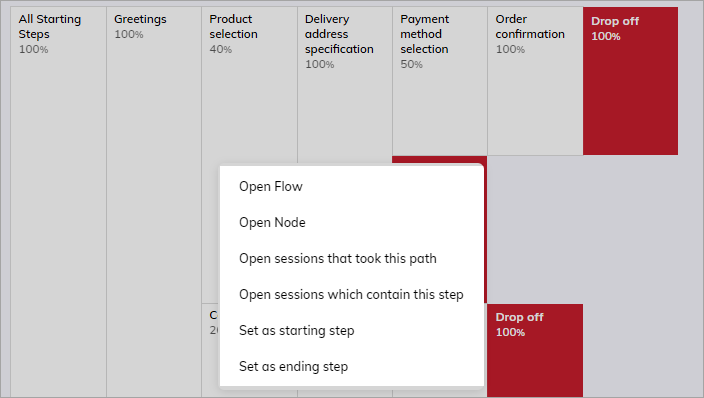
Step Operations
To view step operations, right-click the selected Step on the Step Explorer page.
| Operation | Description |
|---|---|
| Open Flow | Opens a related Flow in the Cognigy.AI interface in a new browser tab. |
| Open Node | Opens a related Node in the Cognigy.AI interface in a new browser tab. |
| Open sessions that took this path | Tracks the number of sessions following the same sequence of steps, including the selected step, which is useful for understanding user interaction with your application. It helps optimize the user experience, identify successful strategies, and assess the effectiveness of features. Related sessions are displayed on the Transcript Explorer page. |
| Open sessions which contain this step | Tracks the number of sessions in which end users have completed the selected step. Related sessions are displayed on the Transcript Explorer page. |
| Open conversations that ended here | This option appears in the menu only if you click the Drop-off step. This means that you can view all sessions from which end users leave a step before finishing it. |
| Set as Starting Step | Places the selected step at the beginning of the path. |
| Set as Ending Step | Places the selected step at the end of the path. |
Examples
Nodes
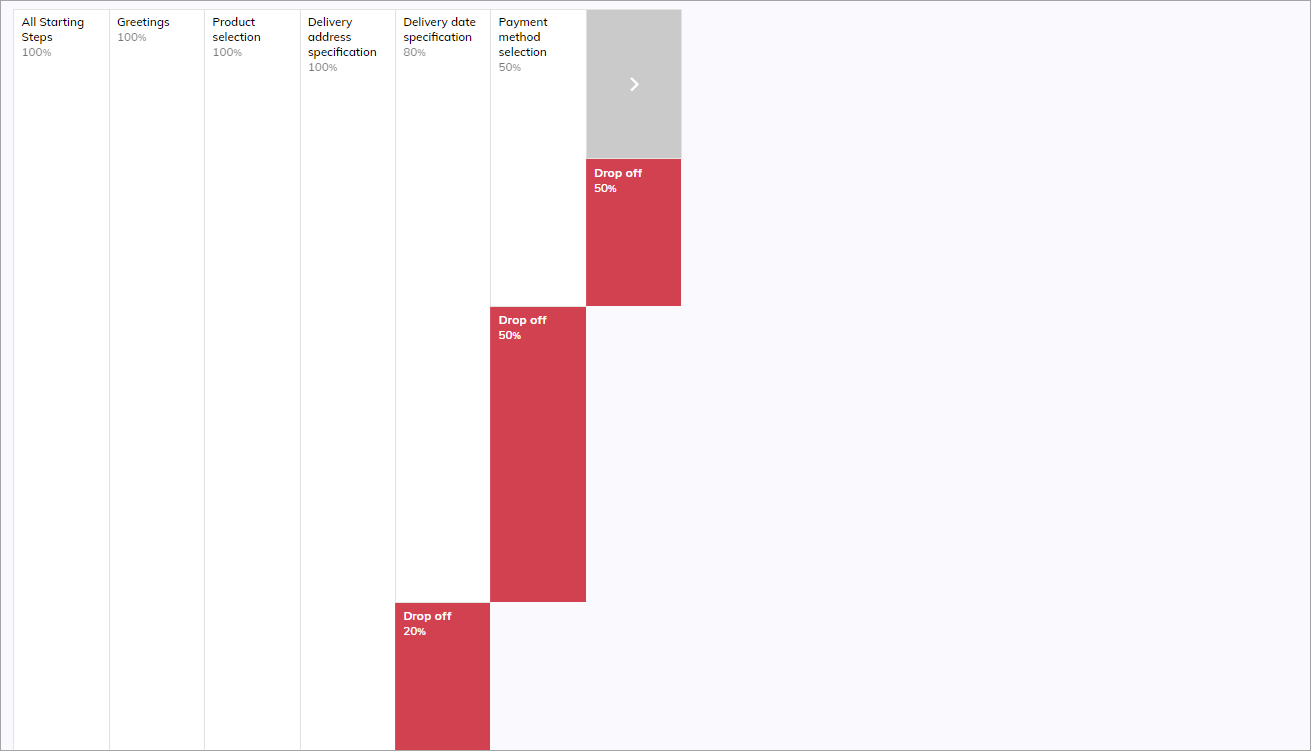
Let's consider an example in which Nodes are annotated in a Flow where users select a product and payment method and make an order.
The following steps are presented:
- Greetings. All 5 users successfully completed the first step, resulting in a 100% completion rate.
- Product selection. All 5 users completed this step, resulting in a 100% completion rate.
- Delivery address specification. All 5 users provided their delivery addresses, resulting in a 100% completion rate.
- Delivery date specification. Only 4 out of the initial 5 users completed this step, resulting in an 80% completion rate. One user did not proceed to specify the delivery date.
- Payment method selection. Only 2 out of the initial 5 users completed this step, resulting in a 50% completion rate compared to the previous step, which was reached by 4 people.
- Order confirmation. Finally, only 1 out of the initial 5 users completed this step, resulting in a 50% completion rate compared to the previous step, which was reached by 2 people.
In the image below, it's evident that out of all users, only 1 completed the order.
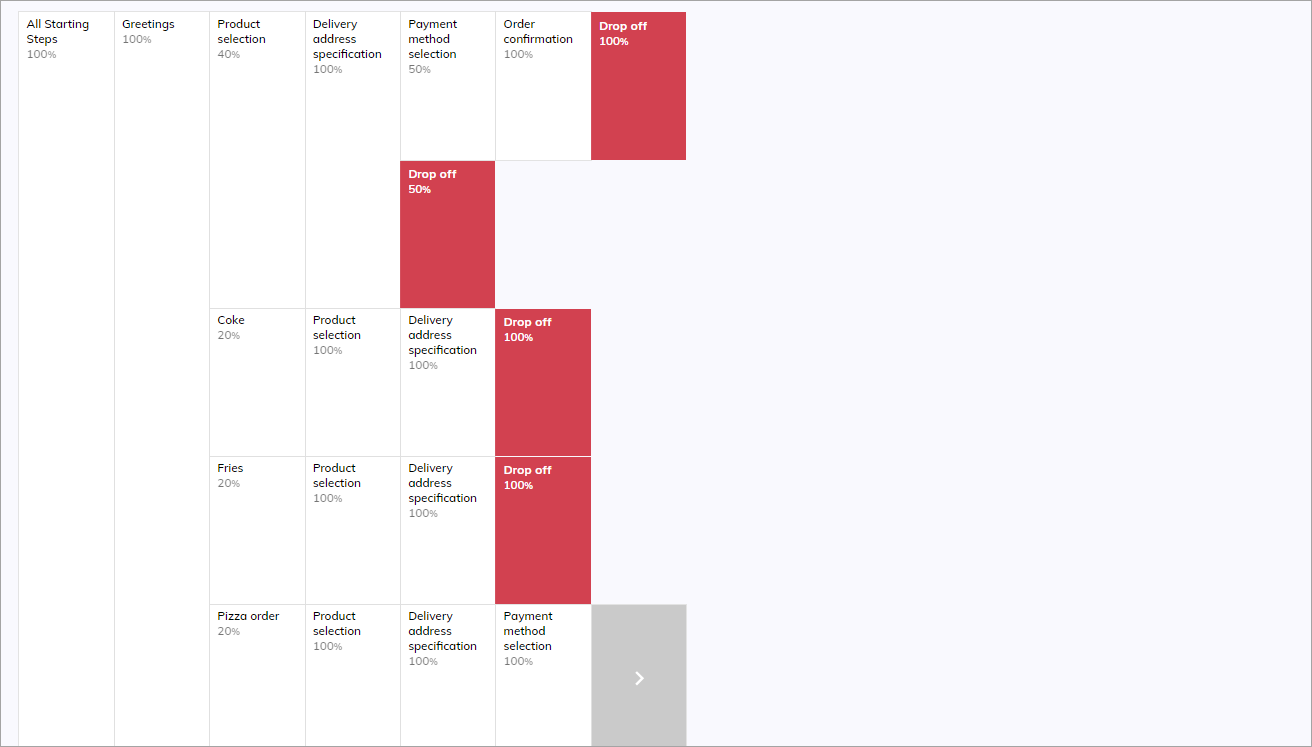
Nodes and Intents
Let's consider an example in which Nodes and Intents are annotated in a Flow where users select a product and payment method and make an order.
The following steps are presented:
- Greetings. All 5 users successfully completed the first step, resulting in a 100% completion rate.
- Product Selection:
- Completed by 100% of users (5 users):
- 40% selected products from a non-specific category.
- 20% selected Coke.
- 20% selected Fries.
- 20% selected Pizza.
- Completed by 100% of users (5 users):
- Delivery address specification. All 5 users provided their delivery addresses, resulting in a 100% completion rate.
- Payment method selection:
- Not completed by 50% of users who did not select a product category (1 user).
- Users who ordered Coke and Fries did not select a payment method, resulting in 100% drop-off for each.
- User who selected Pizza completed the step 100% (1 user).
- Order Confirmation:
- One user who ordered Pizza and one user without a product category completed their orders successfully, resulting in a 50% completion rate (2 users).
In the image below, it's evident that out of all users, only 2 completed the order.