> ## Documentation Index
> Fetch the complete documentation index at: https://docs.cognigy.com/llms.txt
> Use this file to discover all available pages before exploring further.
# Conversation Assignment
Updated in 2026.1
Live Agent has been put in maintenance mode. The product will continue to be maintained in the foreseeable future. Users can continue to fully rely on Live Agent being available. In future releases, only security updates and bug fixes will be provided; no new features will be released.
Within Live Agent, you can assign agents, teams, priority, labels, and change inboxes.
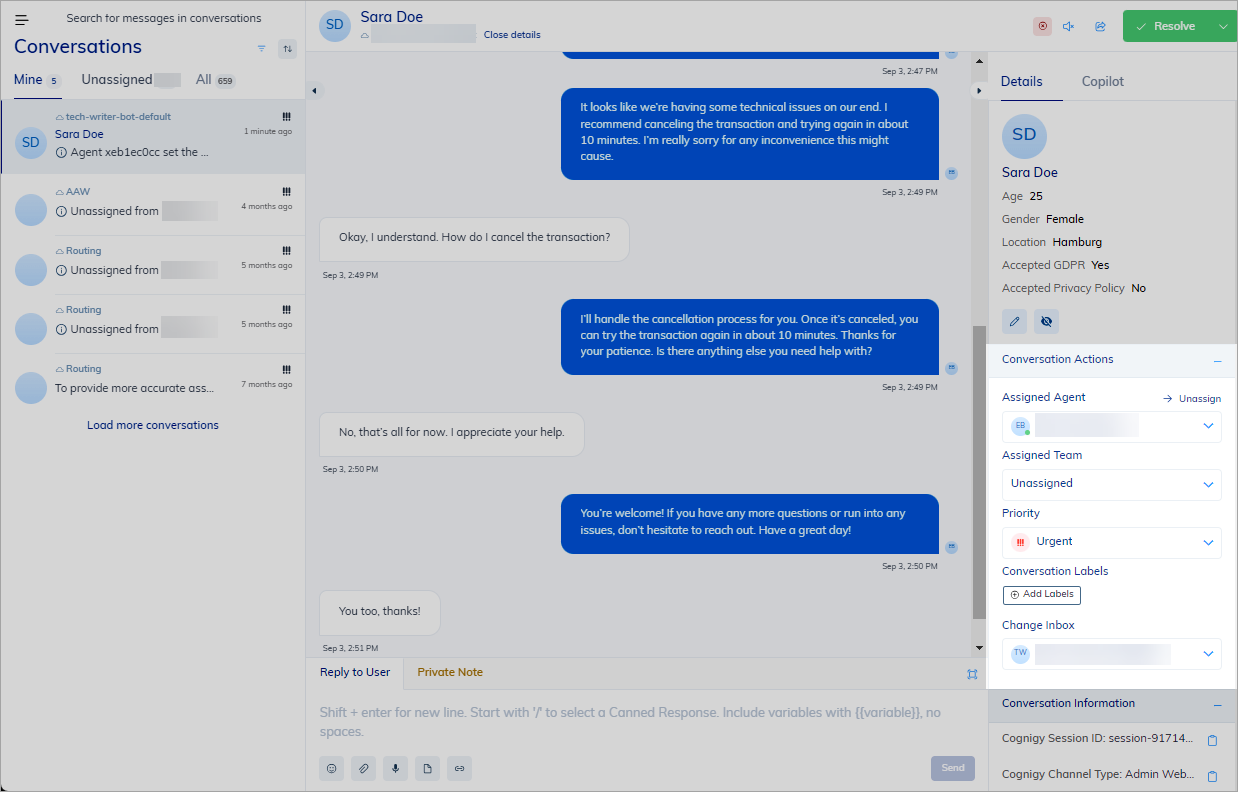 ## Assign Agents
You can transfer a conversation to another human agent by selecting a different agent from the **Assigned Agent** list.
The entire conversation will be visible to the newly selected agent.
To assign an agent to a conversation within Live Agent, do the following:
1. In the left-side menu of Live Agent, click **Conversations**.
2. From the **Inboxes** list, select an Inbox.
3. From the **Conversations** list, select your conversation where you want to assign a priority.
4. On the right side of the conversation chat, go to **Details > Conversation Actions**.
5. From the **Assigned Agent** list, select a different agent by scrolling or typing to search for an agent, then click the intended agent.
The agent will be assigned to the conversation.
### Assign Supervisors
You can select an agent with any role in the **Assigned Agent** list. However, if you want to specifically assign a supervisor, you can do so by escalating the conversation.
To escalate a conversation to a human agent with the `Supervisor` role, click the **↑ Escalate to Supervisor** button. The button appears in the **Conversation Actions** section if the Inbox settings [allow agents to escalate conversations to supervisors](/live-agent/settings/inboxes#escalate-conversations-to-supervisors).
The supervisor will be assigned to the conversation in the Inbox.
Additionally, supervisors can track the number of escalated conversations in the [Supervisor Overview Report](/live-agent/reports/supervisor-overview).
## Assign Teams
To assign a team to a conversation within Live Agent, do the following:
1. In the left-side menu of Live Agent, click **Conversations**.
2. From the **Inboxes** list, select an Inbox.
3. From the **Conversations** list, select your conversation where you want to assign a priority.
4. On the right side of the conversation chat, go to **Details > Conversation Actions**.
5. From the **Assigned Team** list, select a desired team by scrolling or typing to search for a team, then click the intended team.
The team will be assigned to the conversation.
## Assign Priority
To assign a priority to a conversation within Live Agent, do the following:
1. In the left-side menu of Live Agent, click **Conversations**.
2. From the **Inboxes** list, select an Inbox.
3. From the **Conversations** list, select your conversation where you want to assign a priority.
4. On the right side of the conversation chat, go to **Details > Conversation Actions**.
5. From the **Priority** list, select a desired priority by scrolling or typing to search for a priority level, then click the intended level.
The priority will be assigned to the conversation.
The icon representing the matching priority level will now be visible next to the conversation in the Conversations list.
## Assign Labels
To assign a label to a conversation within Live Agent, do the following:
1. In the left-side menu of Live Agent, click **Conversations**.
2. From the **Inboxes** list, select an Inbox.
3. From the **Conversations** list, select your conversation where you want to assign a priority.
4. On the right side of the conversation chat, go to **Details > Conversation Actions**.
5. Under the **Conversation Labels** section, click **Add Labels**.
6. Scroll or type to search for a label, then click a label. You can add multiple labels at once.
The label will be added to the conversation.
## Change Inboxes
When a conversation is initiated, it is automatically assigned to the inbox defined in the Cognigy.AI Flow. However, you can change the inbox for an existing conversation if needed.
Agents can only assign conversations to the inboxes they have access to. Supervisors and Administrators, who have access to all inboxes, can assign conversations to any inbox.
To change an inbox for a specific conversation within Live Agent, follow these steps:
1. In the left-side menu of Live Agent, click **Conversations**.
2. From the **Inboxes** list, select an Inbox. All available inboxes are visible depending on the user's role.
3. From the **Conversations** list, select the conversation where you want to change the inbox.
4. On the right side of the conversation chat, go to **Details > Conversation Actions**.
5. From the **Change Inboxes** list, select the desired inbox.
After selecting a new inbox, the page will refresh to ensure all agents can see the conversation in the newly assigned inbox.
If you want to change inboxes for multiple conversations, follow these steps:
1. In the left-side menu of Live Agent, click **Conversations**.
2. From the **Conversations** list, select the conversations where you want to change the inbox and click
## Assign Agents
You can transfer a conversation to another human agent by selecting a different agent from the **Assigned Agent** list.
The entire conversation will be visible to the newly selected agent.
To assign an agent to a conversation within Live Agent, do the following:
1. In the left-side menu of Live Agent, click **Conversations**.
2. From the **Inboxes** list, select an Inbox.
3. From the **Conversations** list, select your conversation where you want to assign a priority.
4. On the right side of the conversation chat, go to **Details > Conversation Actions**.
5. From the **Assigned Agent** list, select a different agent by scrolling or typing to search for an agent, then click the intended agent.
The agent will be assigned to the conversation.
### Assign Supervisors
You can select an agent with any role in the **Assigned Agent** list. However, if you want to specifically assign a supervisor, you can do so by escalating the conversation.
To escalate a conversation to a human agent with the `Supervisor` role, click the **↑ Escalate to Supervisor** button. The button appears in the **Conversation Actions** section if the Inbox settings [allow agents to escalate conversations to supervisors](/live-agent/settings/inboxes#escalate-conversations-to-supervisors).
The supervisor will be assigned to the conversation in the Inbox.
Additionally, supervisors can track the number of escalated conversations in the [Supervisor Overview Report](/live-agent/reports/supervisor-overview).
## Assign Teams
To assign a team to a conversation within Live Agent, do the following:
1. In the left-side menu of Live Agent, click **Conversations**.
2. From the **Inboxes** list, select an Inbox.
3. From the **Conversations** list, select your conversation where you want to assign a priority.
4. On the right side of the conversation chat, go to **Details > Conversation Actions**.
5. From the **Assigned Team** list, select a desired team by scrolling or typing to search for a team, then click the intended team.
The team will be assigned to the conversation.
## Assign Priority
To assign a priority to a conversation within Live Agent, do the following:
1. In the left-side menu of Live Agent, click **Conversations**.
2. From the **Inboxes** list, select an Inbox.
3. From the **Conversations** list, select your conversation where you want to assign a priority.
4. On the right side of the conversation chat, go to **Details > Conversation Actions**.
5. From the **Priority** list, select a desired priority by scrolling or typing to search for a priority level, then click the intended level.
The priority will be assigned to the conversation.
The icon representing the matching priority level will now be visible next to the conversation in the Conversations list.
## Assign Labels
To assign a label to a conversation within Live Agent, do the following:
1. In the left-side menu of Live Agent, click **Conversations**.
2. From the **Inboxes** list, select an Inbox.
3. From the **Conversations** list, select your conversation where you want to assign a priority.
4. On the right side of the conversation chat, go to **Details > Conversation Actions**.
5. Under the **Conversation Labels** section, click **Add Labels**.
6. Scroll or type to search for a label, then click a label. You can add multiple labels at once.
The label will be added to the conversation.
## Change Inboxes
When a conversation is initiated, it is automatically assigned to the inbox defined in the Cognigy.AI Flow. However, you can change the inbox for an existing conversation if needed.
Agents can only assign conversations to the inboxes they have access to. Supervisors and Administrators, who have access to all inboxes, can assign conversations to any inbox.
To change an inbox for a specific conversation within Live Agent, follow these steps:
1. In the left-side menu of Live Agent, click **Conversations**.
2. From the **Inboxes** list, select an Inbox. All available inboxes are visible depending on the user's role.
3. From the **Conversations** list, select the conversation where you want to change the inbox.
4. On the right side of the conversation chat, go to **Details > Conversation Actions**.
5. From the **Change Inboxes** list, select the desired inbox.
After selecting a new inbox, the page will refresh to ensure all agents can see the conversation in the newly assigned inbox.
If you want to change inboxes for multiple conversations, follow these steps:
1. In the left-side menu of Live Agent, click **Conversations**.
2. From the **Conversations** list, select the conversations where you want to change the inbox and click  .
3. From the **Inboxes** list, select an Inbox. All available inboxes are visible depending on the user's role.
4. Confirm the action by clicking **Assign**.
After selecting a new inbox, the page will refresh to ensure all agents can see the conversations in the newly assigned inbox.
## More Information
* [Manual Assignment](/live-agent/conversation/conversation-routing/manual-mode)
* [Automatic Assignment](/live-agent/conversation/conversation-routing/automatic-mode)
.
3. From the **Inboxes** list, select an Inbox. All available inboxes are visible depending on the user's role.
4. Confirm the action by clicking **Assign**.
After selecting a new inbox, the page will refresh to ensure all agents can see the conversations in the newly assigned inbox.
## More Information
* [Manual Assignment](/live-agent/conversation/conversation-routing/manual-mode)
* [Automatic Assignment](/live-agent/conversation/conversation-routing/automatic-mode)