> ## Documentation Index
> Fetch the complete documentation index at: https://docs.cognigy.com/llms.txt
> Use this file to discover all available pages before exploring further.
# Set up a Cognigy.AI Endpoint for Handover
> Configure a Live Agent Endpoint for Live Agent in Cognigy.AI to hand over conversations from AI Agents to humans.
Live Agent has been put in maintenance mode. The product will continue to be maintained in the foreseeable future. Users can continue to fully rely on Live Agent being available. In future releases, only security updates and bug fixes will be provided; no new features will be released.
When you create a new Agent in Cognigy.AI you are prompted to select an Endpoint. You can select, for example, **Cognigy Webchat** as a specific Endpoint to the Cognigy.AI platform.
For more information, see [Endpoints](https://docs.cognigy.com/ai/endpoints/overview/).
If you want to integrate a Handover process in your Flow, you need to configure your Endpoint for Handover.
## Prerequisites
Before setting up the Endpoint, check whether these steps are done:
* [Live Agent is set up for your Organization](/live-agent/getting-started/live-agent-setup/live-agent-setup-org)
* [The Inbox is created for your Live Agent Account](/live-agent/getting-started/live-agent-setup/live-agent-setup-inbox)
## Handover Configuration
To configure the Handover Settings of your Endpoint, follow these steps:
1. In the left-side menu of the Cognigy.AI interface, select **Deploy > Endpoint**.
2. Click **+New Endpoint**.
3. In the **New Endpoint** window, add an Endpoint name and select your AI Agent Flow that hands you over to a human agent.
4. In the **Endpoint type** list, select the Webchat Endpoint.
5. Enter a unique name and click **Save**.
6. Go to **Handover Settings**.
7. Select **Cognigy Live Agent** from the **Handover Platform** list.
To configure your **Live Agent**, you have two options:
1. You can use the **pre-configured Live Agent** Account for a Handover, which is mapped to the Cognigy.AI organization.
2. You can manually configure the Live Agent handover by deactivating the **Handover to pre-configured Live Agent account** using the toggle switch.
Both options are described below.
## Handover to pre-configured Live Agent
If the toggle switch for the **Handover to pre-configured Live Agent account** option is activated, conversations will be transferred to the Live Agent Account mapped to the current Cognigy.AI organization.
If you have on-premises installation, set the following environment variables in your Cognigy.AI installation:
```txt theme={null}
FEATURE_USE_COGNIGY_LIVE_AGENT: true
COGNIGY_LIVE_AGENT_API_BASE_URL_WITH_PROTOCOL:
COGNIGY_LIVE_AGENT_PLATFORM_TOKEN:
```
You can find these environment variables in the [value.yaml](https://github.com/Cognigy/cognigy-ai-helm-chart/blob/main/values.yaml) configuration file.
## Handover to Manually Configured Live Agent
To configure your Live Agent manually, follow these steps:
1. Open the Endpoint Editor and deactivate in field **Handover Settings** the **Handover to pre-configured Live Agent account** option using the toggle switch.
2. Enter the **Base URL** for the Live Agent instance. The Base URL is your Live Agent installation URL, extended by `plus /api/v1`. For example, in the Cognigy Trial environment `https://liveagent-trial.cognigy.ai/api/v1` is the Base URL where `https://liveagent-trial.cognigy.ai` is the Live Agent URL.
3. Enter the **Account ID** and the **API Key**. How to find the **Account ID** and the **API Key**, see sections below.
4. Click **Save** to confirm your Live Agent settings.
Your Live Agent has been configured.
## Find an Account ID
You can find the Account ID in the Live Agent URL of your Live Agent **Inbox**.
To locate the ID, follow these steps:
1. Open your Live Agent Account and go to **Settings > Inboxes**.
2. In the Inboxes list, find the Inbox of your project, and click the **Settings** icon next to the Inbox.
3. The Inbox settings will be displayed, and you will see the address line of your browser as follows: `https://liveagent-/app/accounts//settings/inboxes/`. For example, in the URL `https://liveagent-dev.cognigy.ai/app/accounts/2/settings/inboxes/32852`, the Account ID is 2.
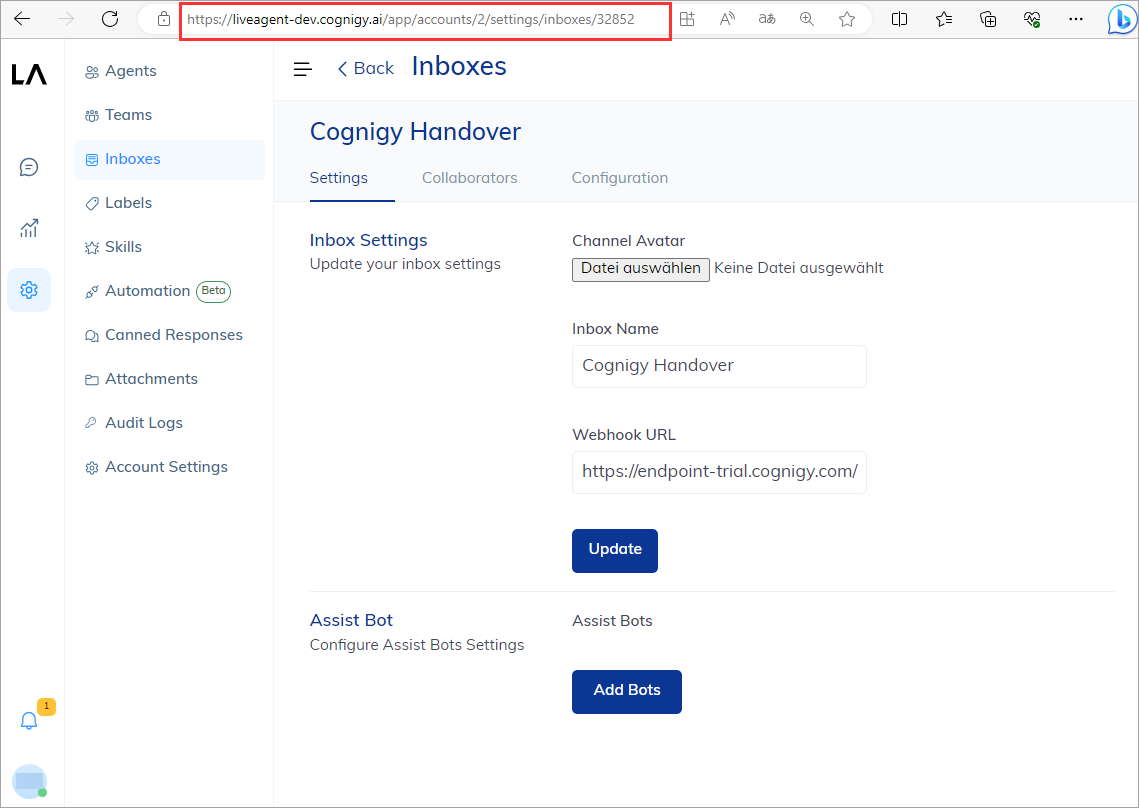 When you have found the Account ID, you can enter it in the **Handover Settings** of your Endpoint in Cognigy.AI.
## Find API Keys
1. Click the **Profile Settings** icon of your Account in the bottom-left corner of the Live Agent dashboard, then select **Profile Settings** in the selection menu.
2. Find the **Access Token** section, showing your API Key.
3. Copy the API Key and paste it into the **API Key** field of your Endpoint in Cognigy.AI.
## What's Next?
When the Endpoint is configured, [set up your Flow for Handover to Live Agent](/live-agent/getting-started/live-agent-setup/live-agent-setup-handover-flow)
When you have found the Account ID, you can enter it in the **Handover Settings** of your Endpoint in Cognigy.AI.
## Find API Keys
1. Click the **Profile Settings** icon of your Account in the bottom-left corner of the Live Agent dashboard, then select **Profile Settings** in the selection menu.
2. Find the **Access Token** section, showing your API Key.
3. Copy the API Key and paste it into the **API Key** field of your Endpoint in Cognigy.AI.
## What's Next?
When the Endpoint is configured, [set up your Flow for Handover to Live Agent](/live-agent/getting-started/live-agent-setup/live-agent-setup-handover-flow)