> ## Documentation Index
> Fetch the complete documentation index at: https://docs.cognigy.com/llms.txt
> Use this file to discover all available pages before exploring further.
# Getting Started with Webchat v3
> Learn how to create an AI Agent, build a conversation Flow, deploy using Webchat v3, and configure settings including feedback forms and conversation starters.
In this tutorial, you will create an AI Agent from scratch, build a conversation using Basic Nodes, deploy this agent using Webchat v3, and test the Flow in Demo Webchat mode. Additionally, you will configure several Webchat settings: add a feedback form, customize the homepage by changing the welcome text, and include conversation starters.
## Prerequisites
Cognigy.AI version 4.72 or later.
## Create a Project
Create a project that involves building an AI Agent:
1. In the upper-left corner of the **Main** page, click **+ Create Project**.
2. On the **Basic settings for your Project** page, specify a name for your agent in the **Project Name** field, for example, `AI Project`.
3. Click **Create Empty Project**.
Once the project creation is complete, you can proceed with building the AI Agent.
## Build a Flow
To build an AI Agent, follow these steps:
1. In the left-side menu of the Project, navigate to **Build > Flows**.
2. Create a new Flow by clicking **+ New Flow** in the upper-right corner.
3. In the **New Flow** window, do the following:
3.1. Add a unique name, for example, `Getting Started`.
3.2. Add a relevant description, for example, `Getting Started Guide for Webchat v3`.
3.3. Click **Create**.
4. In the Flow editor, create a new Node by clicking **+** and selecting a Question Node from the list.
5. In the Question Node editor, set up the following parameters:
5.1. From the **Question Type** list, select **Text**.
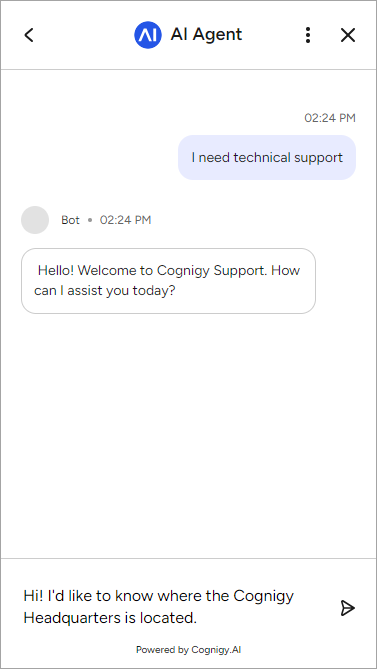
5.2. In the **Text** field, enter the following sentences: `Hello! Welcome to Cognigy Support. How can I assist you today?`
5.3. Click **Save Node**.
6. Below the Question Node, add a Say Node.
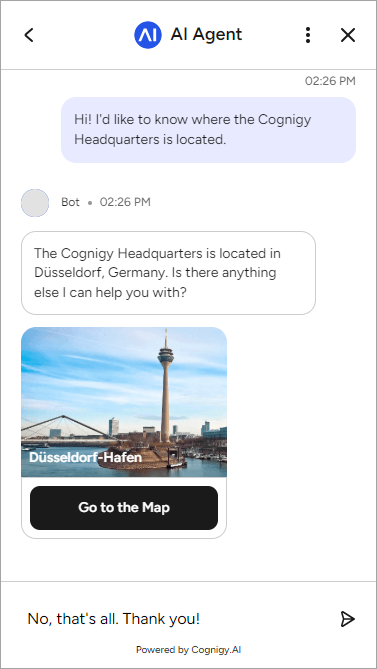
7. In the Say Node editor, go to the **Text** field and enter the following sentences: `The Cognigy Headquarters is located in Düsseldorf, Germany. Is there anything else I can help you with?`
8. Click **Save Node**.
9. Below the Say Node, add the second one.
10. In the second Say Node, set up the following parameters:
10.1. From the **Question Type** list, select **Gallery**.
10.2. Click **Add Card**.
10.3. Open the card settings by clicking the image card.
10.4. In the **Image URL** field, enter the `https://docs.cognigy.com/webchat/images/europe-office-cognigy.png` URL and click **Done**.
10.5. In the **Title** field, enter `Düsseldorf-Hafen`.
10.6. Click **Add**, then **Empty Tile**.
10.7. In the **Button Title** field, enter `Go to the Map`.
10.8. From the **Select Button Type** list, choose **URL**.
10.9. In the **URL** field, enter the `https://maps.app.goo.gl/nWgwUdgaPABkSFZC7` URL and click **Save**.
11. Click **Save Node**.
12. Below the second Say Node, add a **Wait for Input** Node.
13. Below the **Wait for Input** Node, add the third Say Node.
14. In the Say Node editor, go to the **Text** field and enter the following sentences: `You're welcome! If you have a moment, please rate your experience with our support today in the Chat options.`
15. Click **Save Node**.
Once your AI Agent is created, you can deploy it via the Webchat v3 Endpoint.
## Create an Endpoint
To create a Webchat Endpoint v3, follow these steps:
1. In the left-side menu of the Project, go to **Deploy > Endpoints**.
2. On the **Endpoints** page, click **+ New Endpoint**.
3. In the **New Endpoint** section, do the following:
3.1. Select the **Webchat (v3)** Endpoint type.
3.2. Add a unique name.
3.3. Select a Flow that you created on the [previous step](#build-a-flow).
4. Click **Save**.
Now you can change the default settings of the Webchat v3 Endpoint.
### Customize Webchat
To customize settings within the Webchat v3 Endpoint, follow these steps:
1. Go to the **Home Screen** settings.
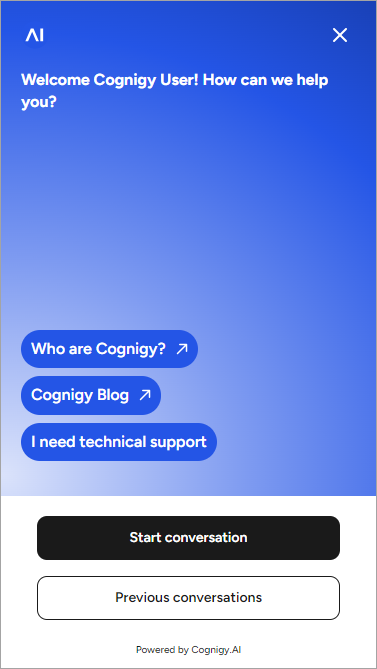
2. In the **Change Welcome Text** field, enter the following text: `Welcome Cognigy User! How can we help you?`
3. In the **Conversation Starters** section, activate **Enable Conversation Starters** and click **Add**.
4. In the **Title** field, enter `Who are Cognigy?`
5. From the **Type** list, select **URL**.
6. In the **URL** field, enter `https://www.cognigy.com/`.
7. Click **Add**.
8. In the **Title** field, enter `Cognigy Blog`.
9. From the **Type** list, select **URL**.
10. In the **URL** field, enter `https://www.cognigy.com/blog`.
11. Click **Add**.
12. In the **Title** field, enter `I need technical support`.
13. From the **Type** list, select **Postback Value**. Using this type, the user will immediately enter a chat with an agent to start a conversation.
14. In the **Postback Value** field, enter `technical-support`.
15. Go to the **Chat Options** section.
16. In the **Conversation Rating** settings, select **Always** from the **Enable Rating Functionality** list.
17. Click **Save**.
Once the Webchat v3 settings are configured, proceed to test the AI Agent.
## Test your AI Agent
To test your AI Agent via Demo Webchat, follow these steps:
1. In the upper-right corner of the **Endpoint Editor** page, select **Open Demo Webchat**. A home screen of Webchat v3 opens.
2. Click the button **I need technical Support** that triggers a conversation with the AI Agent.
 3. Reply to the AI Agent with the following message: `Hi! I'd like to know where the Cognigy Headquarters is located`.
 4. The agent sends you the answer, which contains the location and a link to the map, and asks if further assistance is needed. Send the following message as a reply: `No, that's all. Thank you!`
 5. When you send a reply, the AI Agent asks you to leave feedback on the Chat Options screen. In the upper-right corner of the current page, click
  .
.
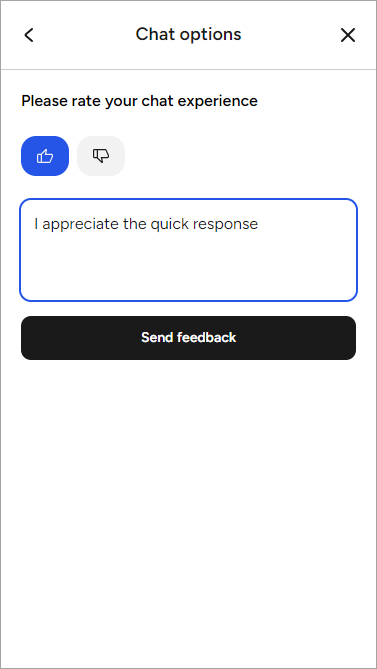
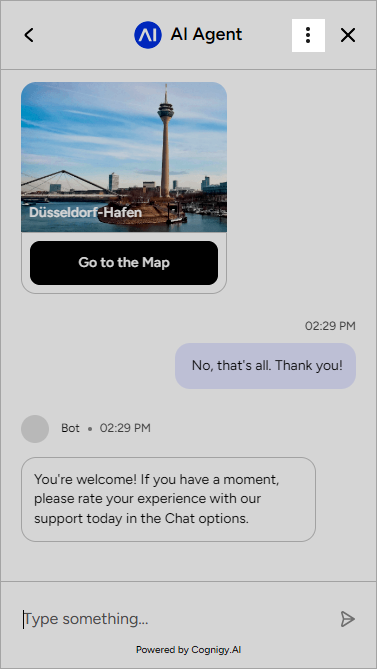 6. On the Chat Options screen, click
  (**thumbs up**) and leave the message `I appreciate the quick response` in the feedback field. Click **Send feedback**.
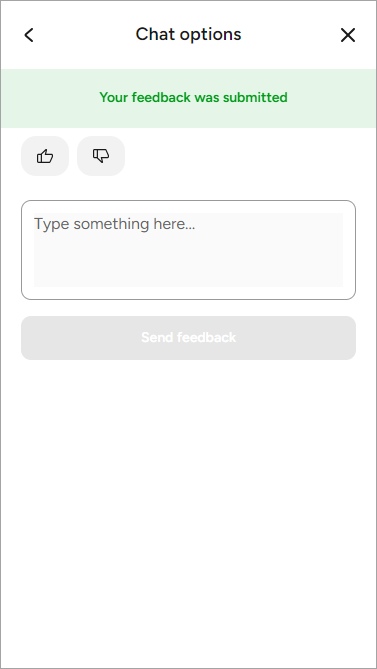
 7. After submitting feedback, a notification about the sent message will appear at the top of the window. The user can give feedback an unlimited number of times. Return to the conversation you started or view earlier conversations on the home screen. For navigation, use the **\<** button in the upper-left corner of the screen.
 ## What's Next?
* [Explore the key features of Webchat v3](/webchat/v3/features)
* [Discover the Endpoint settings to tailor Webchat v3 according to your preferences](/webchat/v3/configuration)
* [Learn how to deploy the application on your website](/webchat/v3/embedding/hosted-script)
## What's Next?
* [Explore the key features of Webchat v3](/webchat/v3/features)
* [Discover the Endpoint settings to tailor Webchat v3 according to your preferences](/webchat/v3/configuration)
* [Learn how to deploy the application on your website](/webchat/v3/embedding/hosted-script)