> ## Documentation Index
> Fetch the complete documentation index at: https://docs.cognigy.com/llms.txt
> Use this file to discover all available pages before exploring further.
# Build your First xApp
> Build your first xApp in Cognigy, using Adaptive Cards to create login and registration forms for AI Agents.
In this tutorial, you will learn how to create a simple xApp from scratch. You will create an AI Agent that asks users whether they are new or existing customers. If the user already exists, the AI Agent directs them to an xApp that collects their login data. If the user is new, the AI Agent guides them to an xApp that collects registration information.
## Configure a Basic xApp Flow
1. Create a new Flow in Cognigy and name it `Basic xApp Tutorial`.
2. In the Flow editor, add an **xApp: Init Session** Node to initialize the xApp session.
3. Below the **xApp: Init Session** Node, add an **xApp: Show Adaptive Card** Node to update the initialized xApp session with a new **Adaptive Card-based xApp** page.
4. In the **AdaptiveCard Definition** field, paste the following JSON:
```json theme={null}
{
"type": "AdaptiveCard",
"body": [
{
"type": "TextBlock",
"size": "Medium",
"weight": "Bolder",
"text": "Please provide your customer status"
},
{
"type": "Input.ChoiceSet",
"id": "status",
"choices": [
{
"title": "New Customer",
"value": "new"
},
{
"title": "Existing Customer",
"value": "existing"
}
],
"placeholder": "Select Customer Status"
}
],
"actions": [
{
"type": "Action.Submit",
"title": "Submit"
}
],
"$schema": "http://adaptivecards.io/schemas/adaptive-card.json",
"version": "1.6"
}
```
5. Click **Save Node**.
6. Below the **xApp: Show Adaptive Card** Node, add a **Question** Node. This Node will be used to prompt the user, via the primary channel, to provide data through the xApp. It will then wait for the xApp's submit input before proceeding with further Flow execution.
7. Set the **xApp** question type to ensure only data from the xApp will be accepted as a valid answer.
8. Select the **Text with Buttons** output type to display a button with the xApp URL.
9. Configure the prompt message to instruct users to enter their email using the xApp. In the **Text** field, paste the following text:
```text theme={null}
Welcome to the xApp tutorial. Take a look at your xApp
```
10. Click **Add** button. Fill in the following fields:
* **Button Title** — enter `Open xApp`.
* **Selection Button Type** — select **URL** from the list.
* **URL** — click  and select the **xApp Session URL** Token.
* **URL Target** — select **Open URL in a new tab**.
11. Click **Save**.
12. If a user types anything in the chat, inform them that they need to use the xApp URL to enter their email. To do that, go to the **Reprompt Options** section and paste the following reprompt message:
```text theme={null}
I can't continue before you make your selection in the xApp
```
13. Click **Save Node**.
14. Below the **Question** Node, add an **If** Node to your Flow and set the conditions to:
```text theme={null}
input.data._cognigy._app.payload.status = 'new'
```
This allows you to update the xApp session with a different xApp passed based on the user's selection.
15. Click **Save Node**.
16. In the **If-Then** case, add an **xApp: Show Adaptive Card** Node to update the initialized xApp session with a new Adaptive Card-based xApp page.
17. In the **AdaptiveCard Definition** field, paste the following JSON:
```json theme={null}
{
"$schema": "http://adaptivecards.io/schemas/adaptive-card.json",
"type": "AdaptiveCard",
"version": "1.0",
"body": [
{
"type": "TextBlock",
"text": "Full Name",
"size": "Medium"
},
{
"type": "Input.Text",
"id": "fullName"
},
{
"type": "TextBlock",
"text": "Date of Birth",
"size": "Medium"
},
{
"type": "Input.Date",
"id": "dateOfBirth"
},
{
"type": "TextBlock",
"text": "Email",
"size": "Medium"
},
{
"type": "Input.Text",
"id": "email",
"style": "email",
"placeholder": "example@domain.com"
}
],
"actions": [
{
"type": "Action.Submit",
"title": "Submit"
}
]
}
```
This will ask the user to provide their name, date of birth and email address.
18. Click **Save Node**.
19. Repeat the same Node for the **If-Else** case and paste the following JSON:
```json theme={null}
{
"$schema": "http://adaptivecards.io/schemas/adaptive-card.json",
"type": "AdaptiveCard",
"version": "1.0",
"body": [
{
"type": "Input.Text",
"placeholder": "Username",
"id": "username"
},
{
"type": "Input.Text",
"placeholder": "Password",
"id": "password",
"style": "password"
},
{
"type": "ActionSet",
"actions": [
{
"type": "Action.Submit",
"title": "Submit"
}
]
}
]
}
```
This will ask the user to log in via their username and password.
20. Click **Save** Node.
21. Below the **If-Then** and **If-Else** cases, add a new **Question** Node. This Node will be used to wait for the xApp input.
22. Click **Save Node**.
23. In the end, add a **Say** Node.
24. In the Text field, paste the following text:
```txt theme={null}
Thank you, we got all of the data!
{{JSON.stringify(input.data._cognigy._app.payload, undefined, 4)}}
```
25. Click **Save Node**.
Once you built your first xApp, you can test your xApp via the Interaction Panel.
## Test the App via the Interaction Panel
1. Open the Interaction Panel and enter a message like `Hi` to trigger the Flow.
2. In the Interaction Panel, click **Open xApp** to access the xApp session. By the way, you can also check the **Info** tab to see the xApp's URL in the `input.apps.url` input object.
and select the **xApp Session URL** Token.
* **URL Target** — select **Open URL in a new tab**.
11. Click **Save**.
12. If a user types anything in the chat, inform them that they need to use the xApp URL to enter their email. To do that, go to the **Reprompt Options** section and paste the following reprompt message:
```text theme={null}
I can't continue before you make your selection in the xApp
```
13. Click **Save Node**.
14. Below the **Question** Node, add an **If** Node to your Flow and set the conditions to:
```text theme={null}
input.data._cognigy._app.payload.status = 'new'
```
This allows you to update the xApp session with a different xApp passed based on the user's selection.
15. Click **Save Node**.
16. In the **If-Then** case, add an **xApp: Show Adaptive Card** Node to update the initialized xApp session with a new Adaptive Card-based xApp page.
17. In the **AdaptiveCard Definition** field, paste the following JSON:
```json theme={null}
{
"$schema": "http://adaptivecards.io/schemas/adaptive-card.json",
"type": "AdaptiveCard",
"version": "1.0",
"body": [
{
"type": "TextBlock",
"text": "Full Name",
"size": "Medium"
},
{
"type": "Input.Text",
"id": "fullName"
},
{
"type": "TextBlock",
"text": "Date of Birth",
"size": "Medium"
},
{
"type": "Input.Date",
"id": "dateOfBirth"
},
{
"type": "TextBlock",
"text": "Email",
"size": "Medium"
},
{
"type": "Input.Text",
"id": "email",
"style": "email",
"placeholder": "example@domain.com"
}
],
"actions": [
{
"type": "Action.Submit",
"title": "Submit"
}
]
}
```
This will ask the user to provide their name, date of birth and email address.
18. Click **Save Node**.
19. Repeat the same Node for the **If-Else** case and paste the following JSON:
```json theme={null}
{
"$schema": "http://adaptivecards.io/schemas/adaptive-card.json",
"type": "AdaptiveCard",
"version": "1.0",
"body": [
{
"type": "Input.Text",
"placeholder": "Username",
"id": "username"
},
{
"type": "Input.Text",
"placeholder": "Password",
"id": "password",
"style": "password"
},
{
"type": "ActionSet",
"actions": [
{
"type": "Action.Submit",
"title": "Submit"
}
]
}
]
}
```
This will ask the user to log in via their username and password.
20. Click **Save** Node.
21. Below the **If-Then** and **If-Else** cases, add a new **Question** Node. This Node will be used to wait for the xApp input.
22. Click **Save Node**.
23. In the end, add a **Say** Node.
24. In the Text field, paste the following text:
```txt theme={null}
Thank you, we got all of the data!
{{JSON.stringify(input.data._cognigy._app.payload, undefined, 4)}}
```
25. Click **Save Node**.
Once you built your first xApp, you can test your xApp via the Interaction Panel.
## Test the App via the Interaction Panel
1. Open the Interaction Panel and enter a message like `Hi` to trigger the Flow.
2. In the Interaction Panel, click **Open xApp** to access the xApp session. By the way, you can also check the **Info** tab to see the xApp's URL in the `input.apps.url` input object.
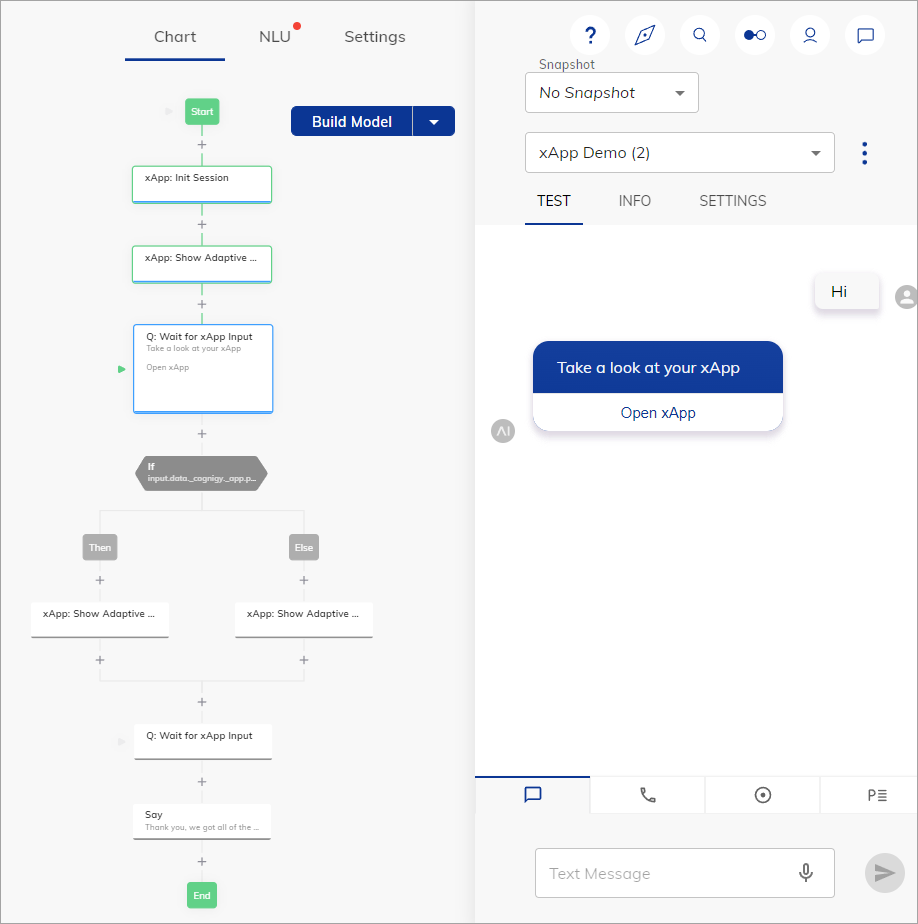 3. Open the URL in a new tab to view the xApp with the Adaptive Card and select your customer status.
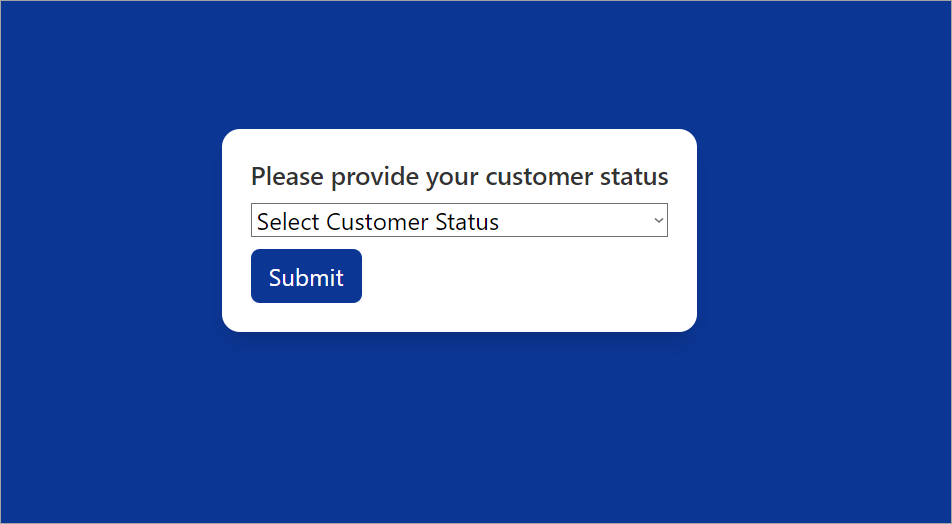 4. When you select **New Customer** and submit the action, a new page will be loaded.
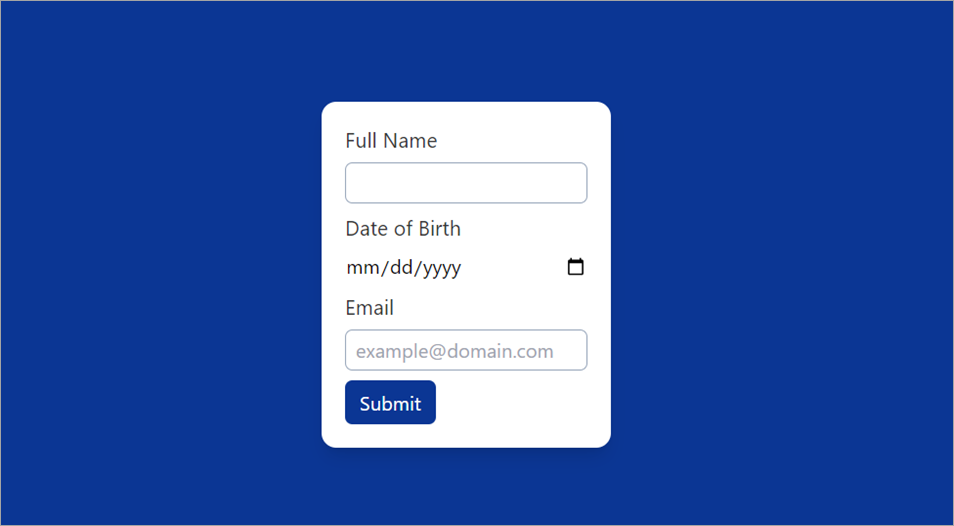 5. You can submit data in the entry fields and observe the behavior, for example, `Dan Schneider`, `01.01.1999`, and `dan@cognigy.com`.
6. Check the input result via the Interaction Panel.
5. You can submit data in the entry fields and observe the behavior, for example, `Dan Schneider`, `01.01.1999`, and `dan@cognigy.com`.
6. Check the input result via the Interaction Panel.
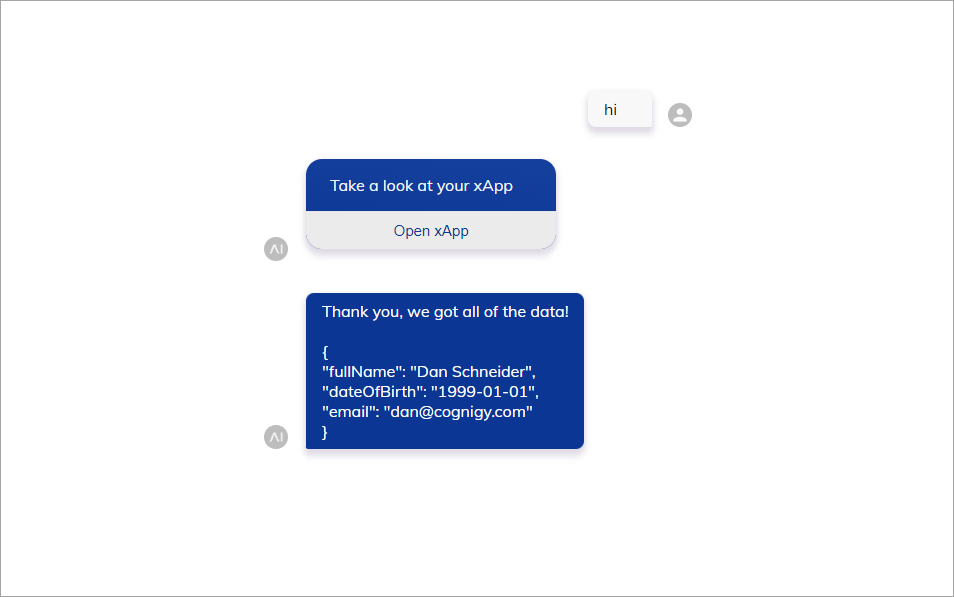 You can download a Cognigy Package with the [xApp Flow example](https://docscognigyassets.blob.core.windows.net/assets/Flow-xApp-Demo.zip).
## More Information
* [Ready-made examples of xApps](https://github.com/Cognigy/xApps/tree/main)
* [xApp Nodes](/ai/agents/develop/node-reference/xApp/overview)
* [Build an xApp](/xApps/build/overview)
* [xApps](/xApps/overview)
You can download a Cognigy Package with the [xApp Flow example](https://docscognigyassets.blob.core.windows.net/assets/Flow-xApp-Demo.zip).
## More Information
* [Ready-made examples of xApps](https://github.com/Cognigy/xApps/tree/main)
* [xApp Nodes](/ai/agents/develop/node-reference/xApp/overview)
* [Build an xApp](/xApps/build/overview)
* [xApps](/xApps/overview)