Received info:
"{{JSON.stringify(input.data, null, 2)}}"
```
4. Click **Save Node**.
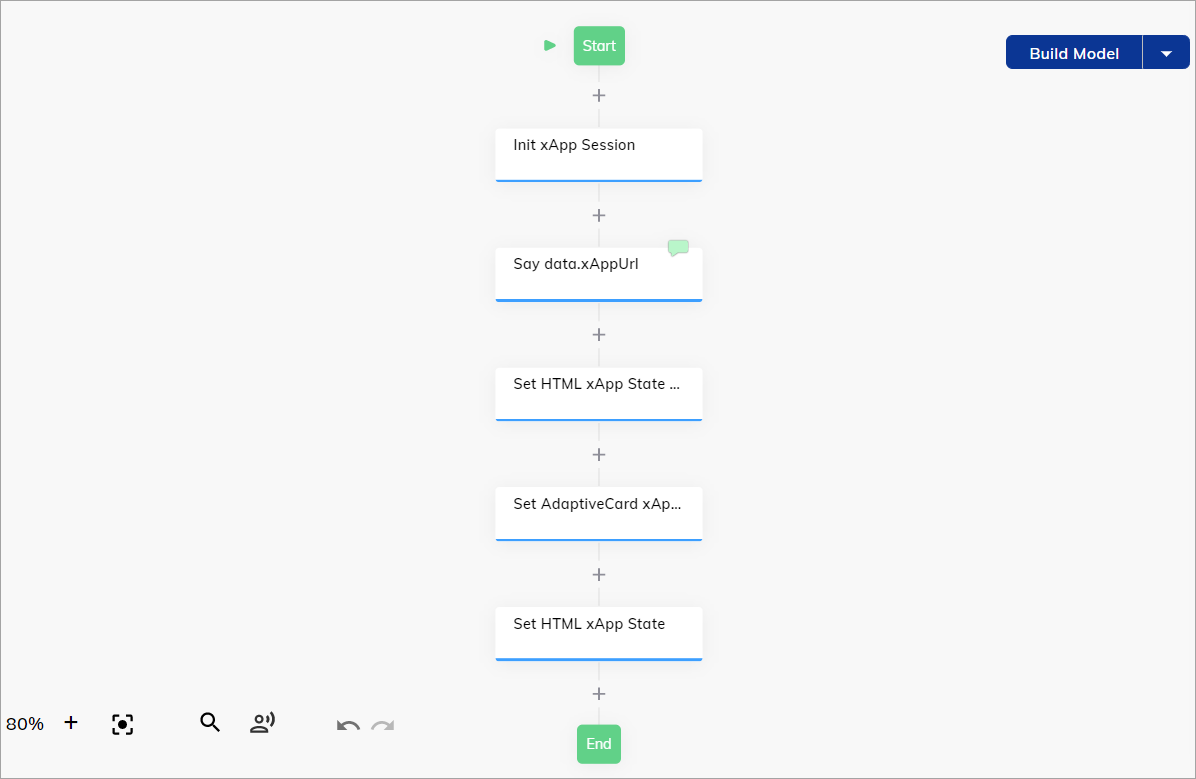
### xApp: Show Adaptive Card Node
1. Below the **Question** Node, add the **xApp: Show Adaptive Card** Node.
2. In the **AdaptiveCard Definition** field, specify the following code:
```json theme={null}
{
"$schema": "http://adaptivecards.io/schemas/adaptive-card.json",
"type": "AdaptiveCard",
"version": "1.5",
"body": [
{
"type": "Container",
"items": [
{
"type": "TextBlock",
"text": "Tell us about yourself",
"weight": "Bolder",
"size": "Medium",
"wrap": true,
"style": "heading"
},
{
"type": "TextBlock",
"text": "We just need a few more details to get you booked for the trip of a lifetime!",
"isSubtle": true,
"wrap": true
},
{
"type": "Input.Text",
"id": "name",
"label": "Your name (Last, First)",
"isRequired": true,
"regex": "^[A-Z][a-z]+, [A-Z][a-z]+$",
"errorMessage": "Please enter your name in the specified format",
"value": "Doe, John"
},
{
"type": "Input.Text",
"id": "email",
"label": "Your email",
"regex": "^[A-Za-z0-9._%+-]+@[A-Za-z0-9.-]+[.][A-Za-z0-9-]{2,4}$",
"isRequired": true,
"errorMessage": "Please enter a valid email address",
"style": "Email",
"value": "john@doe.cc"
},
{
"type": "Input.Text",
"id": "phone",
"label": "Phone Number (xxx xxx xxxx)",
"regex": "^\\(?([0-9]{3})\\)?[-.\\s]?([0-9]{3})[-.\\s]?([0-9]{4})$",
"errorMessage": "Invalid phone number. Please enter a 10 digit phone number",
"style": "Tel"
}
]
}
],
"actions": [
{
"type": "Action.Submit",
"title": "Submit",
"style": "positive"
}
]
}
```
3. Under **Waiting Behavior**, select **Wait for xApp User Input**.
4. Click **Save Node**.
### xApp: Show HTML Node
1. Below the **xApp: Show Adaptive Card** Node, add an **xApp: Show HTML** Node.
2. In the **Content** field, select **Full HTML Document**.
3. In the **HTML Document** field, specify the following code:
```html theme={null}
Received info:
 Now you can test the result via the Interaction Panel.
## Test the Flow
1. Open the Interaction Panel and enter a message like `Hi` to trigger the Flow.
2. In the Interaction Panel, expand the **Event/Message with payload** section to access the xApp session. Also, you can check the **Info** tab to see the xApp's URL in the `input.apps.url` input object.
3. Open the xApp's URL.
4. Once the page is opened, click **Ok**. The Adaptive Card form will be loaded.
5. In the **Phone Number** field, specify a mobile number and click **Submit**.
Now you can test the result via the Interaction Panel.
## Test the Flow
1. Open the Interaction Panel and enter a message like `Hi` to trigger the Flow.
2. In the Interaction Panel, expand the **Event/Message with payload** section to access the xApp session. Also, you can check the **Info** tab to see the xApp's URL in the `input.apps.url` input object.
3. Open the xApp's URL.
4. Once the page is opened, click **Ok**. The Adaptive Card form will be loaded.
5. In the **Phone Number** field, specify a mobile number and click **Submit**.
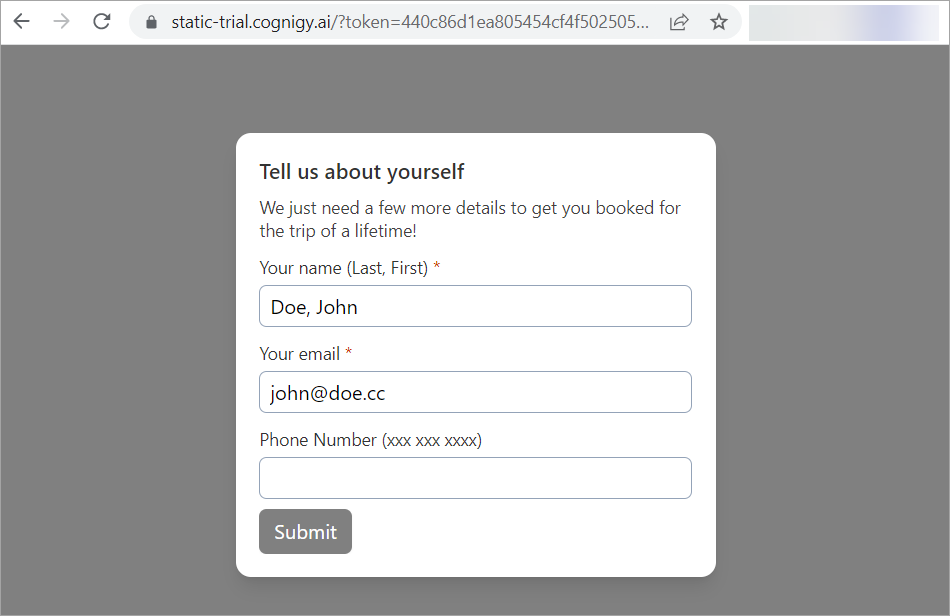 If the operation is successful, you will receive the following message: `Thank you for the info. You can now close this tab`.
After that, you can deploy your xApp.
## Deploy the xApp
1. Go to **Deploy > Endpoints**.
2. Click **+ New Endpoint**.
3. Select the **Rest** Endpoint from the list.
4. Specify a unique name and select the corresponding Flow.
5. In the Endpoint editor, go to the **Transformer Functions** section.
6. Activate the **Enable Input Transformer** and **Enable Execution Finished Transformer** settings.
7. In the **Transformer** field, specify the following code:
```js theme={null}
const generateId = () => 'xxxx-xxxx-xxxx-xxxx'.replace(/x/g, () => String.fromCharCode(97 + Math.random() * 25))
createRestTransformer({
handleInput: async ({ endpoint, request, response }) => {
const userId = 'xapp-user'
const sessionId = generateId()
const text = 'GET_STARTED'
const data = request.query
return { userId, sessionId, text, data }
},
handleOutput: async ({ output, endpoint, userId, sessionId }) => {
return output
},
handleExecutionFinished: async ({ processedOutput, outputs, userId, sessionId, endpoint, response }) => {
const { xAppUrl } = processedOutput.data
if (xAppUrl) {
response
.redirect(xAppUrl)
// .status(200)
// .header('Content-Type', 'application/json')
// .send(JSON.stringify({ processedOutput, outputs }, null, 2))
}
return processedOutput
}
})
```
8. Click **Save**.
To check if the xApp was deployed as expected, copy and paste the Endpoint URL into your browser's address bar and test your Flow again.
## More Information
* [xApp Nodes](/ai/agents/develop/node-reference/xApp/overview)
* [Build an xApp](/xApps/build/overview)
* [xApps](/xApps/overview)
If the operation is successful, you will receive the following message: `Thank you for the info. You can now close this tab`.
After that, you can deploy your xApp.
## Deploy the xApp
1. Go to **Deploy > Endpoints**.
2. Click **+ New Endpoint**.
3. Select the **Rest** Endpoint from the list.
4. Specify a unique name and select the corresponding Flow.
5. In the Endpoint editor, go to the **Transformer Functions** section.
6. Activate the **Enable Input Transformer** and **Enable Execution Finished Transformer** settings.
7. In the **Transformer** field, specify the following code:
```js theme={null}
const generateId = () => 'xxxx-xxxx-xxxx-xxxx'.replace(/x/g, () => String.fromCharCode(97 + Math.random() * 25))
createRestTransformer({
handleInput: async ({ endpoint, request, response }) => {
const userId = 'xapp-user'
const sessionId = generateId()
const text = 'GET_STARTED'
const data = request.query
return { userId, sessionId, text, data }
},
handleOutput: async ({ output, endpoint, userId, sessionId }) => {
return output
},
handleExecutionFinished: async ({ processedOutput, outputs, userId, sessionId, endpoint, response }) => {
const { xAppUrl } = processedOutput.data
if (xAppUrl) {
response
.redirect(xAppUrl)
// .status(200)
// .header('Content-Type', 'application/json')
// .send(JSON.stringify({ processedOutput, outputs }, null, 2))
}
return processedOutput
}
})
```
8. Click **Save**.
To check if the xApp was deployed as expected, copy and paste the Endpoint URL into your browser's address bar and test your Flow again.
## More Information
* [xApp Nodes](/ai/agents/develop/node-reference/xApp/overview)
* [Build an xApp](/xApps/build/overview)
* [xApps](/xApps/overview)