> ## Documentation Index
> Fetch the complete documentation index at: https://docs.cognigy.com/llms.txt
> Use this file to discover all available pages before exploring further.
# Build an xApp with Multiple Channels
> Build a multi-channel xApp that complements voice and SMS channels, collecting user data via a Twilio-linked xApp form.
In this tutorial, you will learn how to build an xApp that can complement a primary channel, the voice channel,
to cover a certain use case that cannot be ideally covered via the voice channel.
The xApp will be used to collect the email address from the users.
As part of this tutorial,
it will also be implemented that the link to the xApp will be shared with the customers via a text message.
## Prerequisites
* Access to a [voice provider](/ai/administer/access/project-settings), for example, Microsoft Azure Speech Services.
* [Twilio API Key](https://www.twilio.com/docs/glossary/what-is-an-api-key#how-can-i-create-api-keys).
* Twilio Extension preinstalled from [Cognigy Marketplace](/ai/for-developers/extensions).
* [Voice Gateway Endpoint](/ai/agents/deploy/endpoint-reference/voice-gateway) configured in Cognigy.
## Configure a Basic xApp Flow
1. Create a new Flow in Cognigy and name it `Multichannel App Tutorial`.
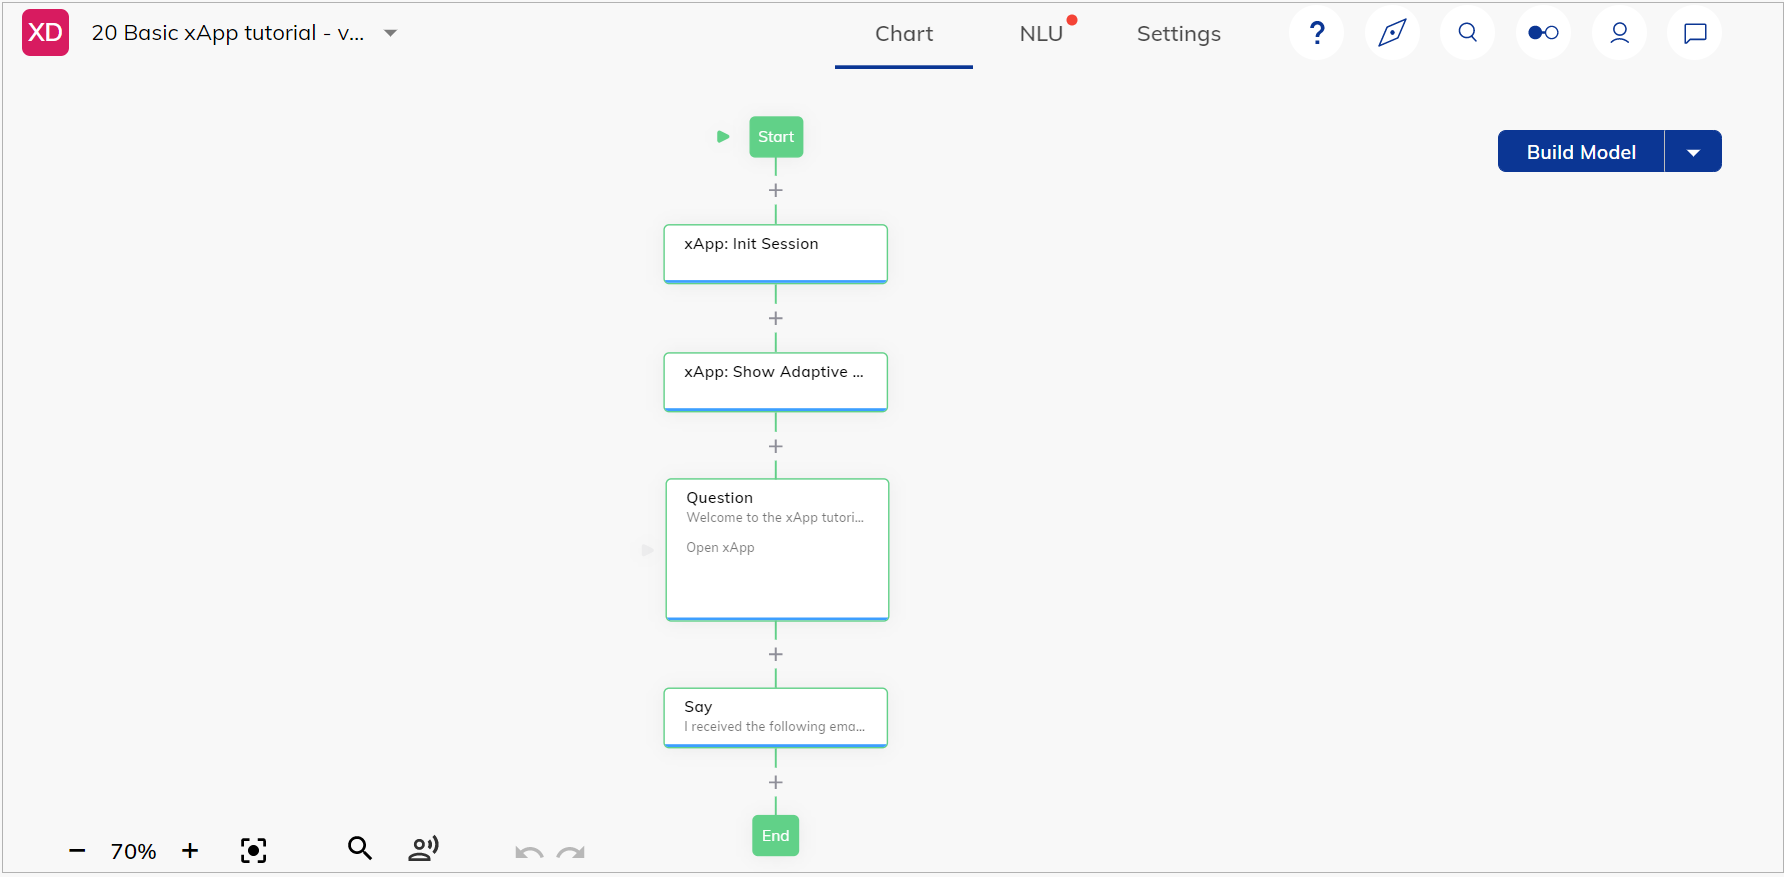
2. In the Flow editor, add an **xApp: Init Session Node** to initialize the xApp session.
3. Below the **xApp: Init Session** Node, add an **xApp: Show Adaptive Card** Node to update the initialized xApp session with a new Adaptive Card-based xApp page.
4. In the **AdaptiveCard Definition** field, paste the following JSON:
```json theme={null}
{
"$schema": "http://adaptivecards.io/schemas/adaptive-card.json",
"type": "AdaptiveCard",
"version": "1.5",
"body": [
{
"type": "TextBlock",
"text": "Demo xApp form",
"weight": "Bolder",
"size": "Medium",
"wrap": true,
"style": "heading"
},
{
"type": "Input.Text",
"id": "myEmail",
"label": "Your email",
"regex": "^[A-Za-z0-9._%+-]+@[A-Za-z0-9.-]+[.][A-Za-z0-9-]{2,4}$",
"isRequired": true,
"errorMessage": "Please enter a valid email address",
"style": "Email"
}
],
"actions": [
{
"type": "Action.Submit",
"title": "Submit",
"style": "positive"
}
]
}
```
5. Click **Save Node**.
6. Below **xApp: Show Adaptive Card** Node, add a **Question** Node. This Node will be used to prompt the user, via the primary channel, to provide data through the xApp. It will then wait for the xApp's submit input before proceeding with further Flow execution.
7. Set the **xApp** question type to ensure only data from the xApp will be accepted as a valid answer.
8. Select the **Text with Buttons** output type to display a button with the xApp URL.
9. Configure the prompt message to instruct users to enter their email using the xApp. In the **Text** field, paste the following text:
```txt theme={null}
Welcome to the xApp tutorial. Please enter your email in the xApp using the link which I texted you via SMS
```
10. Copy and paste the text from the **Text with Buttons** setting to the **Textual Description** field, as a voice channel doesn't support the **Text with Buttons** setting.
11. Click **Add button**. Fill in the following fields:
* **Button Title** — enter **Open xApp**.
* **Selection Button Type** — select the **URL** from the list.
* **URL** — click  and select the **xApp Session URL** Token.
* **URL Target** — select **Open URL in a new tab**.
12. If a user types anything in the chat, inform them that they need to use the xApp URL to enter their email. To do that, go to the **Reprompt Options** section and paste the following reprompt message:
```txt theme={null}
I can't continue before you enter the email in the xApp
```
13. Click **Save**.
14. Click **Save Node**.
15. Below the **Question** Node, add a **Say** Node.
16. In the **Text** field, paste the following text:
```txt theme={null}
I received the following email: {{input.data._cognigy._app.payload.myEmail}}
Goodbye!
```
17. Click **Save Node**.
and select the **xApp Session URL** Token.
* **URL Target** — select **Open URL in a new tab**.
12. If a user types anything in the chat, inform them that they need to use the xApp URL to enter their email. To do that, go to the **Reprompt Options** section and paste the following reprompt message:
```txt theme={null}
I can't continue before you enter the email in the xApp
```
13. Click **Save**.
14. Click **Save Node**.
15. Below the **Question** Node, add a **Say** Node.
16. In the **Text** field, paste the following text:
```txt theme={null}
I received the following email: {{input.data._cognigy._app.payload.myEmail}}
Goodbye!
```
17. Click **Save Node**.
 ## Configure Voice Channel Support
1. Below the **Say** Node, add a **Hang Up** Voice Gateway Node at the end of the Flow to terminate the conversation after email confirmation.
2. In the **Reason for hang up** field, specify **Bot ended the call**.
3. Click **Save Node**.
## Implement SMS Functionality
1. Below the **xApp: Show Adaptive Card** Node, add an **IF** Node to check if the caller number is available in the input metadata. This step is optional but helps distinguish between different channels in testing scenarios.
2. In the **If** Node, add the **VG: Caller Number** condition.
3. Click **Save Node**.
4. If the caller number is available, add a **Send SMS** Node using a service like Twilio.
5. In the **Send SMS** Node, fill in the following fields:
* **Twilio Connection** — specify an API key that you previously got from your Twilio account.
* **Sender Number** — set the sender number.
* **Receiver Number** — specify the **VG: Caller Number** condition.
* **Message Body** — customize the SMS message to include the xApp session URL.
6. Click **Save Node**.
Once you create the xApp, test your Flow via the Interaction Panel.
## Test the Flow with a Voice Channel
1. Use the Interaction Panel's voice call feature to test the Flow. Ensure the voice preview settings in the agent's settings are properly configured.
2. Call the specified voice gateway number from your phone.
3. Follow the conversation prompts and observe the Flow's behavior.
## Configure Voice Channel Support
1. Below the **Say** Node, add a **Hang Up** Voice Gateway Node at the end of the Flow to terminate the conversation after email confirmation.
2. In the **Reason for hang up** field, specify **Bot ended the call**.
3. Click **Save Node**.
## Implement SMS Functionality
1. Below the **xApp: Show Adaptive Card** Node, add an **IF** Node to check if the caller number is available in the input metadata. This step is optional but helps distinguish between different channels in testing scenarios.
2. In the **If** Node, add the **VG: Caller Number** condition.
3. Click **Save Node**.
4. If the caller number is available, add a **Send SMS** Node using a service like Twilio.
5. In the **Send SMS** Node, fill in the following fields:
* **Twilio Connection** — specify an API key that you previously got from your Twilio account.
* **Sender Number** — set the sender number.
* **Receiver Number** — specify the **VG: Caller Number** condition.
* **Message Body** — customize the SMS message to include the xApp session URL.
6. Click **Save Node**.
Once you create the xApp, test your Flow via the Interaction Panel.
## Test the Flow with a Voice Channel
1. Use the Interaction Panel's voice call feature to test the Flow. Ensure the voice preview settings in the agent's settings are properly configured.
2. Call the specified voice gateway number from your phone.
3. Follow the conversation prompts and observe the Flow's behavior.
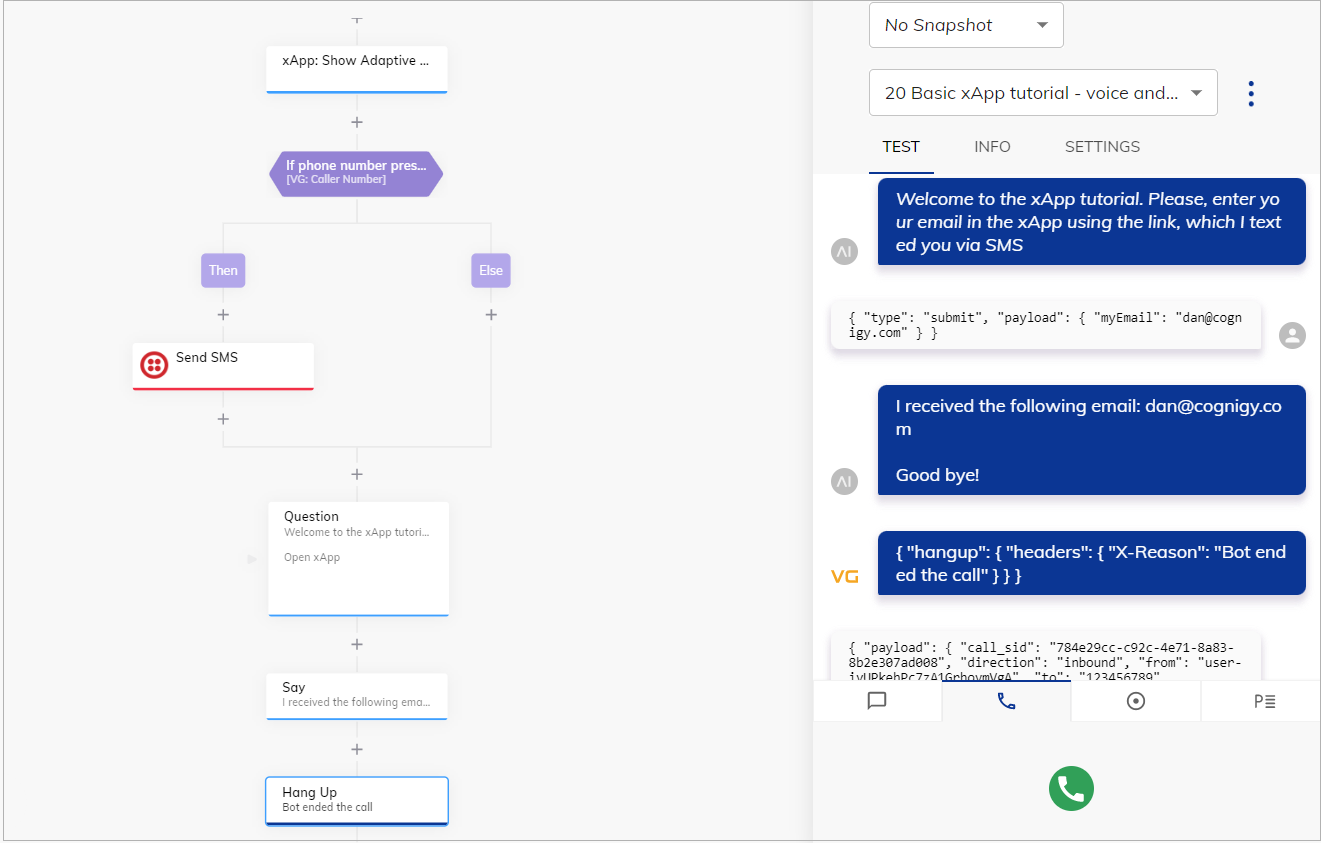 Note that the voice fallback text will be used instead of buttons.
The conversation should progress only when the user enters data through the xApp.
## More Information
* [xApp Nodes](/ai/agents/develop/node-reference/xApp/overview)
* [Build an xApp](/xApps/build/overview)
* [xApps](/xApps/overview)
Note that the voice fallback text will be used instead of buttons.
The conversation should progress only when the user enters data through the xApp.
## More Information
* [xApp Nodes](/ai/agents/develop/node-reference/xApp/overview)
* [Build an xApp](/xApps/build/overview)
* [xApps](/xApps/overview)