> ## Documentation Index
> Fetch the complete documentation index at: https://docs.cognigy.com/llms.txt
> Use this file to discover all available pages before exploring further.
# Chatwoot
Updated in 4.97
 ## Description
The Chatwoot handover provider bridges Cognigy.AI and [Chatwoot](https://www.chatwoot.com/),
enabling end users to connect with human agents working in a contact center that uses Chatwoot.
Chatwoot integration allows users to receive text messages, files, videos (MP4), images (JPG, PNG), and GIFs.
Cognigy.AI supports Chatwoot API v1.19.0, custom agent bot names and descriptions, full conversation history.
## Prerequisites
* Access to [Chatwoot](https://www.chatwoot.com/). You can also run Chatwoot on an [on-premises environment](https://www.chatwoot.com/docs/self-hosted).
* Created Endpoint [compatible with Chatwoot](/ai/agents/deploy/endpoints/handover-settings#endpoints-compatible-with-handover-providers).
* You need two IDs that are listed in the Chatwoot address line:
* **Account ID** — a unique identifier assigned to you as the user.
* **Inbox ID** — not unique and is created again for each channel.
## Description
The Chatwoot handover provider bridges Cognigy.AI and [Chatwoot](https://www.chatwoot.com/),
enabling end users to connect with human agents working in a contact center that uses Chatwoot.
Chatwoot integration allows users to receive text messages, files, videos (MP4), images (JPG, PNG), and GIFs.
Cognigy.AI supports Chatwoot API v1.19.0, custom agent bot names and descriptions, full conversation history.
## Prerequisites
* Access to [Chatwoot](https://www.chatwoot.com/). You can also run Chatwoot on an [on-premises environment](https://www.chatwoot.com/docs/self-hosted).
* Created Endpoint [compatible with Chatwoot](/ai/agents/deploy/endpoints/handover-settings#endpoints-compatible-with-handover-providers).
* You need two IDs that are listed in the Chatwoot address line:
* **Account ID** — a unique identifier assigned to you as the user.
* **Inbox ID** — not unique and is created again for each channel.
Both IDs are required to use the new Inbox channel. You can find them in your Chatwoot URL. For example, `https://app.chatwoot.com/app/account/6607/inbox/5446`, where the Account ID is `6607` and the Inbox ID is `5446`.
## Configuration on the Handover Provider Side
To enable agents to handle handovers, add them in your Chatwoot instance:
1. Go to the Chatwoot home page.
2. In the left-side **Settings** menu, select **Agents**.
3. Add a new agent as needed.
To configure Chatwoot to receive incoming messages via a webhook:
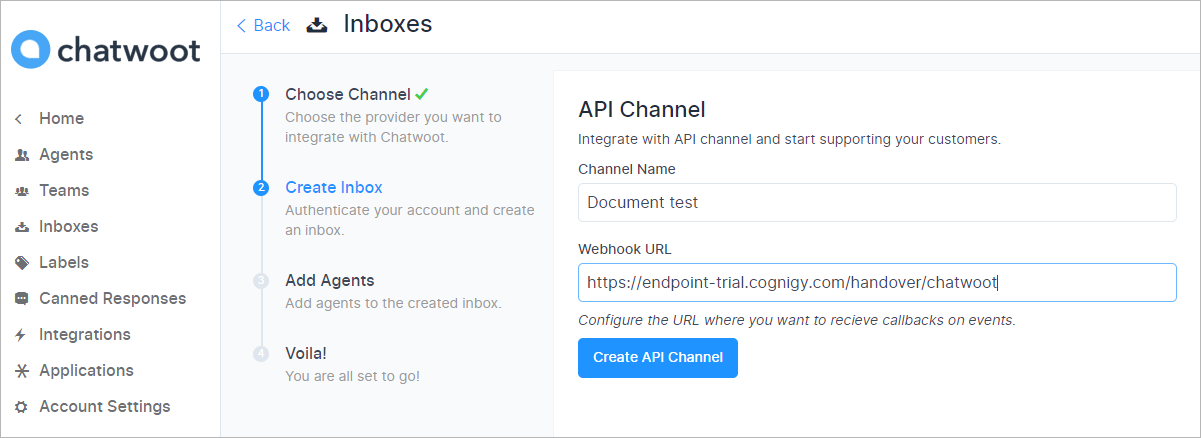
1. On the Chatwoot main page, go to the left-side menu and click **Inboxes**.
2. Click **Add Inbox** to start creating a new inbox.
3. Select **API channel** and provide a channel name.
4. In the **Webhook URL** field, enter your Cognigy Endpoint Base URL appended with `/handover/chatwoot/`, for example, `https://endpoint-trial.cognigy.com/handover/chatwoot`.
5. Click **Create API Channel**.
6. Assign an agent to the inbox by selecting them and clicking **Add agents**.
 The new API channel will now appear in your Chatwoot Inbox list.
## Configuration on the Cognigy.AI Side
To link your Cognigy.AI Endpoint to Chatwoot:
1. Go to **Deploy > Handover Providers**.
2. Click **+ New Handover Provider** and select **Chatwoot** as the handover provider.
3. Enter the **Base URL** for your Chatwoot instance, which is your Chatwoot installation URL extended with `/api/v1`, for example, `https://app.chatwoot.com/api/v1`. For on-premises setups, use your custom Chatwoot API URL.
4. Provide the Chatwoot **Account ID**.
5. Enter the Chatwoot **API Key**.
6. Click **Save** to store the configuration.
7. Test the setup by clicking **Open Webchat** and initiating a conversation that triggers a handover.
To specify the Chatwoot Inbox for the handover:
1. In the Flow editor, add a **Handover to Human Agent** Node.
2. Open the Node editor and go to the **Chatwoot Settings** section.
3. In the **Chatwoot Inbox Id** field, enter the Inbox ID. You can use [CognigyScript](/ai/platform-features/cognigyscript) to dynamically select an Inbox ID based on the conversation context.
When the Handover Node is triggered during a conversation, the handover process will begin, and the user's message will appear in the specified Chatwoot Inbox. In Chatwoot, user messages are shown on the left, while agent responses appear on the right.
Human agents can resolve a conversation once the user's request is addressed. If the user sends a new request, the human agent can reopen the conversation in Chatwoot to continue assisting.
## More Information
* [All Providers](/ai/escalate/handover-reference/overview)
* [Handover](/ai/escalate/handovers)
The new API channel will now appear in your Chatwoot Inbox list.
## Configuration on the Cognigy.AI Side
To link your Cognigy.AI Endpoint to Chatwoot:
1. Go to **Deploy > Handover Providers**.
2. Click **+ New Handover Provider** and select **Chatwoot** as the handover provider.
3. Enter the **Base URL** for your Chatwoot instance, which is your Chatwoot installation URL extended with `/api/v1`, for example, `https://app.chatwoot.com/api/v1`. For on-premises setups, use your custom Chatwoot API URL.
4. Provide the Chatwoot **Account ID**.
5. Enter the Chatwoot **API Key**.
6. Click **Save** to store the configuration.
7. Test the setup by clicking **Open Webchat** and initiating a conversation that triggers a handover.
To specify the Chatwoot Inbox for the handover:
1. In the Flow editor, add a **Handover to Human Agent** Node.
2. Open the Node editor and go to the **Chatwoot Settings** section.
3. In the **Chatwoot Inbox Id** field, enter the Inbox ID. You can use [CognigyScript](/ai/platform-features/cognigyscript) to dynamically select an Inbox ID based on the conversation context.
When the Handover Node is triggered during a conversation, the handover process will begin, and the user's message will appear in the specified Chatwoot Inbox. In Chatwoot, user messages are shown on the left, while agent responses appear on the right.
Human agents can resolve a conversation once the user's request is addressed. If the user sends a new request, the human agent can reopen the conversation in Chatwoot to continue assisting.
## More Information
* [All Providers](/ai/escalate/handover-reference/overview)
* [Handover](/ai/escalate/handovers)