> ## Documentation Index
> Fetch the complete documentation index at: https://docs.cognigy.com/llms.txt
> Use this file to discover all available pages before exploring further.
# Genesys Cloud Open Messaging
Updated in 2026.4
 The Genesys Cloud Open Messaging handover provider bridges Cognigy.AI and [Genesys](https://login.mypurecloud.com/), enabling end users to connect with human agents working in a contact center that uses Genesys Cloud CX.
The Genesys Cloud Open Messaging handover provider is based on [Open Messaging APIs](https://developer.genesys.cloud/commdigital/digital/openmessaging/openmessaging-apis). [Open messaging](https://developer.genesys.cloud/commdigital/digital/openmessaging/) facilitates integrations between Genesys Cloud and a third-party messaging service through a webhook.
## Prerequisites
* Access to [Genesys Cloud](https://login.mypurecloud.com/).
* Create an Endpoint [compatible with Genesys Cloud Open Messaging](/ai/agents/deploy/endpoints/handover-settings#endpoints-compatible-with-handover-providers).
* Activate Genesys Cloud Open Messaging on the Cognigy.AI side:
* If you have a SaaS installation, contact Cognigy technical support.
* If you have an on-premises installation, specify the following feature flags: `FEATURE_ENABLE_GENESYS_CLOUD_OM="true"`, `FEATURE_ENABLE_GENESYS_CLOUD_OM_WHITELIST="organization1,organization2"`, `FEATURE_USE_GENESYS_BOT_CONNECTOR_ENDPOINT_WHITELIST="organization1,organization2"`. To enable the Genesys Cloud Open Messaging handover provider for all organizations in your installation, use `*` instead of a list of organizations.
* To detect handover completion in Genesys:
* Starting from Cognigy 4.100, migrate to [Amazon EventBridge](/ai/escalate/handover-reference/genesys-cloud-open-messaging-with-amazon-eventbridge) using the Amazon EventBridge Genesys connector to send requests to Cognigy.AI.
* For Cognigy 4.99 and earlier versions, you have two options:
* By default, Cognigy 4.99 and earlier use a WebSocket connection via the Notifications API to detect handover completion in Genesys. However, this approach has [limitations](https://developer.genesys.cloud/notificationsalerts/notifications/#usage-limitations) and may not always be reliable.
* As an alternative, you can configure [HTTP webhooks](/ai/escalate/handover-reference/genesys-cloud-open-messaging-handover-end-detection) using Triggers and Web Services Data Actions to send requests to Cognigy.AI.
## Restrictions
* The Genesys Cloud Open Messaging can't be used in the [trial environment](https://trial.cognigy.ai/).
## Configuration on the Handover Provider Side
Before starting the integration with Cognigy, build the Genesys Cloud Open Messaging configuration on the Genesys Cloud CX side.
To create a platform config for Genesys Cloud Open Messaging, follow these steps:
1. In the Genesys Cloud interface, click **Menu** in the upper-left corner and go to **Digital and Telephony > Message > Platform Configurations**.
2. In the upper-right corner, click **+ Create Profile**.
3. In the **Create a configuration profile** window, enter a unique name for the platform configuration and click **Create**.
4. In the left-side menu, select **Platform Integrations**.
5. On the **Messaging Platforms** page, click **+ Create New Integration** and select **Open Messaging**.
6. On the **Open Messaging** page, fill in the following fields:
* **Name** — enter a name without spaces for your integration. Copy and save this name. You need to specify this name in the **Deployment name** field on the Cognigy side.
* **Outbound Notification Webhook URL** — enter `https://endpoint-/handover/genesysCloudOM`. For example, `https://endpoint-app.cognigy.ai/handover/genesysCloudOM`, where environment is `app.cognigy.ai`.
* **Outbound Notification Webhook Signature Secret Token** — enter the secret into the X-Hub-Signature-256 header generation for webhook requests sent to the outbound notification webhook URL. For the secret, you can choose any arbitrary but sufficiently random string that you want. The external service should use the secret and signature to validate the message originating from Genesys Cloud. This validation is optional but recommended. For more information about validation, see [Validate webhook notifications in the Genesys Cloud Developer Center](https://developer.genesys.cloud/commdigital/digital/openmessaging/validate). Copy and save this token for future use in Cognigy.AI. Note that if you don't copy and save this token, you will need to recreate it after saving the platform configuration.
7. Click **Save**.
8. From the **Platform Config** list, select the config that you created in Platform Configurations.
9. From the **Supported Content Profile** list, select `default`. Save changes.
Your Open Messaging platform will appear in the platform list.
To create a Queue, follow these steps:
1. In the left-side menu, select **User Management > Queues**.
2. On the **Queues** page, click **+ Create Queue**. The **Create Queue** panel opens on the right side.
3. In the **Create Queue** panel, fill in the following fields:
* **Name** — enter a unique name of the queue. Save and copy this name for later use.
* **Division** — select `Home`.
4. Click **Save**. Your queue will appear in the queue list.
5. Open the queue settings by selecting the queue from the list.
6. In your browser's address bar, find and copy the queue ID from the URL. The ID is located between `/queues/` and `/general`. For example, in the URL, `https://apps.mypurecloud.de/directory/#/admin/organization/queues/d59d0280-6664-4896-ad42-1a2715b7178e/general`, copy the ID `d59d0280-6664-4896-ad42-1a2715b7178e`.
7. Save the queue ID for later use in Cognigy.AI.
To create an Inbound Message flow, follow these steps:
1. In the left-side menu, select **Orchestration > Architect**.
2. Hover over the
The Genesys Cloud Open Messaging handover provider bridges Cognigy.AI and [Genesys](https://login.mypurecloud.com/), enabling end users to connect with human agents working in a contact center that uses Genesys Cloud CX.
The Genesys Cloud Open Messaging handover provider is based on [Open Messaging APIs](https://developer.genesys.cloud/commdigital/digital/openmessaging/openmessaging-apis). [Open messaging](https://developer.genesys.cloud/commdigital/digital/openmessaging/) facilitates integrations between Genesys Cloud and a third-party messaging service through a webhook.
## Prerequisites
* Access to [Genesys Cloud](https://login.mypurecloud.com/).
* Create an Endpoint [compatible with Genesys Cloud Open Messaging](/ai/agents/deploy/endpoints/handover-settings#endpoints-compatible-with-handover-providers).
* Activate Genesys Cloud Open Messaging on the Cognigy.AI side:
* If you have a SaaS installation, contact Cognigy technical support.
* If you have an on-premises installation, specify the following feature flags: `FEATURE_ENABLE_GENESYS_CLOUD_OM="true"`, `FEATURE_ENABLE_GENESYS_CLOUD_OM_WHITELIST="organization1,organization2"`, `FEATURE_USE_GENESYS_BOT_CONNECTOR_ENDPOINT_WHITELIST="organization1,organization2"`. To enable the Genesys Cloud Open Messaging handover provider for all organizations in your installation, use `*` instead of a list of organizations.
* To detect handover completion in Genesys:
* Starting from Cognigy 4.100, migrate to [Amazon EventBridge](/ai/escalate/handover-reference/genesys-cloud-open-messaging-with-amazon-eventbridge) using the Amazon EventBridge Genesys connector to send requests to Cognigy.AI.
* For Cognigy 4.99 and earlier versions, you have two options:
* By default, Cognigy 4.99 and earlier use a WebSocket connection via the Notifications API to detect handover completion in Genesys. However, this approach has [limitations](https://developer.genesys.cloud/notificationsalerts/notifications/#usage-limitations) and may not always be reliable.
* As an alternative, you can configure [HTTP webhooks](/ai/escalate/handover-reference/genesys-cloud-open-messaging-handover-end-detection) using Triggers and Web Services Data Actions to send requests to Cognigy.AI.
## Restrictions
* The Genesys Cloud Open Messaging can't be used in the [trial environment](https://trial.cognigy.ai/).
## Configuration on the Handover Provider Side
Before starting the integration with Cognigy, build the Genesys Cloud Open Messaging configuration on the Genesys Cloud CX side.
To create a platform config for Genesys Cloud Open Messaging, follow these steps:
1. In the Genesys Cloud interface, click **Menu** in the upper-left corner and go to **Digital and Telephony > Message > Platform Configurations**.
2. In the upper-right corner, click **+ Create Profile**.
3. In the **Create a configuration profile** window, enter a unique name for the platform configuration and click **Create**.
4. In the left-side menu, select **Platform Integrations**.
5. On the **Messaging Platforms** page, click **+ Create New Integration** and select **Open Messaging**.
6. On the **Open Messaging** page, fill in the following fields:
* **Name** — enter a name without spaces for your integration. Copy and save this name. You need to specify this name in the **Deployment name** field on the Cognigy side.
* **Outbound Notification Webhook URL** — enter `https://endpoint-/handover/genesysCloudOM`. For example, `https://endpoint-app.cognigy.ai/handover/genesysCloudOM`, where environment is `app.cognigy.ai`.
* **Outbound Notification Webhook Signature Secret Token** — enter the secret into the X-Hub-Signature-256 header generation for webhook requests sent to the outbound notification webhook URL. For the secret, you can choose any arbitrary but sufficiently random string that you want. The external service should use the secret and signature to validate the message originating from Genesys Cloud. This validation is optional but recommended. For more information about validation, see [Validate webhook notifications in the Genesys Cloud Developer Center](https://developer.genesys.cloud/commdigital/digital/openmessaging/validate). Copy and save this token for future use in Cognigy.AI. Note that if you don't copy and save this token, you will need to recreate it after saving the platform configuration.
7. Click **Save**.
8. From the **Platform Config** list, select the config that you created in Platform Configurations.
9. From the **Supported Content Profile** list, select `default`. Save changes.
Your Open Messaging platform will appear in the platform list.
To create a Queue, follow these steps:
1. In the left-side menu, select **User Management > Queues**.
2. On the **Queues** page, click **+ Create Queue**. The **Create Queue** panel opens on the right side.
3. In the **Create Queue** panel, fill in the following fields:
* **Name** — enter a unique name of the queue. Save and copy this name for later use.
* **Division** — select `Home`.
4. Click **Save**. Your queue will appear in the queue list.
5. Open the queue settings by selecting the queue from the list.
6. In your browser's address bar, find and copy the queue ID from the URL. The ID is located between `/queues/` and `/general`. For example, in the URL, `https://apps.mypurecloud.de/directory/#/admin/organization/queues/d59d0280-6664-4896-ad42-1a2715b7178e/general`, copy the ID `d59d0280-6664-4896-ad42-1a2715b7178e`.
7. Save the queue ID for later use in Cognigy.AI.
To create an Inbound Message flow, follow these steps:
1. In the left-side menu, select **Orchestration > Architect**.
2. Hover over the  icon on the **Flows** tab and select **Inbound Message**.
3. Click **+ Add** in the upper-left corner. The **Create 'Inbound Message Flow'** dialog box opens.
4. In the **Name** field, enter a unique name for the inbound message flow.
5. From the **Divisions** list, select the division to assign the flow to.
6. Click **Create Flow**. The flow's configuration page opens.
7. In the **Search Toolbox** field, enter `Send Response` and drag the action below the **Start** action in the messaging flow editor.
8. In the **Message Body** field of the **Send Response** action, enter `Connected` and select **Literal** from the list next to the field.
9. *(Optional)* Below the **Send Response** action, add the [Get Participant Data](https://help.mypurecloud.com/articles/get-participant-data-action/) action.
10. *(Optional)* In the **Get Participant Data** editor, click **+** and add the following attributes:
| Attribute | Name | Value |
| --------- | ---------- | ------------ |
| 1 | `Queue ID` | `queueId` |
| 2 | `Language` | `myLanguage` |
| 3 | `Skills` | `mySkills` |
| 4 | `User ID` | `userId` |
11. *(Optional)* For debugging purposes, you can send this data to the human agent within a conversation. To do that, below the **Get Participant Data** action, add a second **Send Response** action. In the message body, enter the attributes in a [message sequence with the String Builder](https://help.mypurecloud.com/articles/set-up-a-message-sequence-with-the-string-builder/).
12. Below the **Send Response** action, place the [Transfer to ACD](https://help.mypurecloud.com/articles/transfer-acd-action/) action to transfer an interaction to a queueing system.
13. In the **Queue** field of the **Transfer to ACD** action, select the queue to which you want to transfer the interaction.
14. In the upper-left corner, click **Save**, then **Publish**.
After creating your inbound message flow, you will see this flow in the architect list.
To learn more about designing the flow, refer to the [Configure Inbound Message Flow](https://help.mypurecloud.com/articles/inbound-message-flows/) documentation.
To set up Message Routing, follow these steps:
1. Go to the Genesys Cloud interface, click **Menu** in the upper-left corner and select **Orchestration > Routing > Message Routing**.
2. In the upper-right corner, click **+ Attach New Addresses to a Flow**. The **Attach New Addresses** page opens.
3. From the **Select Flow** list, select the Inbound Message Flow you created.
4. From the **Select Addresses** section, choose the Open Messaging platform you created and click **Attach Address**. Save changes.
Your Message Routing configuration will appear in the message routing list.
To configure credentials, follow these steps:
1. In the left-side menu, select **IT and Integrations > OAuth**, then click **+ Add Client**.
2. On the **Add New Client** page, configure the following:
* **App Name** — enter a unique name for the client.
* **Grant Types** — select **Client Credentials**. Click **Next**.
3. In the **Roles** list, activate the corresponding role for the client. The role must include at least the following permissions:
* `messaging-platform:readonly` (View messaging platform integrations)
* `conversations` (Create, edit, and delete conversation data)
* `analytics:readonly` (Query aggregate conversation data and view conversation details)
4. Click **Next**.
5. In the **Token Duration in seconds** field, enter the token expiration time. Click **Next**.
6. Click **Generate New Client Secret**, then **Confirm**.
7. Copy the Client ID and Client Secret, save them for future use, and click **Finish**. Confirm that you copied the Client ID and Client Secret in the dialog box.
8. In the left-side menu, select **Authorized Applications**.
9. In the upper-right corner, click **+ Authorize a Client**.
10. In the **Authorize Client** window, enter the Client ID that you copied previously and click **Authorize Client**.
11. (Optional) In the **Users that can use this application** section, select the roles of the users who can use this application.
12. In the **Scope** section, select the minimum scope of the application, as listed in step 3. Click **Authorize**.
Once your client is authorized, you can start configuring the Genesys Cloud Open Messaging handover provider on the Cognigy.AI side.
## Configuration on the Cognigy.AI Side
1. Go to **Deploy > Handover Providers**.
2. Click **+ New Handover Provider** and select **Genesys Open Messaging** from the list.
3. Scroll down to **Handover Settings** and select **Genesys Cloud Open Messaging** from the list.
4. Fill in the following fields:
* **Host** — enter the login URL for Genesys Cloud customers, which varies by region, such as `mypurecloud.de` for Germany. You can use the base domain like `mypurecloud.com` or `cac1.pure.cloud`, omitting the `apps.` or `login.` part. For more on Genesys Cloud regions, refer to [AWS regions for deployment](https://help.mypurecloud.com/articles/aws-regions-for-genesys-cloud-deployment/).
* **Deployment Name** — specify the Open Messaging platform name that you created [on the Genesys Cloud CX side](#configuration-on-the-handover-provider-side).
* **Queue ID** — enter the Queue ID that you copied when you created a queue [on the Genesys Cloud CX side](#configuration-on-the-handover-provider-side).
* **Webhook Secret** — specify the Outbound Notification Webhook Signature Secret Token that you created [on the Genesys Cloud CX side](#configuration-on-the-handover-provider-side).
* **Client ID** — enter the Client ID that you generated [on the Genesys Cloud CX side](#configuration-on-the-handover-provider-side).
* **Client Secret** — enter the Client Secret that you generated [on the Genesys Cloud CX side](#configuration-on-the-handover-provider-side).
5. *(Optional)* Activate the **Send Profile information** setting if you want to display human agent information, such as the first and last name, to the user. Save changes.
In the [Handover to Human Agent](/ai/agents/develop/node-reference/service/handover-to-agent) Node, configure the following settings:
* **Language** — specify a language for the conversation. For example, `english`, `spanish`, `german`.
* **Skills** — define skills for the conversation. For example, `escalation`.
* **Priority** — set the priority for the conversation. For example, `1`. If a priority is set, it triggers a flow in Genesys to prioritize or de-prioritize the conversation within the queue. Note that this functionality requires the appropriate flow to be set up in Genesys.
* **Enable User Connects Message** — notify human agents when an end user reconnects to the chat. The parameter is enabled by default. When the parameter is enabled, the message `User joined the conversation` appears in the chat as soon as the end user returns to the chat tab by clicking the **←** (back arrow) at the top bar in the browser, after having opened a new URL on the same tab as the chat.
* **Enable User Disconnects Message** — notify human agents when an end user disconnects from the chat. The parameter is enabled by default. When the parameter is enabled, the message `User left the conversation` is sent as soon as the end user closes the tab with the chat or switches to a new URL address within the current tab.
* **Display Agent Details** — display the human agent's name and avatar from Genesys in the chat for the end user. The parameter is disabled by default.
* **Custom Attributes** — add custom attributes, which allows you to include additional information. When sending custom attributes from Cognigy.AI to Genesys Cloud, you can enter them in two ways:
```json JSON String theme={null}
"{\"customerType\":\"premium\",\"tags\":[\"urgent\",\"vip\"]}"
```
```json JSON Object theme={null}
{
"customerType": "premium",
"tags": ["urgent","vip"],
"preferences": { "language": "en", "notifications": true }
}
```
Before sending to Genesys, Cognigy.AI flattens nested objects, joins or indexes arrays, converts booleans to 1/0, and skips unsupported types.
To test the connection, click **Open Demo Web Chat** in your Endpoint.
## Additional Configuration
Before using this feature, add the `GENESYS_CLOUD_OM_HANDLE_BOT_MESSAGE: "true"` feature flag.
By default, the Genesys Inbound Message flow routes messages to human agents only.
You can configure your settings so that not only human agents but also end users receive these messages.
Forwarding messages to the end user can be helpful in the following use cases:
* When the conversation status or wait time information is relevant to the end user.
* To provide the end user with updates and transparency throughout the interaction.
* To allow the end user to make informed decisions while waiting for a human agent, such as requesting a callback.
The Genesys Inbound flow is responsible for message configuration.
However, if you want to use additional logic,
such as allowing end users to see their queue position,
set up the [In-Queue Message flow](https://help.mypurecloud.com/articles/work-with-in-queue-flows/) in Genesys in addition to the Genesys Inbound flow.
Cognigy.AI is responsible for message routing logic. Follow the instructions to configure this logic:
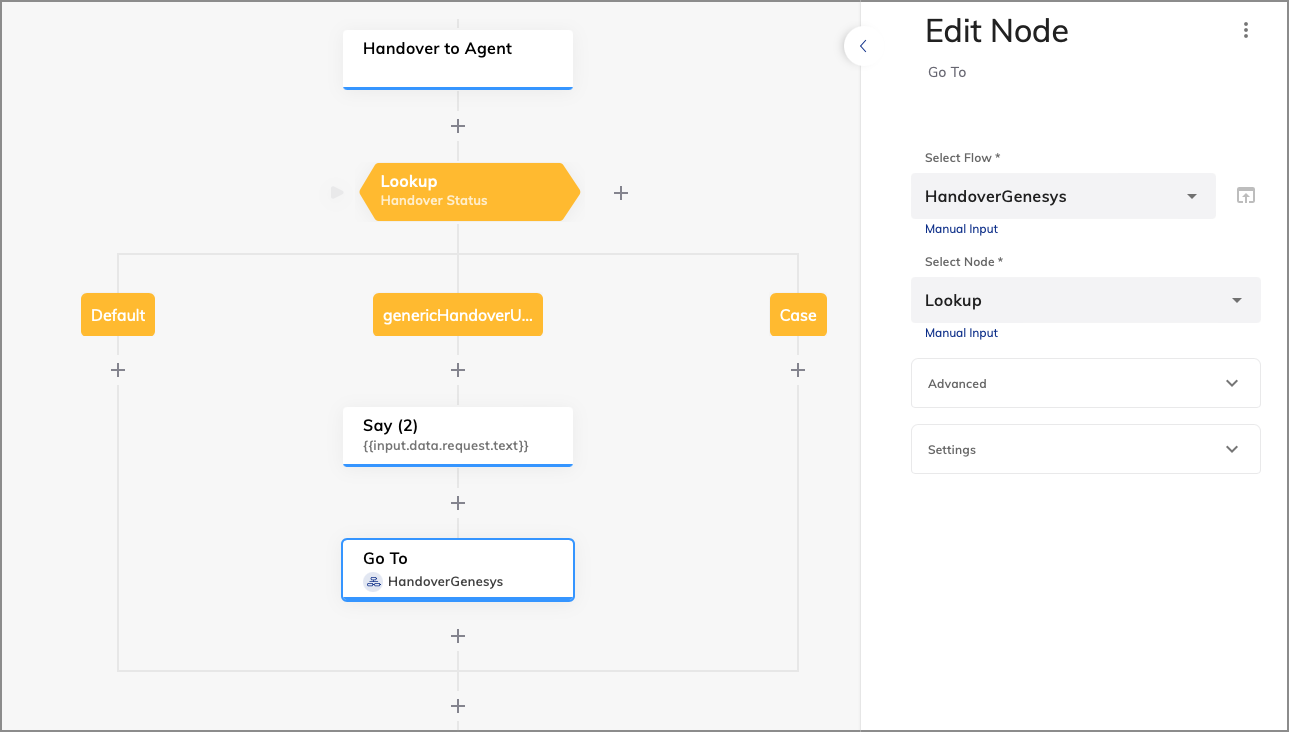
1. In your chosen Handover Flow, set a **Lookup** Node below the **Handover to Human Agent** Node. Set the **Lookup** Node as your Entrypoint.
2. For the **Type** field within the **Lookup** Node, select **Handover Status**.
3. For the child **Case** Node, specify `genericHandoverUpdate` in the **Value** field.
4. Add your **Say** Node under the **Case** Node to display the messages to the end user. Select **Text** from the **Output Type** list, and in the **Text** field enter the following **CognigyScript**: `{{ input.data.request.text }}`. The script will then query Genesys for the relevant data, such as a queue position.
5. In the Handover Settings of the **Say** Node, select **User Only** from the **Handover Output Destination** list.
6. To display all incoming Genesys Status or Bot messages, add a **Go To** Node below the **Say** Node.
7. Open the **Go To** Node. From the **Select Node** list, choose **Lookup**. Scroll down to the **Advanced** section. From the **Execution Mode** list, select **Go to Node and wait for Input**.
The main Flow on Cognigy.AI should look like this:
icon on the **Flows** tab and select **Inbound Message**.
3. Click **+ Add** in the upper-left corner. The **Create 'Inbound Message Flow'** dialog box opens.
4. In the **Name** field, enter a unique name for the inbound message flow.
5. From the **Divisions** list, select the division to assign the flow to.
6. Click **Create Flow**. The flow's configuration page opens.
7. In the **Search Toolbox** field, enter `Send Response` and drag the action below the **Start** action in the messaging flow editor.
8. In the **Message Body** field of the **Send Response** action, enter `Connected` and select **Literal** from the list next to the field.
9. *(Optional)* Below the **Send Response** action, add the [Get Participant Data](https://help.mypurecloud.com/articles/get-participant-data-action/) action.
10. *(Optional)* In the **Get Participant Data** editor, click **+** and add the following attributes:
| Attribute | Name | Value |
| --------- | ---------- | ------------ |
| 1 | `Queue ID` | `queueId` |
| 2 | `Language` | `myLanguage` |
| 3 | `Skills` | `mySkills` |
| 4 | `User ID` | `userId` |
11. *(Optional)* For debugging purposes, you can send this data to the human agent within a conversation. To do that, below the **Get Participant Data** action, add a second **Send Response** action. In the message body, enter the attributes in a [message sequence with the String Builder](https://help.mypurecloud.com/articles/set-up-a-message-sequence-with-the-string-builder/).
12. Below the **Send Response** action, place the [Transfer to ACD](https://help.mypurecloud.com/articles/transfer-acd-action/) action to transfer an interaction to a queueing system.
13. In the **Queue** field of the **Transfer to ACD** action, select the queue to which you want to transfer the interaction.
14. In the upper-left corner, click **Save**, then **Publish**.
After creating your inbound message flow, you will see this flow in the architect list.
To learn more about designing the flow, refer to the [Configure Inbound Message Flow](https://help.mypurecloud.com/articles/inbound-message-flows/) documentation.
To set up Message Routing, follow these steps:
1. Go to the Genesys Cloud interface, click **Menu** in the upper-left corner and select **Orchestration > Routing > Message Routing**.
2. In the upper-right corner, click **+ Attach New Addresses to a Flow**. The **Attach New Addresses** page opens.
3. From the **Select Flow** list, select the Inbound Message Flow you created.
4. From the **Select Addresses** section, choose the Open Messaging platform you created and click **Attach Address**. Save changes.
Your Message Routing configuration will appear in the message routing list.
To configure credentials, follow these steps:
1. In the left-side menu, select **IT and Integrations > OAuth**, then click **+ Add Client**.
2. On the **Add New Client** page, configure the following:
* **App Name** — enter a unique name for the client.
* **Grant Types** — select **Client Credentials**. Click **Next**.
3. In the **Roles** list, activate the corresponding role for the client. The role must include at least the following permissions:
* `messaging-platform:readonly` (View messaging platform integrations)
* `conversations` (Create, edit, and delete conversation data)
* `analytics:readonly` (Query aggregate conversation data and view conversation details)
4. Click **Next**.
5. In the **Token Duration in seconds** field, enter the token expiration time. Click **Next**.
6. Click **Generate New Client Secret**, then **Confirm**.
7. Copy the Client ID and Client Secret, save them for future use, and click **Finish**. Confirm that you copied the Client ID and Client Secret in the dialog box.
8. In the left-side menu, select **Authorized Applications**.
9. In the upper-right corner, click **+ Authorize a Client**.
10. In the **Authorize Client** window, enter the Client ID that you copied previously and click **Authorize Client**.
11. (Optional) In the **Users that can use this application** section, select the roles of the users who can use this application.
12. In the **Scope** section, select the minimum scope of the application, as listed in step 3. Click **Authorize**.
Once your client is authorized, you can start configuring the Genesys Cloud Open Messaging handover provider on the Cognigy.AI side.
## Configuration on the Cognigy.AI Side
1. Go to **Deploy > Handover Providers**.
2. Click **+ New Handover Provider** and select **Genesys Open Messaging** from the list.
3. Scroll down to **Handover Settings** and select **Genesys Cloud Open Messaging** from the list.
4. Fill in the following fields:
* **Host** — enter the login URL for Genesys Cloud customers, which varies by region, such as `mypurecloud.de` for Germany. You can use the base domain like `mypurecloud.com` or `cac1.pure.cloud`, omitting the `apps.` or `login.` part. For more on Genesys Cloud regions, refer to [AWS regions for deployment](https://help.mypurecloud.com/articles/aws-regions-for-genesys-cloud-deployment/).
* **Deployment Name** — specify the Open Messaging platform name that you created [on the Genesys Cloud CX side](#configuration-on-the-handover-provider-side).
* **Queue ID** — enter the Queue ID that you copied when you created a queue [on the Genesys Cloud CX side](#configuration-on-the-handover-provider-side).
* **Webhook Secret** — specify the Outbound Notification Webhook Signature Secret Token that you created [on the Genesys Cloud CX side](#configuration-on-the-handover-provider-side).
* **Client ID** — enter the Client ID that you generated [on the Genesys Cloud CX side](#configuration-on-the-handover-provider-side).
* **Client Secret** — enter the Client Secret that you generated [on the Genesys Cloud CX side](#configuration-on-the-handover-provider-side).
5. *(Optional)* Activate the **Send Profile information** setting if you want to display human agent information, such as the first and last name, to the user. Save changes.
In the [Handover to Human Agent](/ai/agents/develop/node-reference/service/handover-to-agent) Node, configure the following settings:
* **Language** — specify a language for the conversation. For example, `english`, `spanish`, `german`.
* **Skills** — define skills for the conversation. For example, `escalation`.
* **Priority** — set the priority for the conversation. For example, `1`. If a priority is set, it triggers a flow in Genesys to prioritize or de-prioritize the conversation within the queue. Note that this functionality requires the appropriate flow to be set up in Genesys.
* **Enable User Connects Message** — notify human agents when an end user reconnects to the chat. The parameter is enabled by default. When the parameter is enabled, the message `User joined the conversation` appears in the chat as soon as the end user returns to the chat tab by clicking the **←** (back arrow) at the top bar in the browser, after having opened a new URL on the same tab as the chat.
* **Enable User Disconnects Message** — notify human agents when an end user disconnects from the chat. The parameter is enabled by default. When the parameter is enabled, the message `User left the conversation` is sent as soon as the end user closes the tab with the chat or switches to a new URL address within the current tab.
* **Display Agent Details** — display the human agent's name and avatar from Genesys in the chat for the end user. The parameter is disabled by default.
* **Custom Attributes** — add custom attributes, which allows you to include additional information. When sending custom attributes from Cognigy.AI to Genesys Cloud, you can enter them in two ways:
```json JSON String theme={null}
"{\"customerType\":\"premium\",\"tags\":[\"urgent\",\"vip\"]}"
```
```json JSON Object theme={null}
{
"customerType": "premium",
"tags": ["urgent","vip"],
"preferences": { "language": "en", "notifications": true }
}
```
Before sending to Genesys, Cognigy.AI flattens nested objects, joins or indexes arrays, converts booleans to 1/0, and skips unsupported types.
To test the connection, click **Open Demo Web Chat** in your Endpoint.
## Additional Configuration
Before using this feature, add the `GENESYS_CLOUD_OM_HANDLE_BOT_MESSAGE: "true"` feature flag.
By default, the Genesys Inbound Message flow routes messages to human agents only.
You can configure your settings so that not only human agents but also end users receive these messages.
Forwarding messages to the end user can be helpful in the following use cases:
* When the conversation status or wait time information is relevant to the end user.
* To provide the end user with updates and transparency throughout the interaction.
* To allow the end user to make informed decisions while waiting for a human agent, such as requesting a callback.
The Genesys Inbound flow is responsible for message configuration.
However, if you want to use additional logic,
such as allowing end users to see their queue position,
set up the [In-Queue Message flow](https://help.mypurecloud.com/articles/work-with-in-queue-flows/) in Genesys in addition to the Genesys Inbound flow.
Cognigy.AI is responsible for message routing logic. Follow the instructions to configure this logic:
1. In your chosen Handover Flow, set a **Lookup** Node below the **Handover to Human Agent** Node. Set the **Lookup** Node as your Entrypoint.
2. For the **Type** field within the **Lookup** Node, select **Handover Status**.
3. For the child **Case** Node, specify `genericHandoverUpdate` in the **Value** field.
4. Add your **Say** Node under the **Case** Node to display the messages to the end user. Select **Text** from the **Output Type** list, and in the **Text** field enter the following **CognigyScript**: `{{ input.data.request.text }}`. The script will then query Genesys for the relevant data, such as a queue position.
5. In the Handover Settings of the **Say** Node, select **User Only** from the **Handover Output Destination** list.
6. To display all incoming Genesys Status or Bot messages, add a **Go To** Node below the **Say** Node.
7. Open the **Go To** Node. From the **Select Node** list, choose **Lookup**. Scroll down to the **Advanced** section. From the **Execution Mode** list, select **Go to Node and wait for Input**.
The main Flow on Cognigy.AI should look like this:
 By default, Cognigy.AI sends the full conversation transcript as a single message once the handover to Genesys occurs. Additionally, you can filter out empty or unsupported messages to keep the transcript relevant and concise:
* **Filter unsupported messages** — if the system detects a message in an unsupported format, such as `UNSUPPORTED_STRUCTURE_DATA`, the system will exclude the message from the conversation transcript. To activate this feature, use the `FEATURE_FILTER_UNSUPPORTED_MESSAGES_HANDOVER_PROVIDER: "true"` feature flag.
* **Filter empty messages** — if a user sends a blank message with no text or content, the system will exclude the message from the conversation transcript. To activate this feature, use the `FEATURE_FILTER_EMPTY_MESSAGES_HANDOVER_PROVIDER: "true"` feature flag.
### Agent Copilot Workspace
Within the Genesys integration, you can use the [Agent Copilot workspace](/agent-copilot/overview) as an assistant for your human agents.
By default, two versions of the application are provided:
Agent Copilot will be available as a standalone application via the following link:
`https://${AgentCopilotBaseUrl}/?userId=${userId}&sessionId=${sessionId}&URLToken=${URLToken}`
Where:
* `AICopilotBaseUrl` — the base URL used to access the Agent Copilot workspace.
* `sessionId` — the Cognigy session ID. A session represents the interaction between the human agent and the Agent Copilot workspace.
* `userId` — the Cognigy user ID. It helps Agent Copilot associate the interaction with a specific user.
* `URLToken` — the Endpoint token from Cognigy.AI. The Endpoint must be linked to the Handover Flow. To find this token, go to the Endpoint that you created previously. In the **Endpoint URL** field, copy the token after `https://endpoint-trial.cognigy.ai/`. For example, in the URL `https://endpoint-trial.cognigy.ai/f38791ae20d4961acf0e97d9f377c4fe3df92894e1eff1c7a774a8ed089a4590`, the token is `f38791ae20d4961acf0e97d9f377c4fe3df92894e1eff1c7a774a8ed089a4590`. Only authorized users can access the Agent Copilot system through this URL.
Example URL:
```txt wrap theme={null}
https://ai-copilot-trial.cognigy.ai/?sessionId=session123&userId=user123&URLToken=a4d5c86c98f27730311591f28d194510e05ffed30ca148e3344970defd418e7d
```
By default, you can use the embedded version of the Agent Copilot workspace, but it will overlap part of the screen with the conversation. To place the workspace to the right of the chat with the conversation, follow these steps:
To create a script, follow these steps:
1. In Cognigy.AI, go to Endpoint **Settings > Copilot**.
2. Copy the Agent Copilot Embedding URL by clicking on it.
3. In Genesys Cloud, open the **Admin** tab.
4. Under **Contact Center**, click **Scripts**, then **Create**. Type a name for the script.
5. Select the **Blank Script** template and click **+ Create**.
6. On the script page, go to the **Add Components** tab.
7. Under the **Components** section, select **Web Page**. In the **Web Page Source** field, enter the Agent Copilot Embedding URL that you copied before.
8. In the **Layout** section, change the size of width and height by clicking the **Stretch** button.
9. In the upper-right corner, go to the **Variables** tab.
10. On the **Variables** tab, go to the **Basic Types** section and click **String**.
11. Create a new variable:
By default, Cognigy.AI sends the full conversation transcript as a single message once the handover to Genesys occurs. Additionally, you can filter out empty or unsupported messages to keep the transcript relevant and concise:
* **Filter unsupported messages** — if the system detects a message in an unsupported format, such as `UNSUPPORTED_STRUCTURE_DATA`, the system will exclude the message from the conversation transcript. To activate this feature, use the `FEATURE_FILTER_UNSUPPORTED_MESSAGES_HANDOVER_PROVIDER: "true"` feature flag.
* **Filter empty messages** — if a user sends a blank message with no text or content, the system will exclude the message from the conversation transcript. To activate this feature, use the `FEATURE_FILTER_EMPTY_MESSAGES_HANDOVER_PROVIDER: "true"` feature flag.
### Agent Copilot Workspace
Within the Genesys integration, you can use the [Agent Copilot workspace](/agent-copilot/overview) as an assistant for your human agents.
By default, two versions of the application are provided:
Agent Copilot will be available as a standalone application via the following link:
`https://${AgentCopilotBaseUrl}/?userId=${userId}&sessionId=${sessionId}&URLToken=${URLToken}`
Where:
* `AICopilotBaseUrl` — the base URL used to access the Agent Copilot workspace.
* `sessionId` — the Cognigy session ID. A session represents the interaction between the human agent and the Agent Copilot workspace.
* `userId` — the Cognigy user ID. It helps Agent Copilot associate the interaction with a specific user.
* `URLToken` — the Endpoint token from Cognigy.AI. The Endpoint must be linked to the Handover Flow. To find this token, go to the Endpoint that you created previously. In the **Endpoint URL** field, copy the token after `https://endpoint-trial.cognigy.ai/`. For example, in the URL `https://endpoint-trial.cognigy.ai/f38791ae20d4961acf0e97d9f377c4fe3df92894e1eff1c7a774a8ed089a4590`, the token is `f38791ae20d4961acf0e97d9f377c4fe3df92894e1eff1c7a774a8ed089a4590`. Only authorized users can access the Agent Copilot system through this URL.
Example URL:
```txt wrap theme={null}
https://ai-copilot-trial.cognigy.ai/?sessionId=session123&userId=user123&URLToken=a4d5c86c98f27730311591f28d194510e05ffed30ca148e3344970defd418e7d
```
By default, you can use the embedded version of the Agent Copilot workspace, but it will overlap part of the screen with the conversation. To place the workspace to the right of the chat with the conversation, follow these steps:
To create a script, follow these steps:
1. In Cognigy.AI, go to Endpoint **Settings > Copilot**.
2. Copy the Agent Copilot Embedding URL by clicking on it.
3. In Genesys Cloud, open the **Admin** tab.
4. Under **Contact Center**, click **Scripts**, then **Create**. Type a name for the script.
5. Select the **Blank Script** template and click **+ Create**.
6. On the script page, go to the **Add Components** tab.
7. Under the **Components** section, select **Web Page**. In the **Web Page Source** field, enter the Agent Copilot Embedding URL that you copied before.
8. In the **Layout** section, change the size of width and height by clicking the **Stretch** button.
9. In the upper-right corner, go to the **Variables** tab.
10. On the **Variables** tab, go to the **Basic Types** section and click **String**.
11. Create a new variable:
1. In the **Name** field, enter `userId`.
2. In the **Description** field, enter `Cognigy variable`.
3. Enable the **Input** toggle and click **Apply**.
12. In the upper-left corner of the script page, click **Script > Properties**.
13. In the **Script Properties** section, activate the **Inbound** and **Message** features.
14. In the upper-left corner of the script page, click **Script > Save**, then **Publish**.
To add the Script to the Inbound Message Flow, follow these steps:
1. In the Genesys Cloud interface, go to **Orchestration > Architect**.
2. Click or hover over the icon on the **Flows** tab and select **Inbound Message**.
3. From the flow list, select a flow that you created before.
4. In the **Toolbox** section, enter `Get Participant Data` in the search field and drag the action to the arrow coming out of the **Start** Node in the messaging flow editor.
5. In the flow editor, ensure that both the **Send Response** and the **Get Participant Data** actions have been added. If you haven't done so already, refer to steps 7-11 in the [Create an Inbound Message Flow section](#3-create-an-inbound-message-flow) of the handover reference.
6. Below the **Get Participant Data** action, place a [Set Screen Pop](https://help.mypurecloud.com/articles/set-screen-pop-action/) action. The **Set Screen Pop** action must be positioned above the **Transfer to ACD** action.
7. From the **Message Script** list of the **Set Screen Pop** action, select the script you previously created.
8. In the **Inputs** action, enter `userId` in the **userId** field.
9. In the upper-left corner, click **Save**, then **Publish**.
## More Information
* [Genesys Cloud Guest Chat](/ai/escalate/handover-reference/genesys-cloud-guest-chat)
* [All Handover Providers](/ai/escalate/handover-reference/overview)
* [Handovers](/ai/escalate/handovers)