> ## Documentation Index
> Fetch the complete documentation index at: https://docs.cognigy.com/llms.txt
> Use this file to discover all available pages before exploring further.
# Add Another Inbox for your Project
> Create additional Inboxes in Live Agent and configure them for handover within your Cognigy.AI Flows.
Updated in 2025.10
Live Agent has been put in maintenance mode. The product will continue to be maintained in the foreseeable future. Users can continue to fully rely on Live Agent being available. In future releases, only security updates and bug fixes will be provided; no new features will be released.
You can create extra Inboxes in Live Agent and configure them for handover within your Flows.
## Add an Additional Inbox
To add another Inbox in Live Agent, follow these steps:
1. In the sidebar of the Live Agent dashboard, click **Inboxes**.
2. In the upper-right corner, click the **+ Add Inbox** button. Live Agent will show you a screen to set up your Inbox.
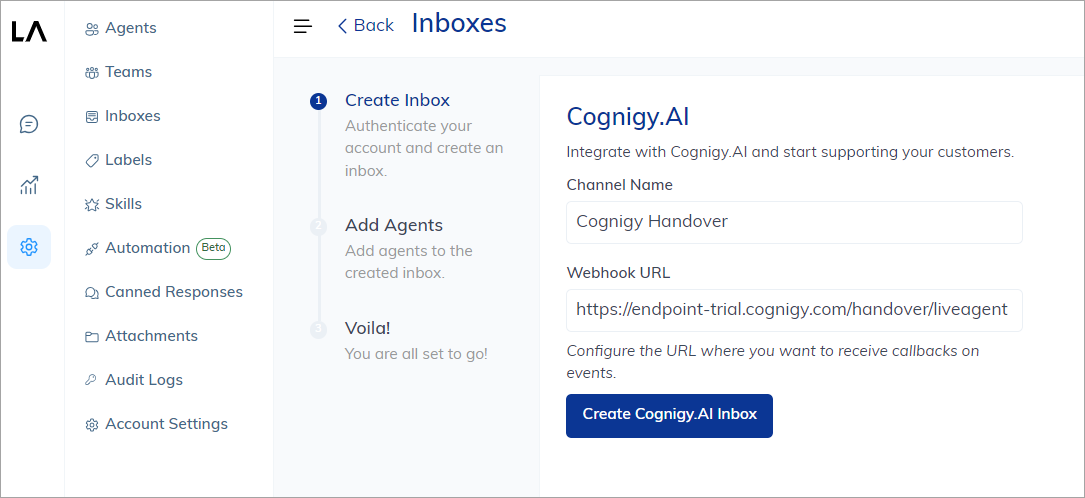 3. On the Inbox setup page, fill in the following fields:
* **Inbox Name** — create a unique Inbox name. For example, `Cognigy Handover`.
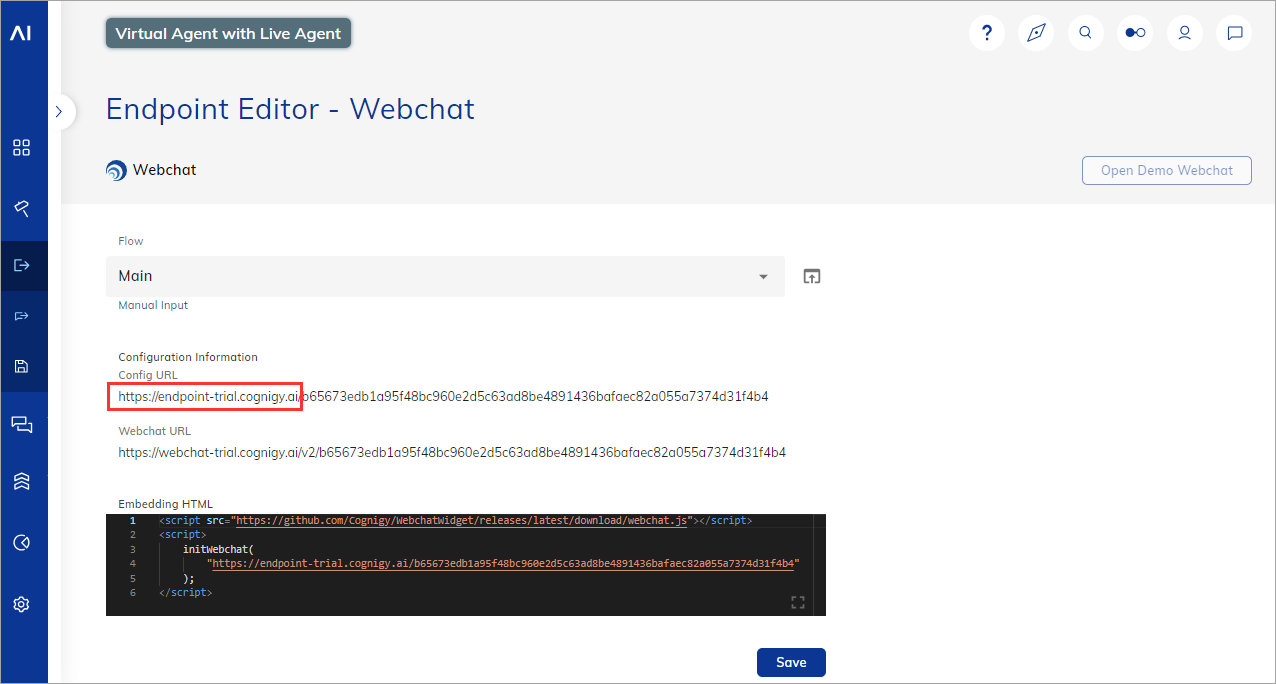
* **Webhook URL** — enter the Cognigy.AI Endpoint Config URL domain name, extended by `/handover/liveagent`. For example, `https://endpoint-trial.cognigy.ai/handover/liveagent`. You can find the Endpoint Config URL in the **Configuration Information** section of your Endpoint.
3. On the Inbox setup page, fill in the following fields:
* **Inbox Name** — create a unique Inbox name. For example, `Cognigy Handover`.
* **Webhook URL** — enter the Cognigy.AI Endpoint Config URL domain name, extended by `/handover/liveagent`. For example, `https://endpoint-trial.cognigy.ai/handover/liveagent`. You can find the Endpoint Config URL in the **Configuration Information** section of your Endpoint.
 4. Click the **Create Cognigy.AI Inbox** button. Once you have successfully set up the Inbox, you are prompted in the next step to assign your Agents to the new Inbox.
5. Select your required Agents in the selection list and click **Add Agents**.
A new Live Agent Inbox has been created.
### Find Account and Inbox IDs
The new Inbox is defined by an Account ID and an Inbox ID. The Inbox ID is required to configure the **Handover to Human Agent** Node.
Both IDs can be found in the Live Agent URL after creating the Inbox.
To locate them, follow these steps:
1. Go to **Settings > Inboxes**.
2. In the **Inboxes** list, find the Inbox that you have created before, and click the **Settings** icon next to the Inbox.
The Inbox settings will be displayed,
and you will see the address line of your browser as follows:
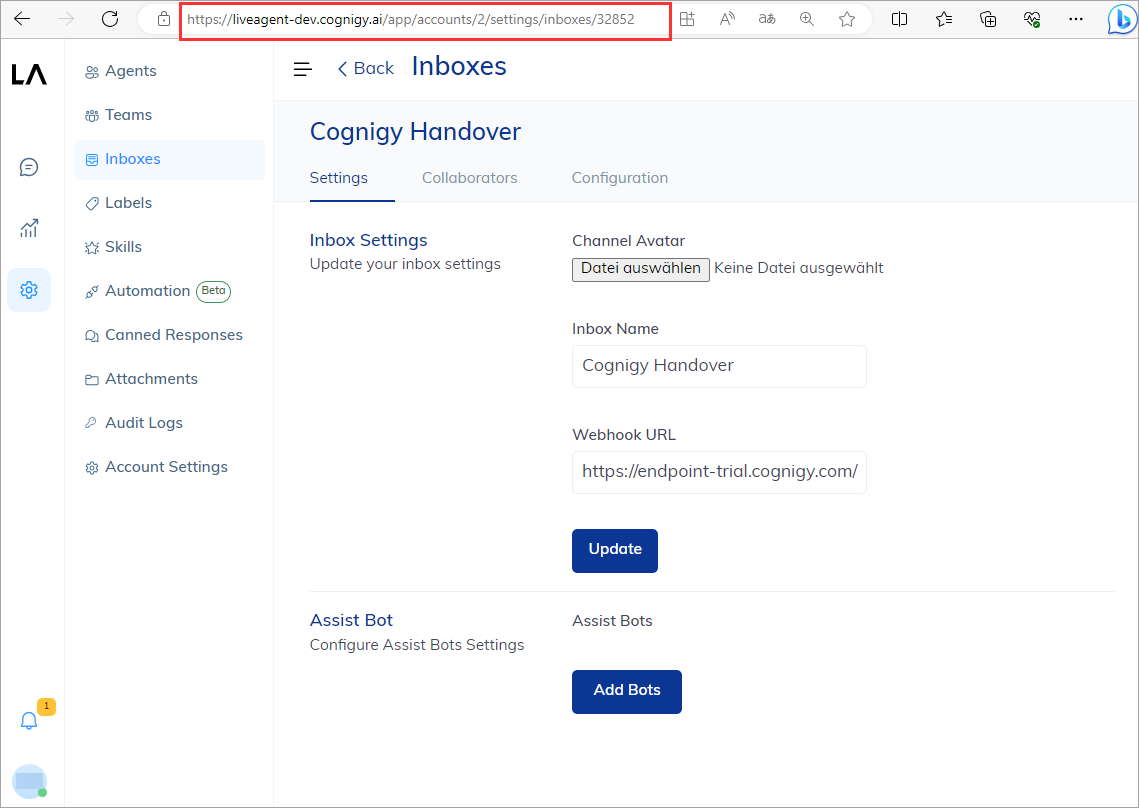
`https://liveagent-/app/accounts//settings/inboxes/`.
For example, in the URL `https://liveagent-dev.cognigy.ai/app/accounts/2/settings/inboxes/32852`, the Account ID is `2`,
and the Inbox ID is `32852`.
4. Click the **Create Cognigy.AI Inbox** button. Once you have successfully set up the Inbox, you are prompted in the next step to assign your Agents to the new Inbox.
5. Select your required Agents in the selection list and click **Add Agents**.
A new Live Agent Inbox has been created.
### Find Account and Inbox IDs
The new Inbox is defined by an Account ID and an Inbox ID. The Inbox ID is required to configure the **Handover to Human Agent** Node.
Both IDs can be found in the Live Agent URL after creating the Inbox.
To locate them, follow these steps:
1. Go to **Settings > Inboxes**.
2. In the **Inboxes** list, find the Inbox that you have created before, and click the **Settings** icon next to the Inbox.
The Inbox settings will be displayed,
and you will see the address line of your browser as follows:
`https://liveagent-/app/accounts//settings/inboxes/`.
For example, in the URL `https://liveagent-dev.cognigy.ai/app/accounts/2/settings/inboxes/32852`, the Account ID is `2`,
and the Inbox ID is `32852`.
 ## Configure a Flow for Handover to the Additional Inbox
To configure a Flow for a Handover to a Live Agent, follow these steps:
1. In the Cognigy.AI interface, open the Flow that contains the Handover Node.
## Configure a Flow for Handover to the Additional Inbox
To configure a Flow for a Handover to a Live Agent, follow these steps:
1. In the Cognigy.AI interface, open the Flow that contains the Handover Node.
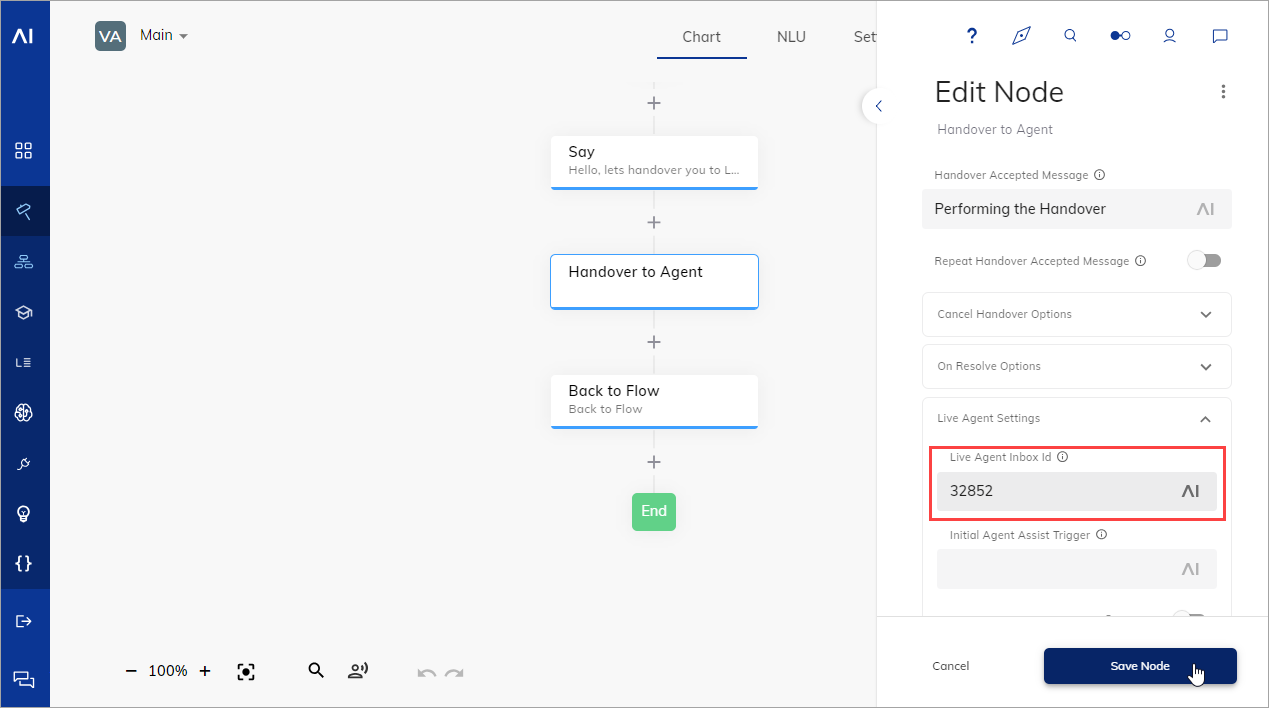 2. Click the **Handover to Human Agent** Node to open the Node Editor.
3. In the **Live Agent Settings** section, enter the Inbox Id of your new Live Agent Inbox.
4. Click **Save Node**.
Your Flow is now configured for a Live Agent Handover.
## What's Next?
* [Explore Conversation Workflow](/live-agent/conversation/overview)
* [Configure Conversation Routing](/live-agent/conversation/conversation-routing/overview)
* [Customize your Live Agent by changing the Account Settings](/live-agent/settings/overview)
* [Group human agents in Teams](/live-agent/settings/teams)
* [Organize your work by adding Labels](/live-agent/settings/labels)
2. Click the **Handover to Human Agent** Node to open the Node Editor.
3. In the **Live Agent Settings** section, enter the Inbox Id of your new Live Agent Inbox.
4. Click **Save Node**.
Your Flow is now configured for a Live Agent Handover.
## What's Next?
* [Explore Conversation Workflow](/live-agent/conversation/overview)
* [Configure Conversation Routing](/live-agent/conversation/conversation-routing/overview)
* [Customize your Live Agent by changing the Account Settings](/live-agent/settings/overview)
* [Group human agents in Teams](/live-agent/settings/teams)
* [Organize your work by adding Labels](/live-agent/settings/labels)