> ## Documentation Index
> Fetch the complete documentation index at: https://docs.cognigy.com/llms.txt
> Use this file to discover all available pages before exploring further.
# Getting Started with Voice Gateway
> Step-by-step guide to set up Voice Gateway, including creating voice Flows, configuring Endpoints, and routing contact centers or phone numbers to your AI Agent.
 ## How to Set Up Voice Gateway?
To set up Voice Gateway, do the following steps:
1. [Create a Voice Gateway Flow](#create-a-voice-gateway-flow)
2. [Create a Voice Gateway Endpoint](#create-a-voice-gateway-endpoint)
3. [Route Contact Centers or Phone Numbers to Voice Gateway](#route-contact-centers-or-phone-numbers-to-voice-gateway)
4. [Set up Voice Gateway for your Organization](#set-up-voice-gateway-for-your-organization)
## Create a Voice Gateway Flow
Start your **Voice Gateway** project by creating a voice-enabled flow. With a voice conversation, the AI Agent must respond with a text-based message for every user input. Voice conversations happen on a turn-by-turn basis, meaning that Voice Gateway bundles all dialogue outputs triggered by the Flow into one message and delivers it across the phone line.
Every Cognigy.AI node that offers text-based messages can be used in a voice flow. If you have rich media in your flow, the fallback text field will be used as voice output.
If there is a Voice Gateway channel-specific configuration, this configuration will be used instead of the one in the default section. In the Voice Gateway channel, you can find pre-defined SSML tags and [activity parameters](/ai/agents/develop/node-reference/voice/voice-gateway/parameter-details).
For voice-specific actions, you can use the [Voice Gateway Flow Nodes](/ai/agents/develop/node-reference/voice/voice-gateway/overview).
## Create a Voice Gateway Endpoint
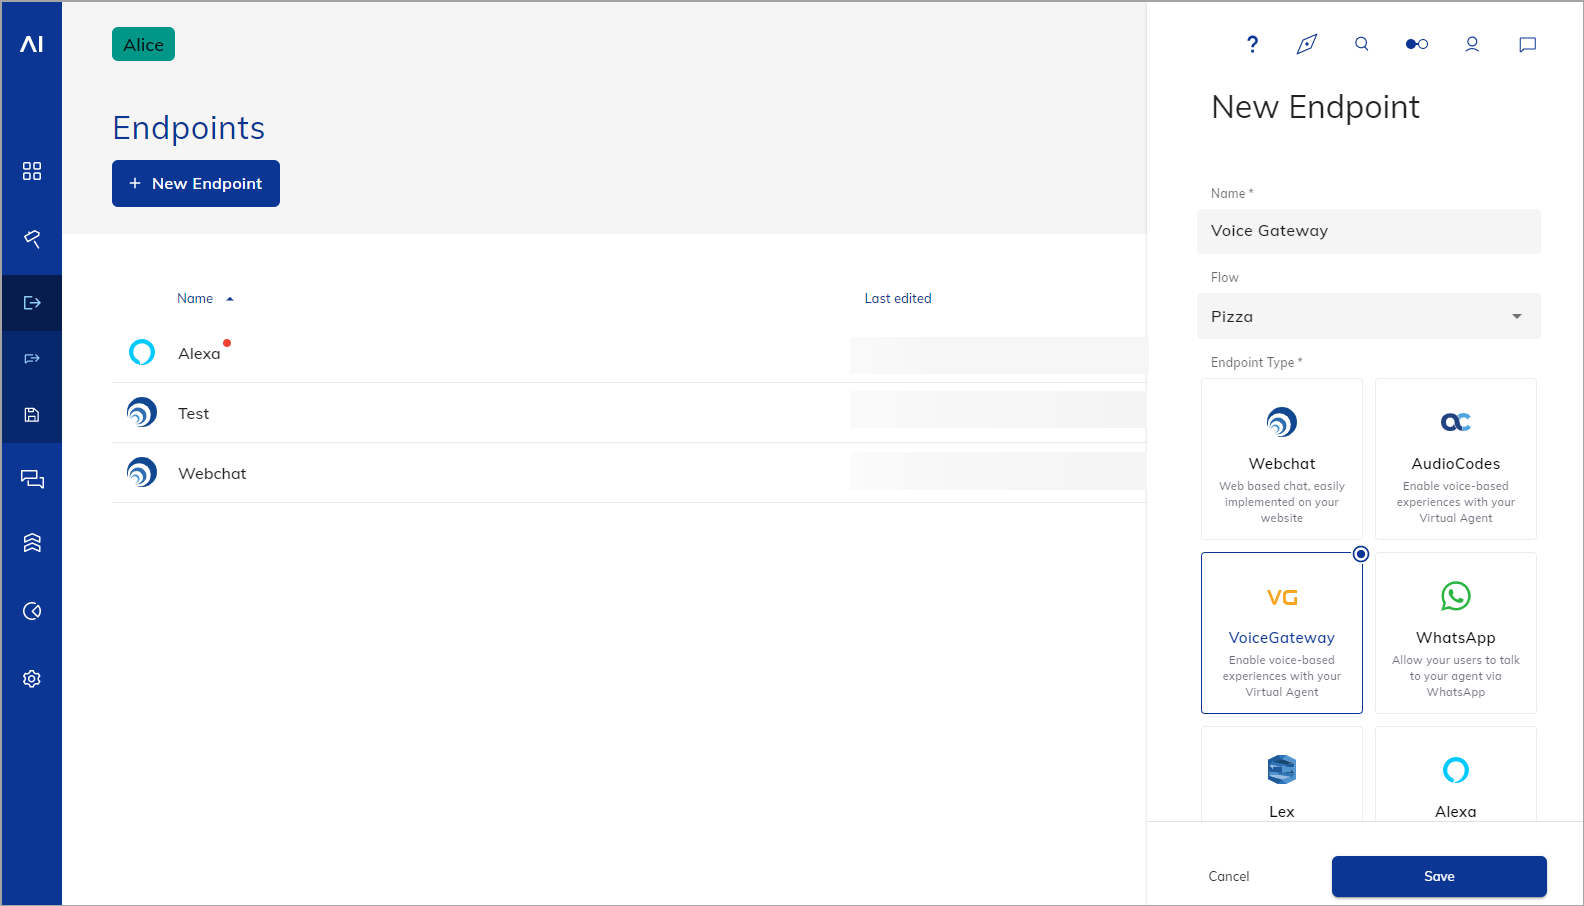
To do voice-based experiences with your AI Agent, create your [Voice Gateway Endpoint](/ai/agents/deploy/endpoint-reference/voice-gateway) in Cognigy.AI. To do that:
1. In the left-side menu of the Cognigy.AI interface, select a Project where you want to create a voice Flow.
2. In the left-side menu of the Project, go to **Deploy > Endpoints**.
3. On the **Endpoints** page, click **+ New Endpoint**.
4. In the **New Endpoint** section, do the following:
## How to Set Up Voice Gateway?
To set up Voice Gateway, do the following steps:
1. [Create a Voice Gateway Flow](#create-a-voice-gateway-flow)
2. [Create a Voice Gateway Endpoint](#create-a-voice-gateway-endpoint)
3. [Route Contact Centers or Phone Numbers to Voice Gateway](#route-contact-centers-or-phone-numbers-to-voice-gateway)
4. [Set up Voice Gateway for your Organization](#set-up-voice-gateway-for-your-organization)
## Create a Voice Gateway Flow
Start your **Voice Gateway** project by creating a voice-enabled flow. With a voice conversation, the AI Agent must respond with a text-based message for every user input. Voice conversations happen on a turn-by-turn basis, meaning that Voice Gateway bundles all dialogue outputs triggered by the Flow into one message and delivers it across the phone line.
Every Cognigy.AI node that offers text-based messages can be used in a voice flow. If you have rich media in your flow, the fallback text field will be used as voice output.
If there is a Voice Gateway channel-specific configuration, this configuration will be used instead of the one in the default section. In the Voice Gateway channel, you can find pre-defined SSML tags and [activity parameters](/ai/agents/develop/node-reference/voice/voice-gateway/parameter-details).
For voice-specific actions, you can use the [Voice Gateway Flow Nodes](/ai/agents/develop/node-reference/voice/voice-gateway/overview).
## Create a Voice Gateway Endpoint
To do voice-based experiences with your AI Agent, create your [Voice Gateway Endpoint](/ai/agents/deploy/endpoint-reference/voice-gateway) in Cognigy.AI. To do that:
1. In the left-side menu of the Cognigy.AI interface, select a Project where you want to create a voice Flow.
2. In the left-side menu of the Project, go to **Deploy > Endpoints**.
3. On the **Endpoints** page, click **+ New Endpoint**.
4. In the **New Endpoint** section, do the following:
1. Select the **voice-gateway** Endpoint type.
2. Add a unique name.
3. Select a relevant Flow from the list.
5. Click **Save**.
 ## Route Contact Centers or Phone Numbers to Voice Gateway
To route your Contact Center or Phone Number to your Voice Gateway Endpoint, your SIP Trunk needs to be set up. Get in touch with your Cognigy business representative to configure your SIP Trunk and route your number to the right Endpoint.
## Set up Voice Gateway for your Organization
Updated in 4.62
This setting allows you to log in to the Voice Gateway Self-Service Portal using your Cognigy.AI user credentials if you have the [Account](/voice-gateway/webapp/users#account) scope. To enable this option, you need to follow these steps:
To set up the Voice Gateway for your organization, follow these steps:
1. In the left-side menu of the Voice Gateway Self-Service Portal, select **Accounts**.
2. On the **Accounts** page, select an account from the list.
3. In the **Account SID** field, copy the SID and save it for later use.
4. In the Cognigy.AI interface, in the upper-right corner of the **Main** page, select **User Menu
## Route Contact Centers or Phone Numbers to Voice Gateway
To route your Contact Center or Phone Number to your Voice Gateway Endpoint, your SIP Trunk needs to be set up. Get in touch with your Cognigy business representative to configure your SIP Trunk and route your number to the right Endpoint.
## Set up Voice Gateway for your Organization
Updated in 4.62
This setting allows you to log in to the Voice Gateway Self-Service Portal using your Cognigy.AI user credentials if you have the [Account](/voice-gateway/webapp/users#account) scope. To enable this option, you need to follow these steps:
To set up the Voice Gateway for your organization, follow these steps:
1. In the left-side menu of the Voice Gateway Self-Service Portal, select **Accounts**.
2. On the **Accounts** page, select an account from the list.
3. In the **Account SID** field, copy the SID and save it for later use.
4. In the Cognigy.AI interface, in the upper-right corner of the **Main** page, select **User Menu  > Admin Center**.
5. In the Admin Center interface, select **Dashboard** from the left-side menu.
6. Click **Set up Voice Gateway**. The **Voice Gateway Setup** window opens.
7. In the **Voice Gateway Account ID** field, enter the SID you copied and saved earlier. Note that your SID can only be associated with one organization in the Cognigy.AI.
8. In the left-side menu, select **Access Control** and assign the `voice-gatewayUser` role to the users who need access to the Voice Gateway Self-Service Portal.
> Admin Center**.
5. In the Admin Center interface, select **Dashboard** from the left-side menu.
6. Click **Set up Voice Gateway**. The **Voice Gateway Setup** window opens.
7. In the **Voice Gateway Account ID** field, enter the SID you copied and saved earlier. Note that your SID can only be associated with one organization in the Cognigy.AI.
8. In the left-side menu, select **Access Control** and assign the `voice-gatewayUser` role to the users who need access to the Voice Gateway Self-Service Portal.