

Prerequisites
- Configure an AI Agent.
- Configure a speech provider in the Voice Preview Settings section of the Project settings.
- Voice Gateway set up for your organization.
- Edit access to the HTML of the page where you will embed the widget.
- For testing purposes, allow microphone access in your browser and, if needed, in your device settings.
Setup Overview
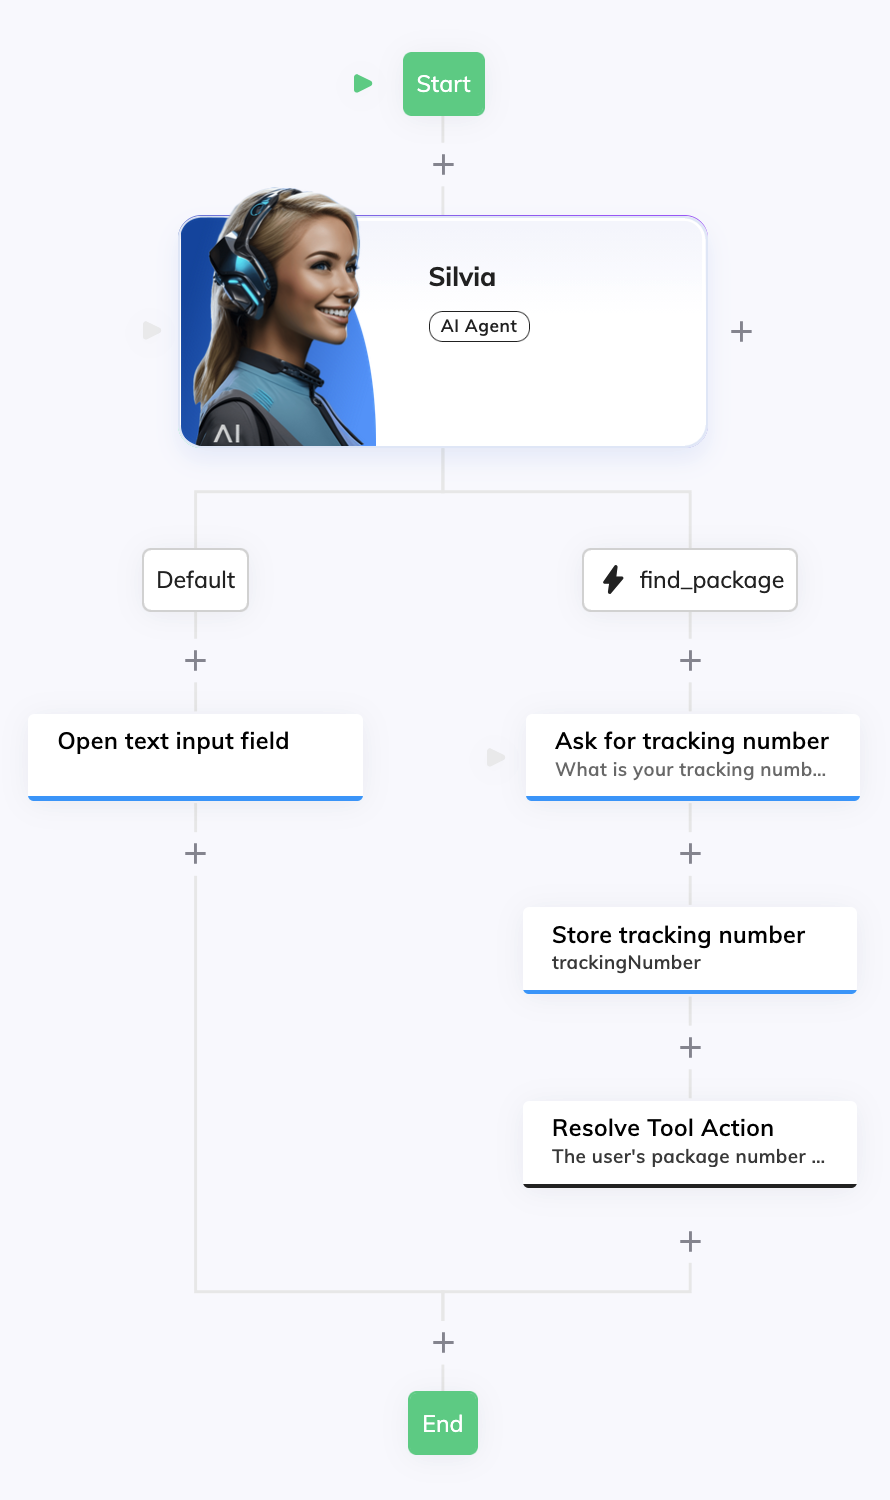
- Configure a Flow with an AI Agent Node and a tool to find packages. The Flow handles the conversation and allows the user to find their package by typing in the text input field.
- Configure a Voice Gateway Endpoint. The Voice Gateway Endpoint connects the Flow to Voice Gateway and activates the Click To Call widget.
- Embed and test the widget. Add the widget script to your page and see the Click To Call widget working.
Set Up a Click To Call Widget with a Text Input Field
1
Create a Flow
- Go to Build > Flows and click + New Flow.
-
On the New Flow panel, configure the following:
- Name — add a unique name, for example,
Click To Call Assistant. - (Optional) Description — add a relevant description, for example,
This Flow supports a Click To Call widget and an input text field.
- Name — add a unique name, for example,
2
Configure an AI Agent Node
-
In the Flow editor, add an AI Agent Node and configure the following:
- AI Agent — select the AI Agent you’ve previously created, for example,
Package Support Assistant. - Job Name —
Package Support Specialist. Save the Node.
- AI Agent — select the AI Agent you’ve previously created, for example,
- Next to the AI Agent Node, click + and select Tool.
-
Configure the Tool Node as follows:
- Tool ID — enter
find_package. - Description — enter
Trigger this tool as soon as the customer needs help finding their packages.. Save the Node.
- Tool ID — enter
3
Configure a Say Node to Open the Input Field
- Below the Default child Node of the AI Agent Node, add a Say Node.
-
Configure the Say Node as follows:
- In the Options section, add the following code in the Data field:
- In the Settings section, enter
Open input fieldin the Label field. This label allows you to better identify the function of this Node.
4
Configure a Question Node
-
Below the
find_packagechild Node, add a Question Node and configure the following:- Question Type — select Number.
- Text — enter the following text:
What is your tracking number?.
5
(Optional) Store the Result in the Context Object
-
Below the Question Node, add an Add To Context Node and configure the following:
- Key — enter
trackingNumber. - Value — enter
{{ci.slots?.NUMBER?}}.
trackingNumberin the Context object. You can use this value for further processing. For example, you can send this to your package management system and track the delivery status. - Key — enter
6
Add a Resolve Tool Node to Return the Result to the AI Agent
Below the Add To Context Node, add a Resolve Tool Node and configure the following:
- Answer Text — enter
The user's package number is {{cc.trackingNumber? || ci.text}}.
Complete Flow
Complete Flow
Configure a Voice Gateway Endpoint
1
Create a Voice Gateway Endpoint
- Go to Deploy > Endpoints.
-
Click + New Endpoint, select Voice Gateway and configure the following:
- Name — for example,
Click To Call Support. - Flow — Select the Flow you previously configured, in this example,
Click To Call Assistant.
- Name — for example,
- Click Save.
2
Generate the Click To Call Embedding Code
- In the Endpoint settings, find Click To Call Embedding HTML.
- Click the Set Up Click To Call Integration button in that field to generate the embedding code in the code editor. Hover over the code editor and click the Copy to clipboard button. You will use this code to embed the Click To Call widget in your website.
3
Enable and Configure the Click To Call Widget
- In Click To Call Widget Settings:
- Enable Click To Call Widget — activate the toggle.
- AI Agent Name — Name shown on the widget, for example,
Package Support. - Tagline — Short text under the name, for example,
Find your package!. - (Optional) AI Agent Avatar Logo URL — Add a URL of the image shown on the widget, for example,
https://www.<domain>.com/logo.png. If empty, the Cognigy.AI logo is used. - (Optional) Theme — select the color theme of the widget.
- Save the Endpoint.
Embed and Test Widget
1
Embed the Widget in your Website
- Paste the code you copied previously from the Endpoint settings into your page’s
<body>or before</body>. The code looks similar to the following:
- Make sure the actual Endpoint configuration URL is the same as the one you copied from Click To Call Embedding HTML in the Voice Gateway Endpoint.
- Edit the script to add the text input field and events to open and close the input field when the Flow sends
openInput: truein the Say Node. The following code is an example of how to do this:
2
Test the Widget
- Open the page in a browser, allow microphone access when prompted, and click
 on the widget to start a voice conversation with your AI Agent.
 - After the AI Agent greets you, the input field opens.
- Say you want to find your package.
- Try answering the question in the text input field and by voice.