

Key Benefits
- Reduced User Anxiety. End users receive continuous updates about their queue position and estimated wait time.
- Increased Transparency. Real-time visibility into queue status builds trust and sets clear expectations.
- Alternative Messaging. Automatically sends a customized message when queue conditions exceed defined thresholds.
- Pattern Analysis. Collected queue data helps identify peak times and typical response times.
Prerequisites
- A handover provider is configured. Real-time queue notifications are supported by Cognigy Live Agent, Salesforce MIAW, and Genesys Cloud Open Messaging.
- For Genesys Cloud Open Messaging, an active Amazon EventBridge Source integration and admin access to Genesys Cloud to configure use and integration settings are required.
- The Endpoint that supports the selected handover provider is configured. For testing purposes, you can use the Webchat v3 Endpoint with Demo Webchat.
How It Works
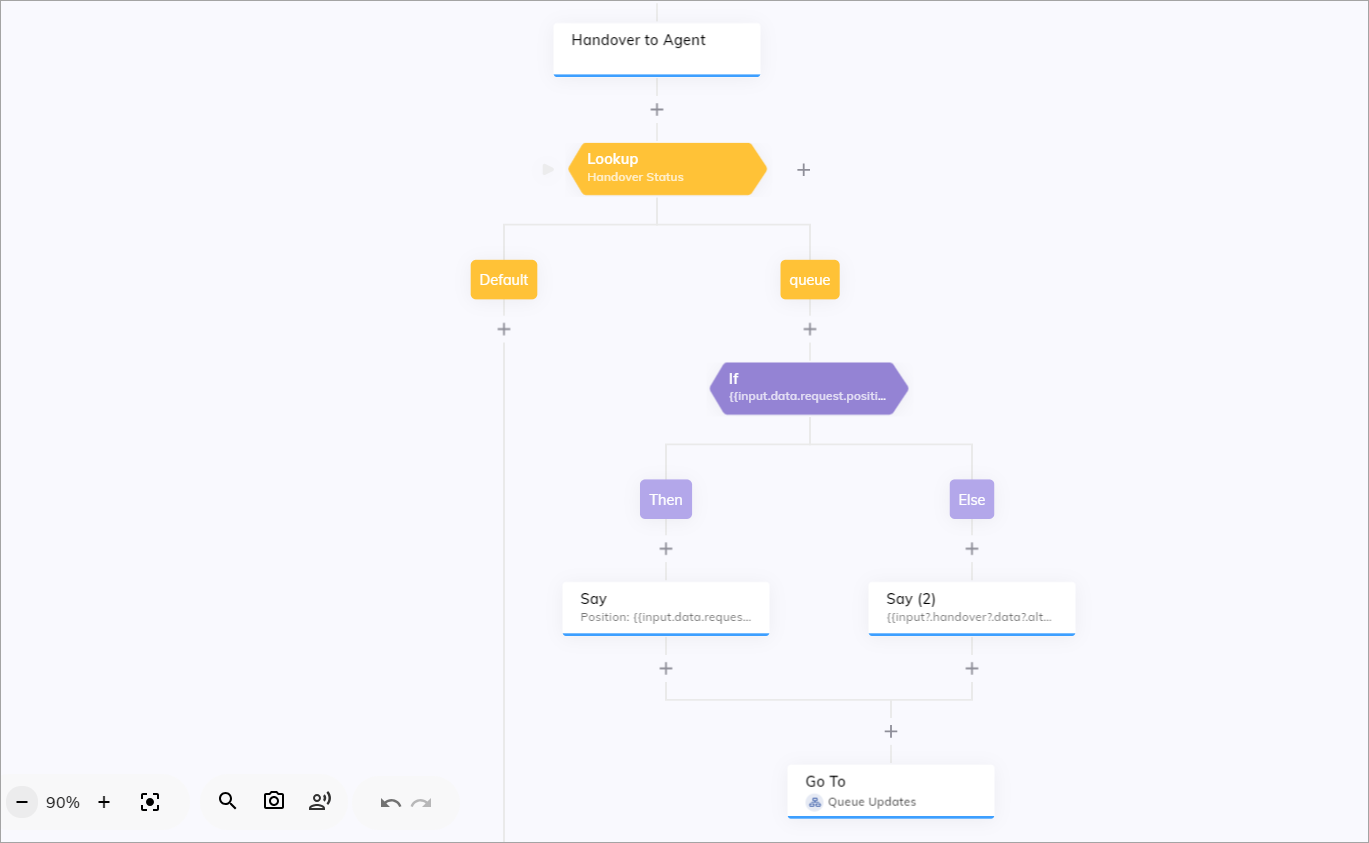
To set up Real-Time Queue Notifications, follow these steps:- Configure the following Nodes in your Flow:
- Handover to Human Agent — enables queue position and wait time tracking.
- Lookup — routes the Flow based on handover status.
- If — evaluates queue conditions.
- Say — displays queue updates or alternative messages to the user.
- Go To — loops back to continue monitoring the queue.
- Configure the provider-side settings to enable queue notifications for Salesforce MIAW or Genesys Cloud Open Messaging.
- (Optional) Configure the Agent Copilot workspace.
Configure Settings for a Handover to Human Agent Node
- In the Flow editor, add the Handover to Human Agent Node or use an existing one if you already added it earlier.
- Open the Node editor by clicking the Handover to Human Agent Node.
- From the Handover Provider list, select Cognigy Live Agent, Salesforce MIAW, or Genesys Cloud Open Messaging.
- For the queue position, configure the following settings:
- Get Queue Position — activate the setting to retrieve the end user’s current queue position. This setting isn’t available for Genesys Cloud Open Messaging, which doesn’t provide a queue position. If you use Genesys Cloud Open Messaging, skip this step and go to step 5.
- Update Interval — specify how often (in seconds) to receive updates on the queue status. For example, set the interval to
30seconds to receive updates every half-minute. This setting is applicable only to Live Agent.
- For estimated wait time, configure the following settings:
- Get Estimated Wait Time — activate the setting to retrieve the estimated wait time for the end user.
- Update Interval — specify how often (in seconds) to receive updates on the wait time. For example, set the interval to
30seconds to receive updates every half-minute. This setting isn’t available for Salesforce MIAW.
- Configure alternative update options:
- Alternative Update — activate the alternative update options that trigger when certain conditions are met, such as reaching the maximum queue position or maximum estimated wait time.
- Maximum Queue Position — specify the maximum queue position. If you set this to
5, the system will send an alternative message when the user’s position exceeds 5. This setting isn’t available for Genesys Cloud Open Messaging, which doesn’t provide a queue position. - Maximum Estimated Wait Time — specify the maximum estimated wait time in milliseconds. Set this to
300000milliseconds (5 minutes). If the estimated wait time exceeds this time, the system will send an alternative message from the Alternative Text field. - Alternative Text — specify the message that should be sent when either the maximum queue position or maximum wait time is reached. For example,
Thank you for your patience. We are experiencing higher than usual wait times. Please hold on, and an agent will assist you shortly.
- Click Save Node.
Add a Lookup Node
- Below the Handover to Human Agent Node, add a Lookup Node.
- Open the Node editor by clicking the Lookup Node.
- From the Type list, select Handover Status.
- Click Save Node.
- In the Case Node of the Lookup Node, select Queue from the Handover Status list and click Select.
- Click Save Node.
- Remove the second Case Node.
Add an If Node
- Below the Case Node, add an If Node.
-
Open the If Node editor and add the following condition:
where:
{{input.data.request.position}} < 2— checks if the customer’s position in the queue is less than 2. If true, it means the customer is either in first place or second place in the queue.{{input.data.request.estimatedWaitTime / (1000 * 60)}} < 200— calculates the estimated wait time in minutes. The estimated wait time is provided in milliseconds, dividing by(1000 * 60)converts it to minutes. It then checks if this wait time is less than 200 minutes. If true, it means the estimated wait time is manageable.
- Click Save Node.
Add Say Nodes
- Below the condition Then, add a Say Node.
-
Open the Say Node editor and paste the following text into the Text field:
where:
input.data.request.position— the user’s current position in the queue.input.data.request.estimatedWaitTime / (1000 * 60)minutes — the estimated wait time in minutes. TheestimatedWaitTimeis initially provided in milliseconds. It is divided by 1000 to convert it to seconds, and then by 60 to convert it to minutes.
- Click Save Node.
-
Below the condition Else, add another Say Node and paste the following text into the Text field to display the text from the Alternative Text field of the Handover to Human Agent Node that you configured earlier:
- Click Save Node.
Add a Go To Node
- Below the Say Nodes, add a Go To Node.
- In the Go To Node, select the current Flow from the Select Flow list and Lookup Node from the Select Node list.
- In the Advanced section, select Go to Node and wait for Input from the Execution Mode list.
- Click Save Node.
Configure Settings in Salesforce MIAW
If you use Salesforce MIAW as your handover provider, enable queue notifications in the Salesforce settings:- In Salesforce, go to the Setup page, enter
Messaging Settingsin the Quick Find box, and click Messaging Settings. Alternatively, go to Feature Settings > Service > Messaging > Messaging Settings in the navigation menu. - In the Channels section, find the channel you want to configure, click the arrow-down icon, and select Edit.
- Go to the Queue Wait Time and Position section.
- From the Notification list, select one of the following options:
- Estimated Wait Time — sends the estimated wait time to the end user.
- Queue Position — sends the user’s current position in the queue.
- Click Save.
Configure Settings in Genesys Cloud Open Messaging
If you use Genesys Cloud Open Messaging as your handover provider, real-time queue notifications rely on the Amazon EventBridge integration. Complete the following configuration in Genesys Cloud.Genesys Cloud Open Messaging doesn’t provide a queue position. Estimated wait time is the only parameter available and is calculated internally by Genesys Cloud Open Messaging.
1. Add the user.start Topic Filter to the Integration
1. Add the user.start Topic Filter to the Integration
Cognigy needs to receive the event indicating when a human agent accepts (answers) a conversation. This event is delivered through the Amazon EventBridge Source’s event stream.
- In Genesys Cloud, go to IT and Integrations > Integrations.
- On the Integrations page, select the Amazon EventBridge Source that you created previously.
- Open the Configuration tab.
- Go to Properties > Topic Filtering.
- Select
v2.detail.events.conversation.{id}.user.start. - Click Save and Activate.
2. Set the Maximum Capacity
2. Set the Maximum Capacity
Estimated wait time is only calculated once an agent has reached maximum capacity and additional conversations are placed on hold.
- In Genesys Cloud, go to Digital and Telephony > Interaction Assets > Utilization.
- On the Organization tab, go to Channels.
- In the Message row, click Edit in the Actions column.
- Set Maximum Capacity to
1, or the value needed for your setup.
(Optional) Agent Copilot
If you use the Agent Copilot workspace and Agent Copilot is active in your contact center, the Agent Copilot Flow needs additional configuration to send queue update messages. To configure the Agent Copilot Flow for sending queue update messages, complete the following steps:- Add a Handover to Human Agent Node to the Agent Copilot Flow. Configure this Node the same way as the Handover to Human Agent Node in your Main Flow.
- Add a Lookup Node for the Queue status, followed by an If Node, Say Nodes, and a Go To Node. Mirror the logic you already configured in the Main Flow:
- Add a Lookup Node
- Add an If Node
- Add Say Nodes
- Add a Go To Node. In the Agent Copilot Flow, point the Go To Node to the Agent Copilot Flow’s own Lookup Node so the queue keeps updating.
- In the Main Flow, below the Case Node that checks the Queue status, add a Go To Node that points to the Agent Copilot Flow’s Lookup Node.