

You are subject to the terms of the Generative AI model providers to which you are connecting. Cognigy cannot take responsibility for your use of third-party services, systems, or materials.
- Support the AI Agent builder (Design-Time)
- Enhance the customer experience (Run-Time)
Prerequisites
Before using Generative AI, you need to have access to an LLM of the following providers:- OpenAI. You need to have a paid account or be a member of an organization that provides you access. Open your OpenAI user profile, copy the existing API Key, or create a new one and copy it.
- Azure OpenAI. You need to have a paid account or be a member of an organization that provides you access. Ask your Azure administrator to provide API Key, resource name, and deployment model name.
- Anthropic Claude. You need to be a member of an organization that provides you access.
- Google Vertex AI, Google Gemini, or Google GenAI. You need to have a paid account or be a member of an organization that provides you access.
- Aleph Alpha. You need to have an Aleph Alpha account.
- Amazon Bedrock. You need to have an AWS account and access to the Amazon Bedrock service.
- Mistral. You need to have a Mistral AI account and activate payments for the LLM usage.
- Cognigy’s built-in LLM. A free-of-charge LLM for design-time features and available only to customers with SaaS installations.
Design-Time Generative AI Features
Configure LLMs for Design-Time Features
- In Manage > Settings, activate Enable Generative AI Features in the Generative AI Settings section.
-
From the Design-Time Generative LLM Features list, select:
- Platform-Provided LLM to use the built-in LLM for the design-time features.
- a third-party LLM you want to use.
Generate Cognigy.AI Resources
During the design phase of creating AI Agents, LLMs can be used to generate a variety of Cognigy.AI resources:Generate Lexicons
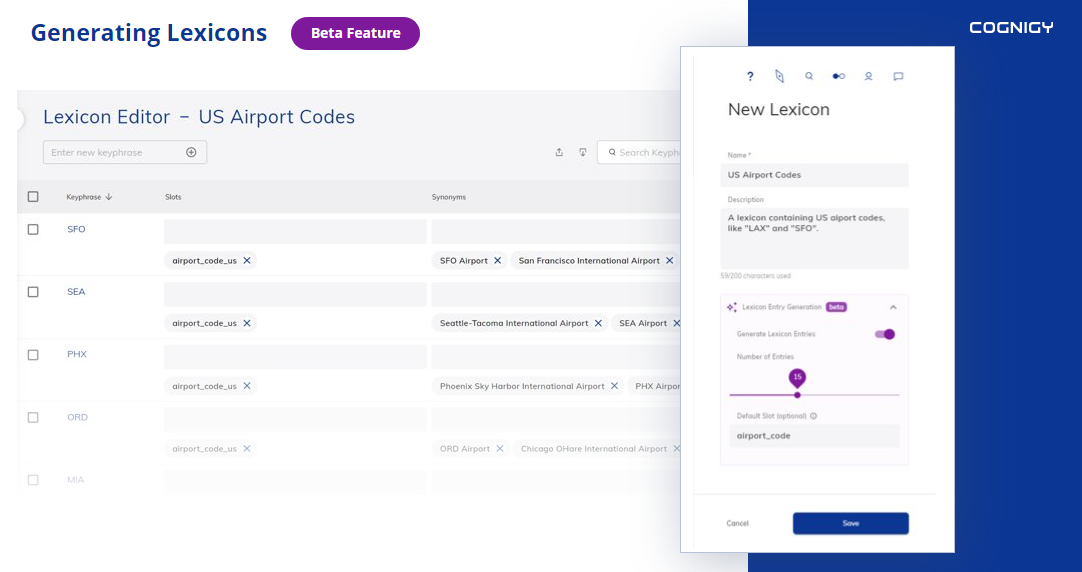
Generate Lexicons
- The generation of Lexicons for primary NLU languages besides German and English isn’t fully supported.
- The model may not always generate the exact number of Lexicon entries requested, as its output can vary based on interpretation and model behavior.
- In the left-side menu of the Cognigy.AI interface, click Build > Lexicons, then + New Lexicon.
- In the New Lexicon window, specify the name covering the Lexicon’s general main topic and add a relevant description. It helps generate a more accurate result. To ensure that the generated content meets the desired expectations, fill in both fields. Relying solely on the title without using the description field will not produce the intended results.
- Go to the Lexicon Entry Generation setting, and activate Generate Lexicon Entries.
- Select Lexicon language from the list and set the number of entries (lexicon units).
- (Optional) Add the default Slot.
- (Optional) Activate Generate Synonyms. Synonyms help AI Agents understand and recognize different variations of the same concept. Up to five synonyms will be generated for each keyphrase.
Generate Flows
Generate Flows
Note that the generation of Flows for primary NLU languages besides German and English is not fully supported.To use Generative AI technology for creating a new Flow with pre-configured Nodes based on your scenario, do the following: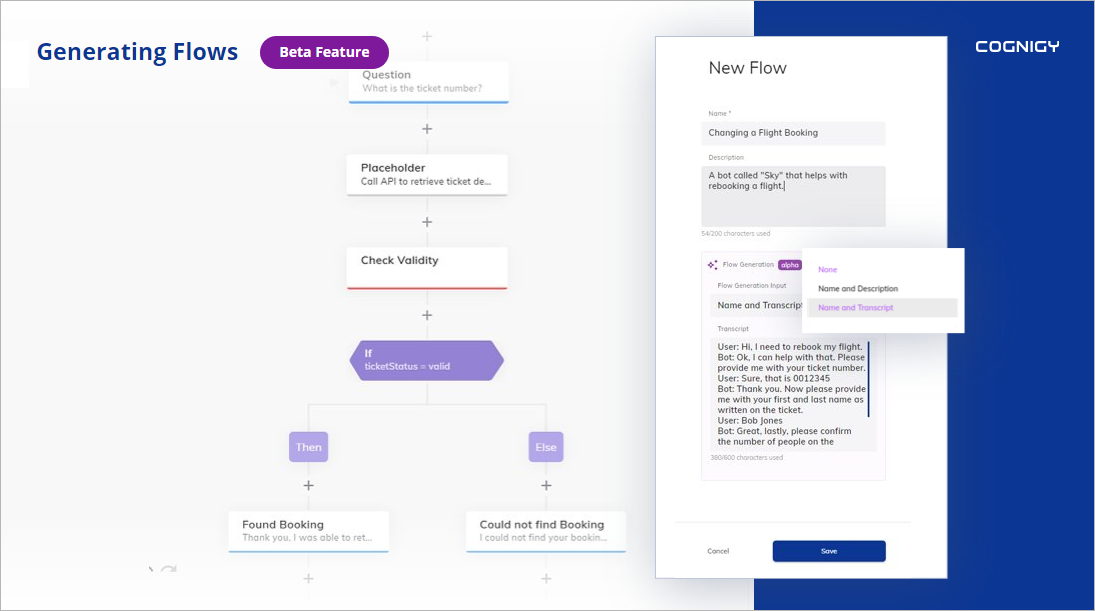
- In the left-side menu of the Cognigy.AI interface, click Build > Flows, then + New Flow.
-
In the New Flow window, go to the Flow Generation section and select one of the options:
- None — the Generative AI will not be applied to this Flow. This setting is activated by default.
- Name and Description — the Generative AI will use the Name and Description fields for generating Flow.
- Name and Transcript — the Generative AI will use the Name and Transcript fields for generating Flow. For this setting, you need to create a scenario and put it in the Transcript field. Use the Transcript field template as an example for your scenario.
Generate Intent Sentences
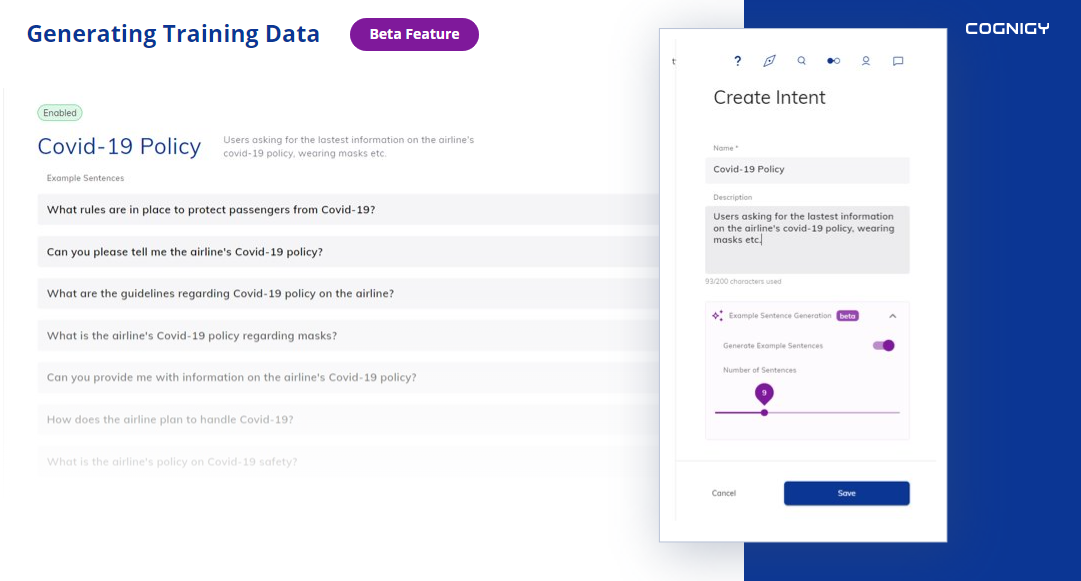
Generate Intent Sentences
- The generation of Intent example sentences for primary NLU languages besides German and English is not fully supported.
- The model may not always generate the exact number of sentences requested, as its output can vary based on interpretation and model behavior.
- Open the existing Flow.
- In the upper-right corner of the Flow Editor page, select NLU.
- On the Intent tab, click Create Intent.
- Specify a unique name for the Intent and add a relevant description. It helps generate a more accurate result. To ensure that the generated content meets the desired expectations, fill in both fields. Relying solely on the title without using the description field will not produce the intended results.
- Activate the Generate Example Sentences setting and set the number of generative sentences.
- Generate new sentences by clicking Create, then click Build Model.
Generate Adaptive Cards
Generate Adaptive Cards
LLMs can create Adaptive Cards based on the prompt you provide in the description field for the Adaptive Card output type in the Say or Copilot: Adaptive Card Tile Nodes.
Run-Time Generative AI Features
In Cognigy.AI, the run-time Generative AI features enrich AI Agents with dynamic interactions using LLMs. These features include running prompts, orchestrating conversations, rephrasing outputs, dynamic question reprompts, and generative knowledge retrieval.Configure LLMs for Run-Time Features
- In Manage > Settings, activate Enable Generative AI Features in the Generative AI Settings section.
- Go to the run-time feature you want to configure and select the LLM you want to use.
Use Run-Time Features
In the Flow editor, you can use the following run-time Generative AI features:LLM Prompt Node
LLM Prompt Node
The LLM Prompt Node enables you to run a prompt against an LLM and either output the message or store it in the Input or Context objects.
Rephrasing AI Agent Outputs
Rephrasing AI Agent Outputs
To use AI-enhanced bot output rephrasing in Say, Question, and Optional Question Nodes, do the following: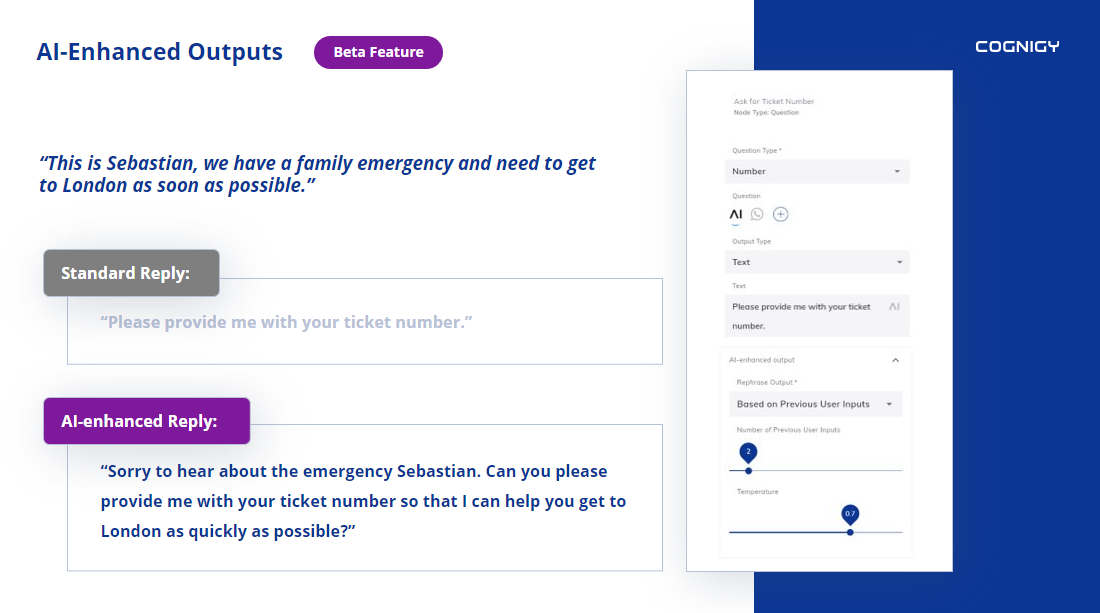
- Open the existing Flow.
- Add one of the Nodes: Say, Question, or Optional Question.
- Go to the AI-enhanced output section.
-
In the Rephrase Output setting, select one of the options:
- None — the Generative AI will not be applied to this Node. This setting is activated by default.
- Based on Custom Input — specify custom values for the Input. Use the Custom Inputs field that allows the bot developer to input information for contextualizing and rephrasing the output.
- Based on previous user inputs — set the last
xuser Inputs considered.
- Set the score in the Temperature setting. The temperature range determines the extent of variation in Generative AI’s response.
- Click Save Node.
LLM-powered Question Reprompts
LLM-powered Question Reprompts
The Question Node includes a feature to output a prompt to the user when they have answered a question incorrectly. Instead of using static text, you can use LLMs to generate a more dynamic and personalized output.
Search Extract Output Node
Search Extract Output Node
The Search Extract Output Node uses Cognigy Knowledge AI
to execute a search within a Knowledge Store,
extracts a relevant answer via a Generative AI model, and creates an output.
LLM Entity Extract Node
LLM Entity Extract Node
The LLM Entity Extract Node retrieves specific entities from user inputs,
such as product or booking codes and customer IDs.
For example, if a user input is
I would like to book flight AB123 from New York to London,
the LLM can extract the booking code AB123 from this input.FAQ
FAQ
Q1: Can I use my OpenAI free account for the Generative AI feature in Cognigy.AI?A1: A paid account is required to get an API Key, which is necessary for using Generative AI. A free account does not provide this key.Q2: Why doesn’t Generative AI work with AudioCodes Nodes?A2: Generative AI output supports only text messages in the AI channel.