Administrator role have access to the Account Settings.
There are the following settings available within the account:
Additionally, you can copy an Account ID and check a current version of your Live Agent installation.
General Settings
You can change the general settings for an account, including its name, language, and conversation workflow.Account Name
The name serves as the identifier and authentication for legal access to your organization’s account. It will always be displayed to indicate the registered account.Site Language
The language represents the preferred site language for your organization’s account. You can select one of the available options in a dropdown list by clicking on the language field. The default language is English (en). Setting a site language also translates system messages, push notifications, and email notifications.Conversation Limit per Agent
The conversation limit per human agent is the maximum number of conversations that a human agent can handle simultaneously. If a human agent reaches the limit in any Inbox, new conversations will remain unassigned, awaiting pickup by other human agents when their capacity utilization decreases. The conversation limit applies to the total number of conversations across all Inboxes. For example, the human agent is assigned to Inboxes A and B, and the conversation limit is set to 2. In this case, the human agent can handle two conversations simultaneously, regardless of the Inbox they belong to. To set up a conversation limit per Agent, follow these steps:- Go to Settings > Account Settings.
- On the Account Settings page, go to the General Settings section.
- Activate the Set conversation limit for agents option.
- In the Max number of conversations per agent field, specify the desired limit for agents.
- In the upper-right corner, click Update Settings.
Auto Set Away
The Auto Set Away option is used to automatically set the human agent as away when they are not active after the amount of time in minutes specified. This means the agent is not performing any action in the browser window while it is opened. When the agent performs an action, it will be set back to online state automatically.- Click Disable Auto Set Away, in case you do not want to use this option.
- Click Enable Auto Set Away for agents availability and enter the number of minutes in a separate field. After the specified time, the agent will then automatically switch to the
Awaystatus.
This setting does not work if the Live Agent interface is closed. In this case, the user is set to offline automatically when the browser window is closed.
TTL for Conversations
The TTL for Conversations option lets you automatically delete the conversations in the account after a set period. To set a TTL for conversations, follow these steps:- Click Enable TTL for conversations.
- Enter the TTL in the Number of days after conversation is deleted field.
TTL for Attachments
The TTL for Attachments option lets you automatically delete the attachments in messages of all conversations in the account after a set period. To set a TTL for attachments, follow these steps:- Click Enable TTL for attachments.
- Enter the TTL in the Number of days after attachment is deleted field.
Auto Resolve Conversations
Auto Resolve Duration
The Auto Resolve Duration option automatically resolves the conversation after a certain number of minutes. After that time, you can assume that the customer’s problem is solved, and the conversation can be closed.- Click Do not automatically resolve conversations, in case you do not want to use this option.
- Click Automatically resolve conversations if there is no activity and enter the number of minutes in a separate field. After this period, the conversation should auto-resolve if there is no activity.
Auto Resolve Action
The Auto Resolve Action option resolves or abandons a conversation automatically after the set Auto Resolve Duration has expired. The system starts a timer based on the last activity in the conversation. This activity can be any interaction, such as adding or removing a label, changing the priority, assigning or unassigning a human agent. If there’s no activity within the set time, the system marks the conversation as ready to be closed. You can select one of the following options:- Select Resolve to close a conversation if the specified time has passed without any activity and the last message was sent by either a human agent or an end user.
- Select Abandon to close a conversation if the specified time has passed without any activity and the last message was sent by a human agent. If an end user replied last, the conversation won’t be marked as abandoned.
Automatically Delete Resolved Conversations
When conversations are resolved, you can delete them. To automate this process, activate the Automatically delete conversations when they are resolved setting. When you activate this setting, Live Agent automatically deletes conversations marked as resolved. Note that this action will also delete all conversations that have already been resolved.Enable Agent Masking
Activating the Enable Agent masking setting masks all agent personal information, such as name, email, and profile images. For example, the agent name “Max Mustermann” would turn into “Agent x4gH5tZ”. Only the agent himself can see the clear name. No one in your organization and of course, no customer can connect the arbitrary masked name with a real human agent’s name.Auto-Assign Conversations to Busy Agents
Updated in 4.53 By default, you can manually assign conversations to any human agents regardless of their status (online, offline, away, busy). When this setting is activated, the system can automatically assign incoming conversations to an agent, even if the agent is busy and engaged in another conversation. By default, only online agents are considered.Agent Copilot
Cognigy Agent Copilot offers the most comprehensive functions compared to the other assistants, enabling human agents to provide faster and more accurate customer support. The workspace is fully customizable with widgets that display the most relevant information for any chat and voice use case. When embedded into your contact center, it enhances the overall efficiency of your contact center. In the Account Settings, administrators can activate Agent Copilot if it has been installed previously. If an administrator has already preset the AI Copilot Workspace setting in the Account Settings, this setting will take precedence over the user profile settings. Before you can enable AI Copilot Workspace for all human agents, activate the Enable overriding AI Copilot preferences setting. The configuration set here applies as a preset to all human agents of your organization account and overrides the Profile Settings.Notifications
Updated in 4.45 You can configure email and push notifications as well as the notification sound of audio notifications.Email and Push Notifications
- Push notifications must be enabled in Live Agent and in your browser. Otherwise, they are not available.
- Push notifications are not supported by the Microsoft Edge browser.
- A conversation is created.
- A conversation is assigned to you.
- You are mentioned in a conversation.
- You receive a message in an assigned conversation.
Notification Sound
You can add a notification sound to the push notifications you configured. To configure the notification sound, follow these steps:- Go to Settings > Account Settings.
- From the Sound list in the Notification Sound section, select one of the following options:
- Default — a short sound is triggered when you send or receive a message.
- Custom — the Sound URL field appears. Enter the URL for the sound file you want to set as audio notification. For example,
https://commondatastorage.googleapis.com/codeskulptor-assets/jump.ogg. The notification sound is triggered when a push notification is triggered. Use a notification sound between 3 and 5 seconds, as longer notification sounds may overlap if you send or receive consecutive messages rapidly. When using a custom sound URL, make sure that the server hosting the sound file has the appropriate cross-origin resource sharing (CORS) headers configured.
Account ID
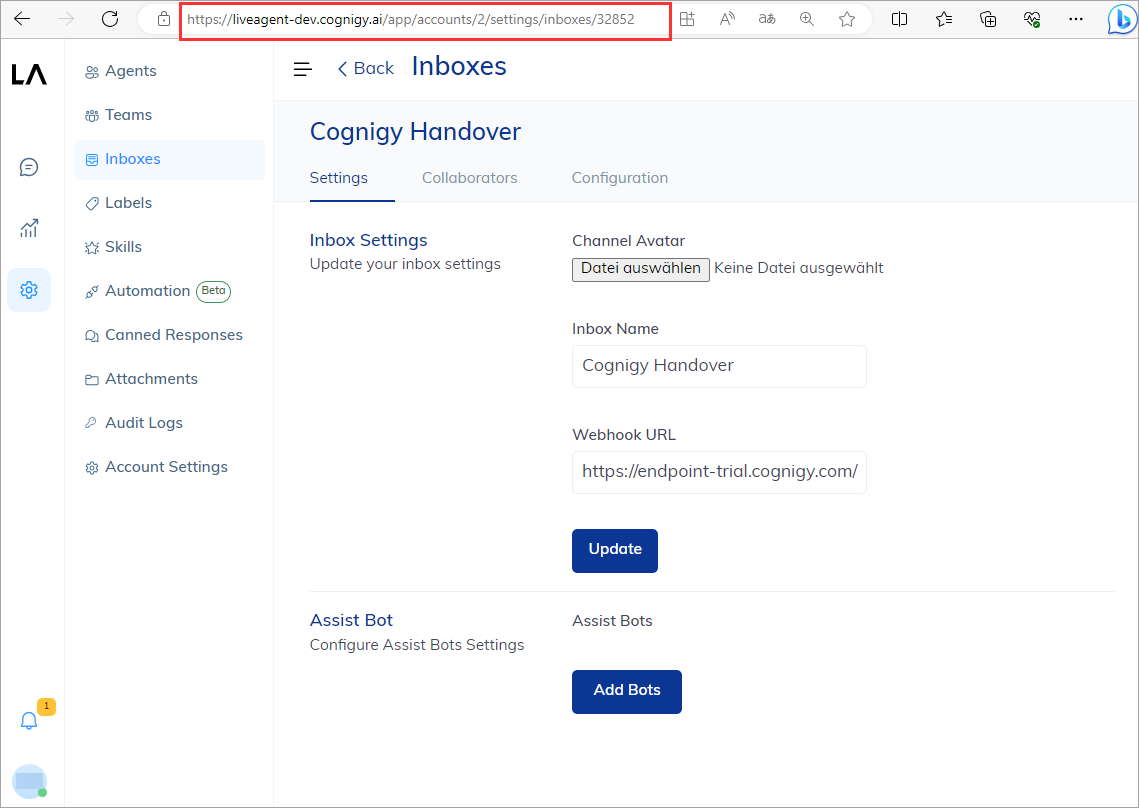
The Account ID, which is indicated here in the Account Settings, is the unique identifier of your account. It is used in the Live Agent URLs to identify which account is accessed. This ID is necessary when using the Live Agent API. To find the Account ID alternatively in the Live Agent URL of your Live Agent Inbox, follow these steps:- Open your Live Agent Account and go to Settings > Inboxes.
- In the Inboxes list, find the Inbox of your project, and click the Settings icon next to the Inbox.
- The Inbox settings will be displayed, and you will see the address line of your browser as follows:
https://liveagent-<your-environment>/app/accounts/<account-id>/settings/inboxes/<inbox-id>. For example, in the URLhttps://liveagent-dev.cognigy.ai/app/accounts/2/settings/inboxes/32852, the Account ID is 2.