DTMF

Description
The DTMF Node sends RTP payloads to the caller's SIP provider to play DTMF digit tones to the caller. If the caller's SIP provider supports RTP payloads according to RFC 2833, the customer will hear the voice tones of the DTMF digits.
This Node is useful when paired with a Handover to Agent Node or a Transfer Node. By playing the DTMF digit tones, the DTMF Node informs the caller that they are being transferred to another agent — either a voice AI Agent or a human agent in a contact center.
The Node can also be used in combination with DTMF input (the Capture DTMF Signals parameter in the Set Session Config Node) to provide feedback on the caller's input. For example, after a caller enters digits, the system plays back the corresponding DTMF tones for each digit entered to confirm the input.
Parameters
| Parameter | Type | Description |
|---|---|---|
| Digits Sequence | Text | Specifies the sequence of digits to be played to the caller. The sequence of digits can be a telephone extension code or the number for the customer service center. |
| Pause time | Slider | Specifies the pause length in milliseconds (ms), between each individual DTMF digit tone. The default value is 500 ms. |
Example
A company provides an option for customers to order equipment by leaving a voice message with the details about the equipment or to get assistance with equipment they have already received. An AI Agent guides the customer through this process using DTMF digit tones.
To build a Flow with the DTMF Node for the previous example, follow these steps:
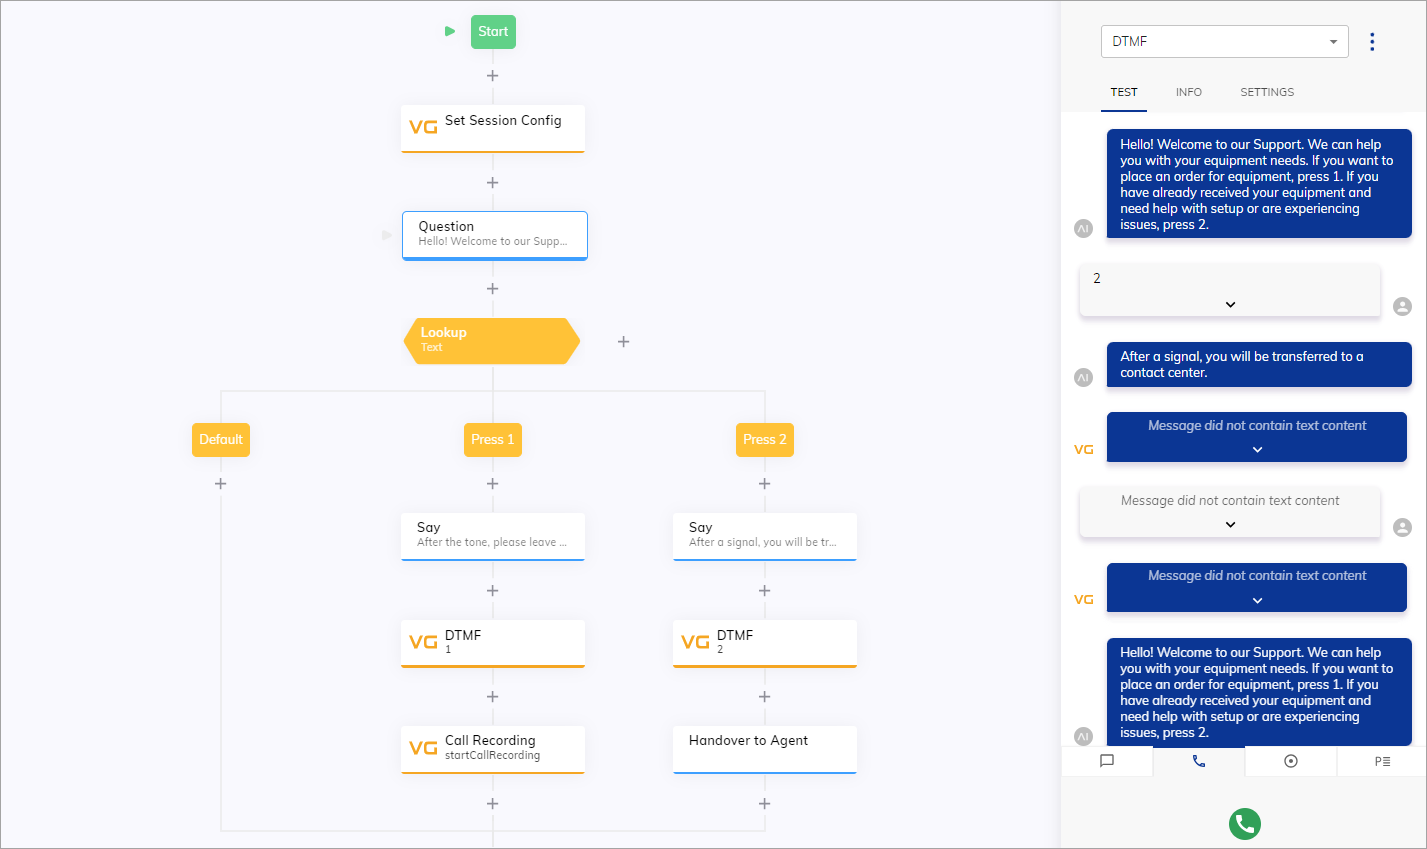
Example DTMF Flow
- In the Flow editor, click + and select Extensions > VG > Set Session Config.
- In the DTMF section of the Set Session Config Node, activate the Capture DTMF Signals parameter, remove
#from the DTMF Submit Digit field, and save. -
Below the Set Session Config Node, add a Question Node and configure the following settings:
- Question Type: select Number.
- Output Type: Select Text.
- Text:
Hello! Welcome to our Support. We can help you with your equipment needs. If you want to place an order for equipment, press 1. If you have already received your equipment and need help with setup or are experiencing issues, press 2.
-
Below the Question Node, add a Lookup Node, select the Text type, and click Save Node.
-
Configure the logic in the branch for the first Case Node:
- In the Value field, specify
1. - Below the Case Node, add a Say Node. In the Text field of the Say Node, specify the following sentence:
After the signal, please leave a voice message with the information about the equipment you wish to order, and we will call you back. - Below the Say Node, add a DTMF Node. Specify
1in the Digit Sequence field to correspond the tone to the dial number that the caller presses. - (Optional) Add a Call Recording Node to record the caller speech.
- In the Value field, specify
-
Configure the logic in the branch for the second Case Node:
- In the Value field, specify
2. - Below the second Case Node, add a Say Node. In the Text field of the Say Node, specify the following sentence:
After the signal, you will be transferred to a contact center. - Below the second Say Node, add another DTMF Node. Specify
2in the Digit Sequence field to correspond the tone to the dial number that the caller presses. - Add a Handover to Agent Node to route the caller to the contact center.
- In the Value field, specify
Test your Flow via the Interaction Panel. Use the Voice Call setting.
