Build Your Voice AI Agent in Minutes
In this tutorial, you will learn how to create a voice agent that uses dial logic. Dial logic lets users select options by pressing the corresponding numbers on a dial pad. This way, the voice agent can guide users through predefined paths based on their choices.
Prerequisites
- You need to have access to a Cognigy.AI account.
- One of the following speech provider credentials is required for testing a voice agent: Microsoft Azure Speech Services, Google Speech Services, or Amazon Polly.
Log in to Cognigy.AI
You can login with your Cognigy.AI credentials or, optionally, with single sign-on (SSO), if you have set up login with SSO. If you have enforced login with SSO, you can only log in with SSO.
Log in with Credentials
-
Go to the login page and enter your account credentials in the following fields:
- E-Mail — the email you provided to your Cognigy.AI admin to register your Cognigy.AI account.
- Password — the password you received from your Cognigy.AI admin. If you don't remember your password, you can reset your password.
-
(Optional) If you want to stay logged in after you close your session, activate the Remember me option.
- Click Sign in.
Log in with SSO
- Go to the login page and click Login with SSO.
- Enter your email in the E-Mail field.
- Click Login with SSO.
- Click Sign in with SSO.
- Go to the login page and click Login with SSO.
- Enter your email in the E-Mail field.
- Click Sign in with SSO.
Create a Project
Create a Project that involves building an AI Agent:
- In the upper-left corner of the Cognigy.AI interface, click + Create Project.
- On the Basic settings for your Project page, specify a name for your agent in the Project Name field, for example,
AI Agent. - Click Create Empty Project.
Once the project creation is complete, you can proceed with building the AI Agent.
Add Speech Provider Credentials
To add credentials for a speech provider, follow these steps:
- In the left-side menu of the Project, go to Manage > Settings.
-
Go to the Voice Preview Settings section and select one of the following providers:
- Next to the Speech Connection field, click + to enter credentials.
- In the New Connection window, fill in the following fields:
- Connection — specify a unique connection name.
- Api Key — specify an API key for Microsoft Azure Speech Services. Log in to the Azure portal, navigate to your Speech Services resource, and copy the API key labeled as Key1 from the Keys and Endpoint section. For more information, read the Microsoft Azure AI documentation.
- Region — this parameter is optional. Enter a specific region if necessary.
- Connection — specify a unique connection name.
- Next to the Speech Connection field, click + to enter credentials.
- In the New Connection window, specify a unique name for your connection in the Connection field.
- Click Upload JSON File and upload the JSON file that you received from Google Speech Services. To obtain a JSON key file for accessing the Google Speech Services, first create a service account in the Google Cloud Console under IAM & Admin. Assign the appropriate roles, generate a JSON key file for the service account, and download this key.
- Next to the Speech Connection field, click + to enter credentials.
- In the New Connection window, fill in the following fields:
- Access Key ID — specify an Access Key ID. Log in to the AWS Management Console, go to the IAM dashboard, select Users, and choose the IAM user. Navigate to the Security credentials tab, and under Access keys, create a new access key if one hasn't been created. Copy the Access Key ID provided after creation.
- Secret Access Key — specify a Secret Access Key. After creating the access key, you'll be prompted to download a file containing the Access Key ID and the Secret Access Key. Alternatively, you can retrieve the Secret Access Key by navigating to the IAM dashboard, selecting the user, going to the Security credentials tab, and clicking Show next to the Access Key ID to reveal and copy the Secret Access Key.
- Session Token — this parameter is optional. If you use temporary security credentials, obtain the token when using AWS STS (Security Token Service) to assume a role or federate users.
- Region — this parameter is optional. Enter the AWS region where your Amazon Polly resources are located, for example,
us-east-1for the US East (N. Virginia) region.
- Access Key ID — specify an Access Key ID. Log in to the AWS Management Console, go to the IAM dashboard, select Users, and choose the IAM user. Navigate to the Security credentials tab, and under Access keys, create a new access key if one hasn't been created. Copy the Access Key ID provided after creation.
- Next to the Speech Connection field, click + to enter credentials.
-
Click Create.
- To check the connection, click Test.
After adding credentials for the speech provider, you can create your first voice agent.
Build a Voice AI Agent
To build a voice AI Agent, follow these steps:
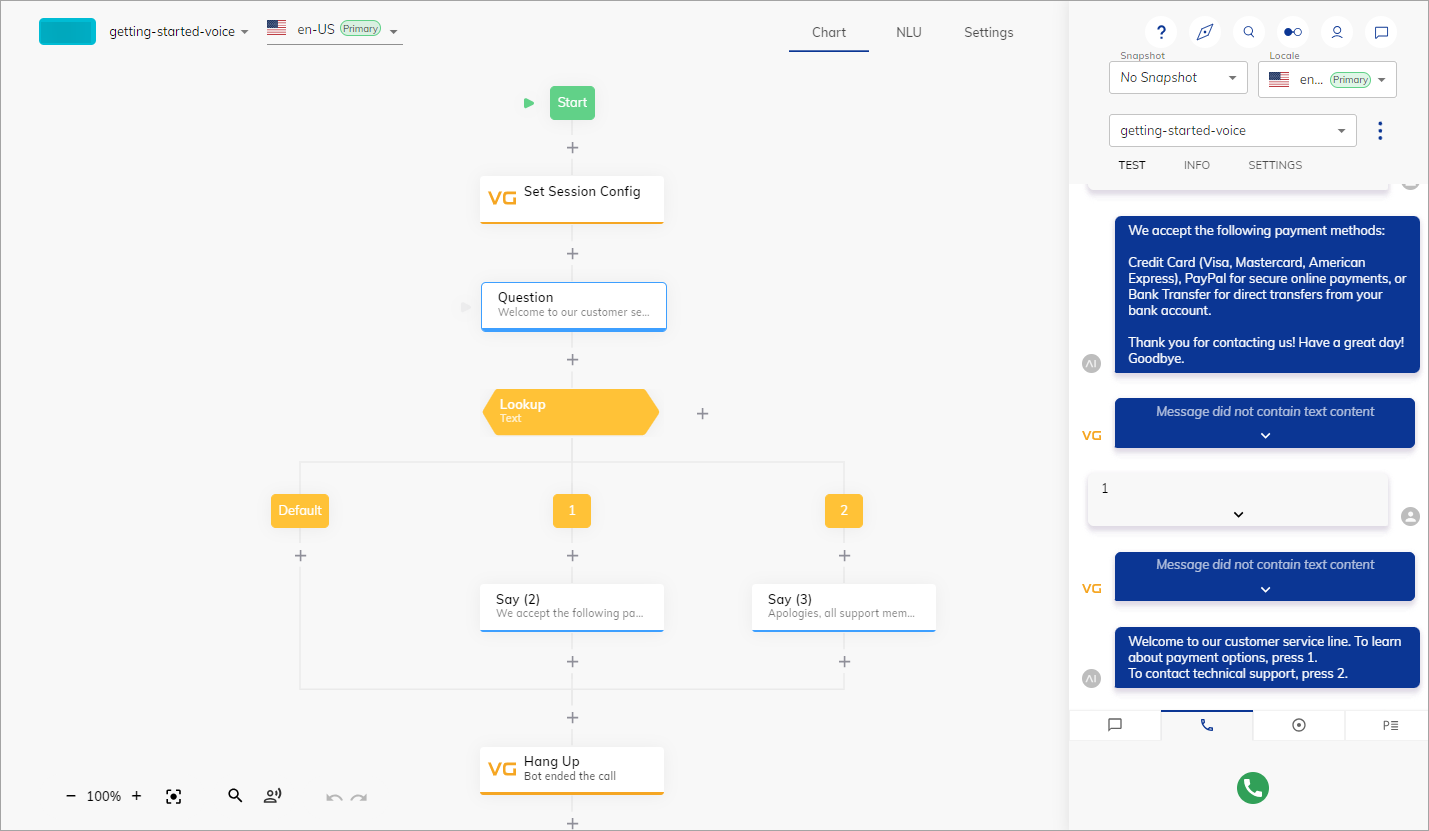
- In the left-side menu of the Project, go to Build > Flows.
- Create a new Flow by clicking + New Flow in the upper-right corner.
- In the New Flow window, do the following:
- Add a unique name, for example,
Getting Started. - Add a relevant description, for example,
Getting Started Guide for voice agent. - Click Create.
- Add a unique name, for example,
- In the Flow editor, click + and select Extensions > VG.
- Create a new Node by selecting Set Session Config from the list. The Node appears in the Flow editor.
- Left-click the Set Session Config Node to open the Node editor.
- In the Node editor, go to the DTMF section.
- In the DTMF section, activate the Capture DTMF Signals setting and remove
#from the DTMF Submit Digit field. - Click Save Node.
- Below the Set Session Config Node, add a Question Node.
- In the Question Node editor, configure the following settings:
- From the Question Type list, select Number.
- From the Output Type list, select Text.
- In the Text field, enter the following sentences:
Welcome to our customer service line. To learn about payment options, press 1. To contact technical support, press 2. - Click Save Node.
- From the Question Type list, select Number.
- Below the Question Node, add a Lookup Node.
- In the Lookup Node editor, select the Text type and click Save Node.
- Click the Case Node. In the Value field, specify
1, then click Save Node. - Below the Case Node, add a Say Node.
- In the Say Node editor, go to the Text field and in specify the following sentences:
We accept the following payment methods:Credit Card (Visa, Mastercard, American Express), PayPal for secure online payments, or Bank Transfer for direct transfers from your bank account. Thank you for contacting us! Have a great day! Goodbye. - Click Save Node.
- Click the second Case Node. In the Value field, specify
2. - Below the second Case Node, add a Say Node.
- In the Say Node editor, go to the Text field and in specify the following sentences:
Apologies, all support members are busy. Try to contact us later. Thank you for your patience. - Click Save Node.
- At the end of the Flow, add a Hang Up Node.
Once the voice agent is created, you can test it using the Interaction Panel.
Test your Voice AI Agent
To test your voice AI Agent, follow these steps:
- In the existing Flow, open the Interaction Panel by clicking
 Chat with your Agent in the upper-right corner of the page. The Interaction panel appears on the right side of the Flow Editor.
 - Initiate a call by clicking
 > Start Call at the bottom of the Interaction Panel.
 - Listen to the message from the voice agent and then select either number 1 or 2 on the dial pad
 located in the bottom-right corner of the Interaction Panel.
 - The voice agent will respond with a voice message according to the number you selected, and then finish the conversation. If you want to listen to a specific voice output again, hover your cursor over the message in the Interaction Panel and click Voice Preview.
To deploy your Flow in production, you will need to create a Voice Gateway Endpoint and set up a SIP Trunk provider. For these steps, refer to the Voice Gateway documentation.
What's Next?
- Familiarize yourself with the core concepts of building AI Agents, such as Projects, Flows, Nodes, and Cognigy Script.
- Enhance your agent's performance with AI features, such as NLU, LLMs and Generative AI, as well as Knowledge AI.
- Explore test and deploy features.
- Connect your agent to the contact center.