Activate Knowledge AI
To activate Knowledge AI, first complete the following steps:
- Apply for a license
- Set quotas
- Activate the feature flag
- Familiarize yourself with Knowledge AI metrics
Apply for a License
You need to obtain a license from Cognigy to use Knowledge AI. The license allows you to use Knowledge AI with your installation and allocate Knowledge Chunks quotas to your organizations. If you exceed your quotas, you can't create new Knowledge AI resources or edit existing ones.
A user with admin rights needs to add the license to your installation. If you are using a shared SaaS installation with version 4.78 or later, contact Cognigy technical support to add a quota for your organization. For on-premises and dedicated SaaS installations, contact Customer Success Management or Account Executives at Cognigy.
Set Quotas
After adding the license, you need to set your Knowledge Chunk quotas based on the number of quotas you purchased within your license. You can set quotas to only one organization or distribute them among multiple organizations.
Only a user with admin rights for the Management UI can set quotas via the Management UI or the Cognigy.AI API. If you use a shared SaaS environment, contact Cognigy technical support to configure quotas. For on-premises and dedicated SaaS installations, contact Customer Success Management or Account Executives at Cognigy.
Set Quotas in Management UI
To set quotas in Management UI, select an organization on the Organisations page. Then, click > Change Organisation Quotas in the upper-right corner and enter the value in the Max knowledge chunks field.
Set Quotas via API
To set quotas via the Cognigy.AI API, follow these steps:
- Under AUTHENTICATION > HTTP Basic, enter your Management UI credentials, then click SET.
-
Send the following HTTP request for a new or an existing organization:
Use the POST /management/v2.0/organisations request. Send the request with a JSON body. In the JSON body, specify a unique name for the new organization and the maximum number of Knowledge Chunks in the
quotaMaxKnowledgeChunksparameter.If the response is successful, the server returns aPOST /management/v2.0/organisations Content-Type: application/json { "name": "My Organization", "quotaMaxKnowledgeChunks": 1000 }200status code with theorganisationIdand set quota.Use the PATCH /management/v2.0/organisations/{organisationId} request. Include the
organisationIdparameter in the path and a JSON body. In the JSON body, specify the maximum number of Knowledge Chunks in thequotaMaxKnowledgeChunksparameter. FindorganisationIdin the ID column under Management UI > Organisations.PATCH /management/v2.0/organisations/{organisationId} Content-Type: application/json { "quotaMaxKnowledgeChunks": 1000 }If the response is successful, the server returns a
200status code with an empty body.
Billable Units
Knowledge Chunks and Knowledge Queries are billable units:
- Number of Knowledge Chunks — Knowledge AI calculates the number of Knowledge Chunks you consume when creating or editing Knowledge Sources or Knowledge Chunks. If your quota is exceeded, you can't edit any Knowledge Sources or create new ones.
- Number of Knowledge Queries — Knowledge AI counts the number of Queries performed to retrieve relevant Knowledge Chunks. The number of Knowledge Queries is unlimited. However, you will be billed based on the Queries you have performed. Each time the following Nodes are executed they increase the number of performed Knowledge Queries by one:
Activate the Feature Flag
To activate the Knowledge AI feature flag, contact Cognigy technical support.
View Metrics
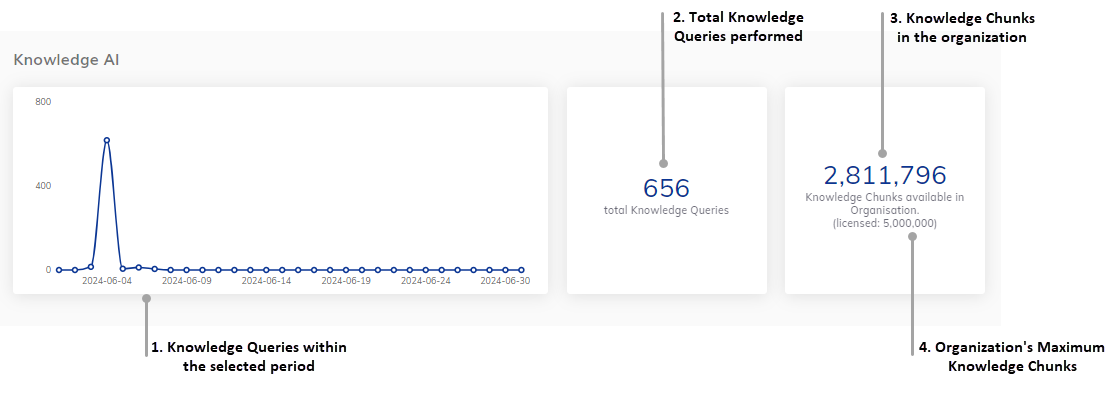
Familiarize yourself with the Admin Center page. On this page, you can monitor Knowledge AI metrics to manage the consumption of Knowledge AI resources effectively.

The Knowledge AI metrics include the following:
- The number of Knowledge Queries performed within the selected period.
- The total number of Knowledge Queries performed.
- The number of Knowledge Chunks currently available in the organization.
- The maximum number of Knowledge Chunks allocated to the organization.
