Guide for Chat AI Agents
In this tutorial, you will learn how to create a simple chat AI Agent from scratch that greets you by name. Then you will test this agent using built-in Cognigy testing tools.
Prerequisites
- You need to have access to a Cognigy.AI account.
Log in to Cognigy.AI
You can log in with your Cognigy.AI credentials or, optionally, with single sign-on (SSO), if you have set up login with SSO. If login with SSO is enforced, you can only log in with SSO.
Log in with Credentials
-
Go to the login page and enter your account credentials in the following fields:
- E-Mail — the email you provided to your Cognigy.AI admin to register your Cognigy.AI account.
- Password — the password you received from your Cognigy.AI admin. If you don't remember your password, you can reset your password.
-
(Optional) If you want to stay logged in after you close your session, activate the Remember me option.
- Click Sign in.
Log in with SSO
- Go to the login page and click Login with SSO.
- Enter your email in the E-Mail field.
- Click Login with SSO.
- Click Sign in with SSO.
- Go to the login page and click Login with SSO.
- Enter your email in the E-Mail field.
- Click Sign in with SSO.
Create Projects
Create Projects that involve building an AI Agent:
- In the upper-left corner of the Cognigy.AI interface, click + Create Project.
- On the Basic settings for your Project page, specify a name for your agent in the Project Name field, for example,
AI Agent. - Click Create Empty Project.
Once the project creation is complete, you can proceed with building the AI Agent.
Build a Chat AI Agent
To build a chat AI Agent, follow these steps:
- In the left-side menu of the Project, go to Build > Flows.
- Create a new Flow by clicking + New Flow in the upper-right corner.
- In the New Flow window, do the following:
- Add a unique name, for example,
Getting Started. - Add a relevant description, for example,
Getting Started Guide for chat agent. - Click Create.
- Add a unique name, for example,
- In the Flow editor, create a new Node by clicking + and selecting a Question Node from the list.
- Left-click the Question Node to open the Node editor.
- In the Question Node editor, set up the following parameters:
- From the Question Type list, select Text.
- In the Text field, enter the following sentences:
Hello! What's your name? - Click Save Node.
- From the Question Type list, select Text.
- Below the Question Node, add a Say Node.
- Left-click the Say Node to open the Node editor.
- In the Say Node editor, go to the Text field.
- In the Text field, enter
Helloand click .
. - From the Tokens list, select Answer. This token lets reuse the user's answer in the AI Agent's response.
- Click Save Node.
Once your AI Agent is created, you can test it via the Interaction Panel.
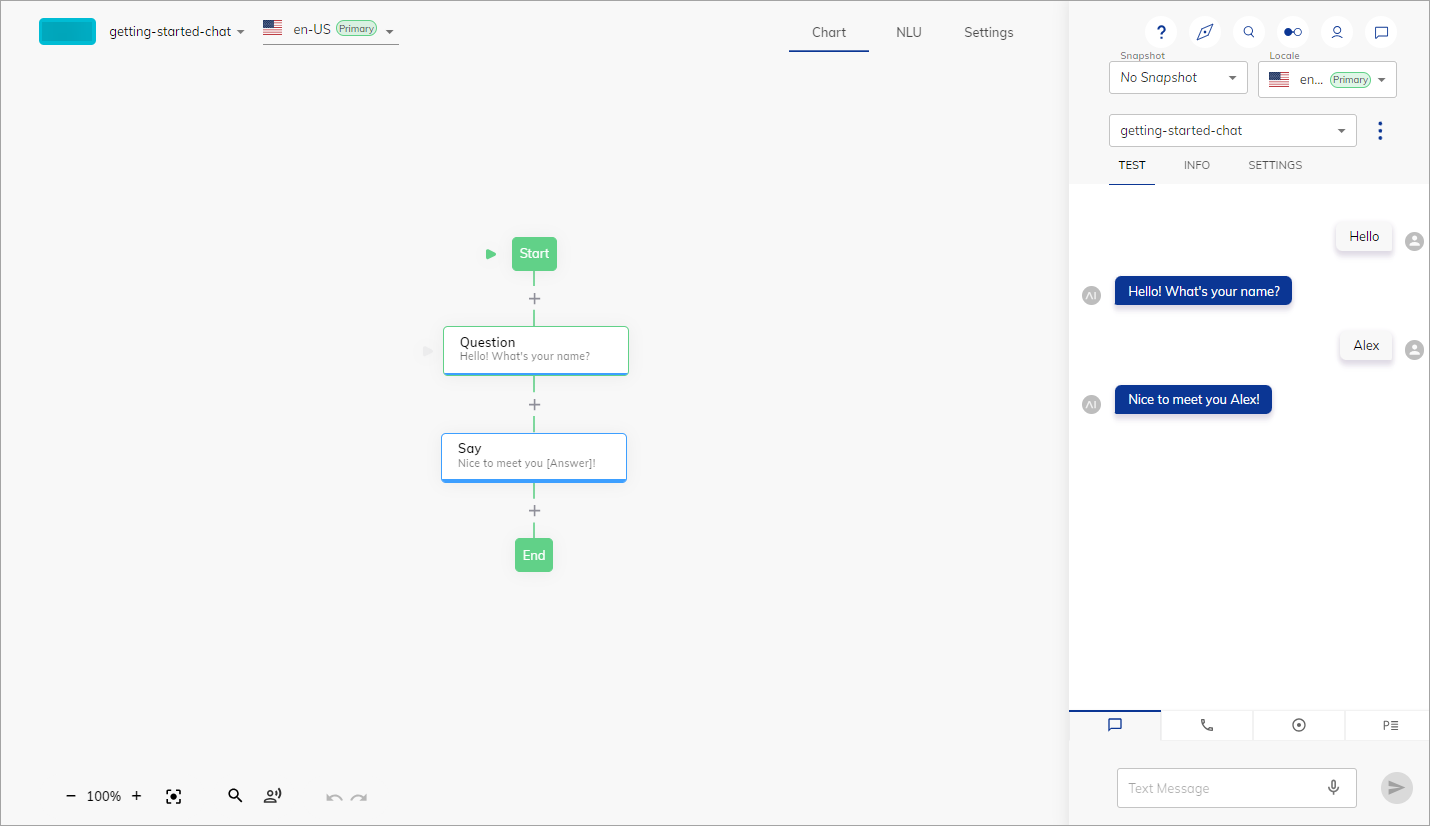
Test your Chat AI Agent
To test your AI Agent, follow these steps:
- In the existing Flow, open the Interaction Panel by clicking
 Chat with your Agent in the upper-right corner of the page. The Interaction panel appears on the right side of the Flow Editor.
 - Initiate a conversation by entering
Helloin the Text Message field and press Enter. - Answer the AI Agent's question by entering your name. The AI Agent will greet you by your name.
Now you can deploy the agent using the Webchat v3 Endpoint, and see how conversations look on the production environment through Demo Webchat.
What's Next?
- Familiarize yourself with the core concepts of building AI Agents, such as Projects, Flows, Nodes, and Cognigy Script.
- Enhance your agent's performance with AI features, such as NLU, LLMs and Generative AI, as well as Knowledge AI.
- Explore test and deploy features.
- Connect your agent to the contact center.