Goals
Note
Goals is a new feature, and we are making it accessible to our customers through a phased rollout. Once it becomes available for your environment, your Cognigy business representative will notify you via email.
You can also explore the Goals Report in the Cognigy trial environment. We encourage you to try this feature out and provide us with feedback.
Goals are structured objectives that require specific steps to be completed in AI Agent interactions. You can use goal steps to track user actions with Track Goal Nodes and tie these actions to measurable business metrics. This setup ensures alignment of your AI Agents with organizational objectives.
With goals, you can evaluate and enhance the business impact of your AI Agent:
- Track user interactions. Monitor specific user interactions during conversations to ensure they align with your business objectives.
- Monitor different goals and their steps. Track different goals and their corresponding steps to get a comprehensive view of the user journey in conversations.
- Measure business value. Goals are linked to business metrics, allowing you to assess the value of AI Agents in achieving key business objectives. Metrics, such as time and money for each completed goal and step, provide a detailed view of the AI Agent's performance.
- Gain valuable insights. Measure how effectively your AI Agent conversations achieve business objectives and optimize AI Agents to improve performance and user satisfaction.
Limitations
- By default, the maximum number of steps per goal is 10. You can increase this number to 20 by using the
FEATURE_USE_GOALS__MAX_STEPS_PER_GOALvariable in thevalues.yamlfile.
Working with Goals
You can create, edit, and delete goals and their steps, as well as export them as a Package in Build > Goals.
When you delete a goal or a step, all associated analytics data is deleted and the Track Goal Node linked to the goal stops working. Before deleting the goal or step, either replace it with another goal or step in the Flow, or remove the linked Node if it's no longer needed.
Determine What You Want to Measure
Decide whether you want to track money, time, or both:
- Money Saved. Track cost savings. To set the currency, go to Manage > Settings > Currency Settings and select a currency type from the Set Standard Currency list. You can select only one type of currency per Project.
- Revenue Earned. Monitor the additional revenue you earn by automating the process with the AI Agent. To set the currency, go to Manage > Settings > Currency Settings and select a currency type from the Set Standard Currency list. You can select only one type of currency per Project.
- Time Saved. Measure the amount of time a person spends on the task. This metric shows the time human agents save when the goal is achieved.
Implement Goals in Flows
To implement goals in your Flows, follow these steps:
1. Create Goals
- In Build > Goals, click + New Goal and configure the parameters of a goal:
- Name — this field is mandatory. Enter a name that reflects the goal. For example,
Reduce Call Handling TimeorIncrease Automation Efficiency. - Description — this field is optional. Provide a brief description that reflects the goal. For example,
This goal aims to reduce average call handling time by automating common customer requests.
- Name — this field is mandatory. Enter a name that reflects the goal. For example,
- In the Initial Step section, complete the following fields:
- Name — this field is mandatory. Provide a descriptive name for the starting step. For example,
Initiate AI Agent Conversation. The initial step is required, as the goal activates when the Flow triggers this step. - Description — this field is optional. Add a detailed description of the starting step. For example,
This step triggers when a user begins an AI Agent session.
- Name — this field is mandatory. Provide a descriptive name for the starting step. For example,
- In the Steps section, click + New Step and add at least one step to complete the goal configuration. If you add only one step, it must be marked as a Completion Point.
- Configure the step parameters:
- Name — this field is mandatory. Enter a name that reflects the step. For example,
Customer Request Handled. - Description — this field is optional. Describe the step. For example,
This step captures when the AI Agent successfully resolves a customer request. - Mark this step as a completion step — activate this setting to mark the current step as the point where the goal is considered fully completed. For example, this step can reflect the key result when the AI Agent has resolved all user requests. At least one step in the goal must be marked as completed. Multiple steps can be marked as completed.
- Name — this field is mandatory. Enter a name that reflects the step. For example,
- In the Success Metrics field, measure the impact of your goal by tracking the following performance metrics:
- Cost Savings — track saved money by entering values in the format
xx.xx. For example,150.00represents$150. Make sure your currency is configured in the Currency Settings section in the Project Settings. - Revenue Earnings — track earnings by entering values in the format
xx.xx. For example,150.00represents$150. Make sure your currency is configured in the Currency Settings section in the Project Settings. - Time Saved — track saved time by entering values in the format
00:00:00(hours:minutes:seconds). For example,02:45:00represents 2 hours and 45 minutes.
- Cost Savings — track saved money by entering values in the format
2. Add Goals to Flows
- In Build > Flows, select a Flow or click + New Flow to create one.
- In the Flow editor, add a Track Goal Node to monitor goal progress in the Flow.
- Configure the Node settings:
- Select Goal — choose the goal you recently created, such as
Reduce Call Handling Time. - Select Steps — choose the goal steps that you want to track. The first selected step must be the initial step. Set the initial step at the beginning of the process you want to track in your Flow. Otherwise, the goal isn't tracked.
- Select Goal — choose the goal you recently created, such as
You can add multiple Track Goal Nodes to the same Flow to track different steps and KPIs.
By defining multiple steps and associating them with predefined metrics, goals provide a more comprehensive way to evaluate success compared to Tasks. While using multiple steps, you must still define the initial and completion steps. Without a completion step, your goal is partially completed or incomplete if only the initial step is triggered.
Track Goals in Insights
After having added goals and their steps to Flows, you can monitor metrics in the Insights Goals report.
Example
In this example, you will configure goals and steps in a Flow, such as entering passenger information and completing payment. This setup lets you track the pre-booking process and monitor and analyze each step of the booking process. Follow these instructions:
1. Configure Goals
- Create a Goal with the name
Pre-book a Flight. - Set up these steps in this Goal:
- Initial Step — navigate to the Initial Step section and enter
Select booking optionsin the Name field. - Further Steps — use the + New Step option to add two further steps with the following names:
- Passenger Details — at this step, set the time savings metric to
3 minutesin the Time Saved field. - Confirm Booking — at this step, set the cost savings metric to
$15in the Cost Savings field, then activate the Mark this step as a completion step option.
- Passenger Details — at this step, set the time savings metric to
- Initial Step — navigate to the Initial Step section and enter
2. Create Flows and Configure the Initial Step
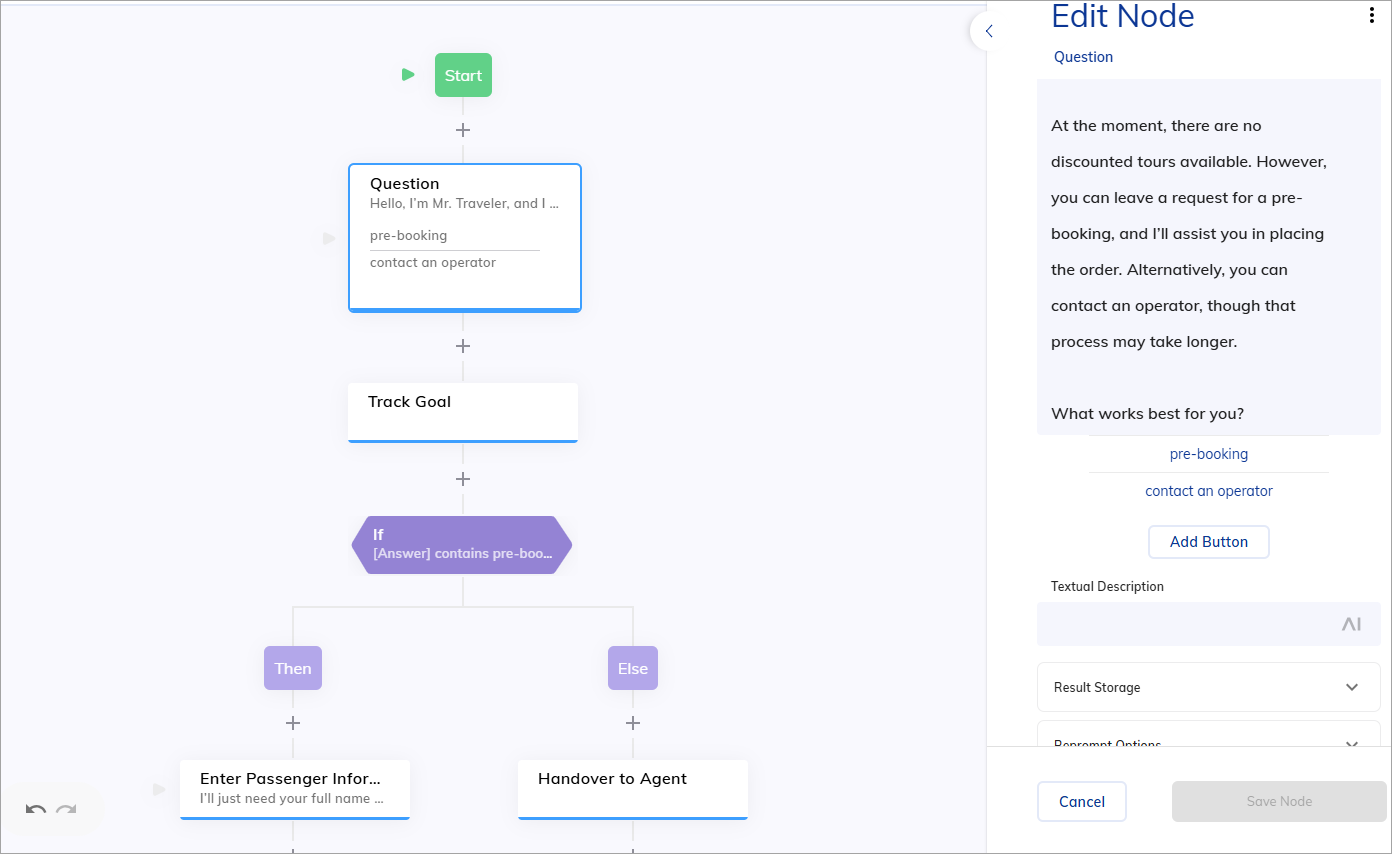
- Create a Flow and add a Question Node to the Flow.
- Open the Question Node and select the Text with Buttons output type.
- In the Text field, enter the following text:
Hello, I’m Mr. Traveler, and I can help you find discounts on tours to Europe. At the moment, there are no discounted tours available. However, you can leave a request for pre-booking, and I’ll assist you in placing the order. Alternatively, you can contact an operator, though that process may take longer. What works best for you? - Click Add Button and configure the first button:
- In the Button Title field, enter
pre-booking. - From the Select Button Type list, select Postback Value.
- In the Postback Value field, enter
pre-bookingand save.
- In the Button Title field, enter
- Click Add Button and configure the second button:
- In the Button Title field, enter
contact an operator. - From the Select Button Type list, select Postback Value.
- In the Postback Value field, enter
contact an operatorand save.
- In the Button Title field, enter
- Below the Question Node, add a Track Goal Node. In the Node editor, select the initial step you created earlier and save. This Node will initiate the goal tracking process.
- Below the Track Goal Node, add an If Node. In the Node editor, configure the
Answer contains pre-bookingcondition:
3. Configure the Passenger Details Step
- Below your Then child Node, add a Question Node. Below the Else child Node, add a Handover to Agent Node.
- Add a Question Node.
In the Node editor, configure the following fields:
- From the Question Type list, select Text.
- From the Output Type list, select Text and enter the following text:
I'll just need your full name and contact information to finalize the booking.
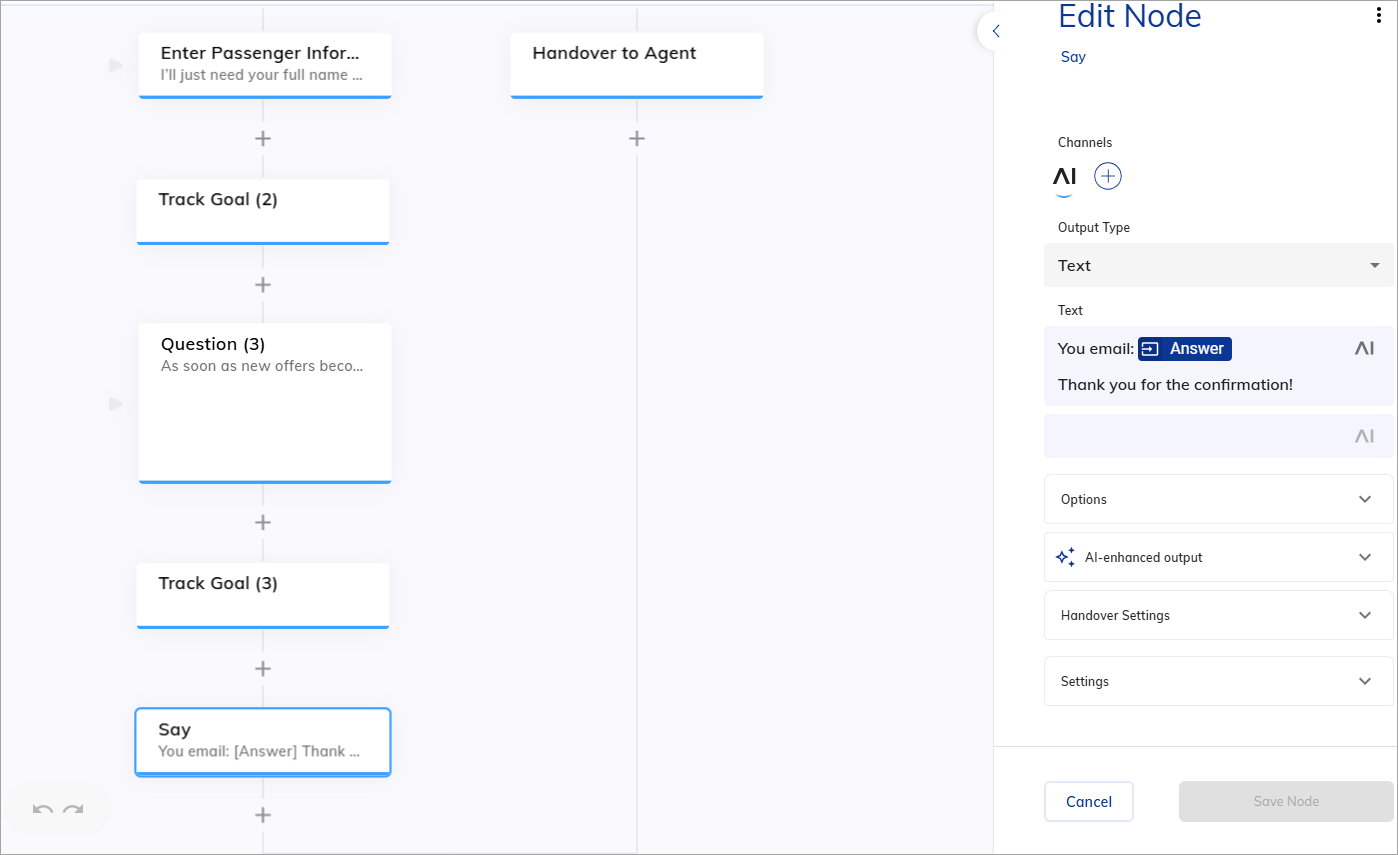
- Add a new Track Goal Node. In the Node editor, select Passenger Details Step from the Steps list and save. This Node will record how much time is saved when the user submits the data manually.
4. Configure the Confirm Booking Step
- Below the Track Goal Node, add a Question Node.
- Add a Question Node.
- Open the Node editor and select Email from the Question Type list.
- Select the Text with Buttons output type.
- In the Text field, enter the following text:
As soon as new offers become available, you will receive an email about your pre-booking. Please confirm your booking by entering your email.- In the Button Title field, enter
pre-booking. - From the Select Button Type list, select Postback Value.
- In the Postback Value field, enter
pre-bookingand save.
- In the Button Title field, enter
- Below the Question Node, add a Track Goal Node. In the Node editor, select Confirm Booking from the Steps list and save. This Node will record how much money is saved when the user submits the data manually.
- Below the Track Goal Node, add a Say Node. In the Node editor, enter the following text in the Text field:
Replace
Your email: <Answer> Thank you for the confirmation!<Answer>with the Answer Token by clicking.
5. Test your Flow
Test your Flow via the Interaction Panel. Activate debug mode to see when Track Goals are triggered. To view recorded metrics, go to Insights and select Goals from the left-side menu.

