Interaction Panel
The Interaction Panel offers a robust testing interface for your AI Agents. It enables you to test and analyze the behavior of your AI Agents, allowing you to modify and improve their communication and service skills.
The Interaction Panel provides the following features:
- Three Testing Modes. Test your AI Agent across all channels with Chat, Voice, and Live modes to simulate real-world interactions.
- Memory Inspection and Extraction. View and extract data stored within the AI Agent's memory to analyze its behavior and identify potential areas for improvement.
- Playbooks. Use playbooks to save your time by automating repetitive tasks and catching errors efficiently.
- Flexible Configuration. Design custom test scenarios for in-depth analysis of your AI Agent's behavior.
If you're new to the Interaction Panel, follow these steps to familiarize yourself with its features and start testing AI Agents:
- Open the Interaction Panel and configure the Project-related settings.
- Select the mode in which you want to test the AI Agent.
- Examine the data stored in the AI Agent's memory and how it's reused.
- Consider enabling additional settings, such as Expert mode, for more detailed testing.
- Run Playbooks to catch potential errors.
Open the Interaction Panel
To open the Interaction Panel, follow these steps:
- Open the Cognigy.AI interface.
- In the left-side menu, select the Project that contains the AI Agent you want to test.
- In the left-side menu of the Project, navigate to Build > Flows.
- On the Flows page, select the Flow that contains the AI Agent you want to test.
- In the toolbar at the top right of the Cognigy.AI interface, click
 .
.
In the Cognigy.AI interface, the Interaction Panel is always accessible within any Project, offering a quick and convenient way to test and debug your AI Agents.
Project-Related Settings
If you open the Interaction Panel directly from a Flow, the Flow itself, any relevant Snapshot (a specific version of your AI Agent), and Locale (language settings) will be preselected based on your Flow settings. However, you can still modify these options as needed.
When you access the Interaction Panel from any other Project page, you'll need to configure the following options for testing:
- Flow — select the specific Flow you want to test with the AI Agent.
- Locale — define the language your AI Agent should use during the test interaction.
- Snapshot — this setting is optional. If applicable, you can select a specific version of your AI Agent for testing.
Flow Select
When you have created more than one Flow, you can select the Flow you want to test as follows:
- Click
 to open a list of the available Flows.
 - Select the Flow you want to test.
Locale
Locales are fundamental components for multilingual AI Agents communication. They enable AI Agents to interact with end users in their native languages, considering cultural nuances and creating a smooth user experience.
When you create more than one locale, you can select a preferred language as follows:
- Click to open a list of the available locales.
- Select the Locale you want to use.
When you run a Flow on the Test tab, the AI Agent's responses will match the language you previously selected in the locale settings of your Flow.
Snapshot
Snapshots are immutable forms of your AI Agent. Using Snapshots, you can test your AI Agent configuration in the Interaction Panel as follows:
- Click to open a list of the available Snapshots.
- Select the Snapshot you want to test.
For more information, refer to Snapshots.
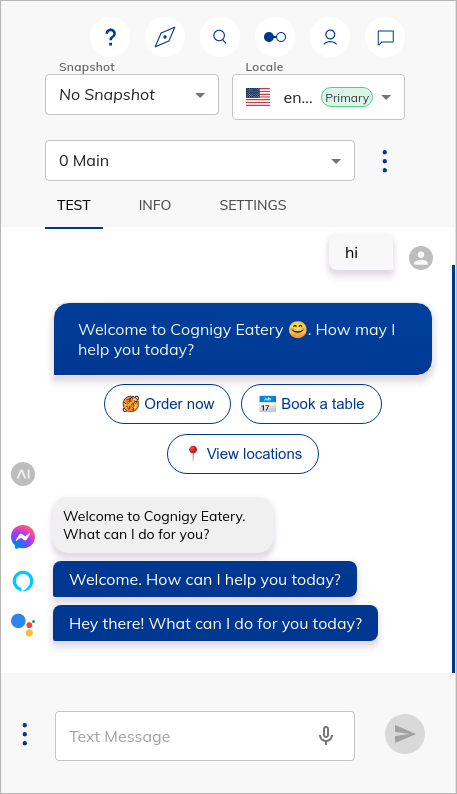
Test
On the Test tab of the Interaction Panel, you can test your AI Agent using different channels.
Channel-Specific Output
To view channel-specific output, it must be configured in an output Node (for example, Say or Question Nodes). The Interaction Panel displays the outputs with corresponding channel icons and can filter them for a selected set of channels. For more information, refer to Chat Output.
Input Modes
You can select three input modes by selecting the corresponding tab at the bottom of the Interaction Panel interface:
Chat
When Chat is selected as the input mode,
a Flow can be triggered by typing into the input field
and pressing Enter on your keyboard or clicking the Send button.
Alternatively,
use the ![]() (microphone) button
to activate your device's microphone and record voice input.
(microphone) button
to activate your device's microphone and record voice input.
Messages can include attached data. You can simulate this data input by adding a data payload in JSON format to the data input field. To activate the Data Input field, go to the Settings tab and enable the Show data input toggle. Any message data sent to Cognigy.AI is accessible via CognigyScript using the expression {{input.data}}.
In Chat mode, you can use additional settings:
- Reset Session — the setting clears the chat history in the Interaction Panel.
- Create Playbook — the setting starts a new Playbook for testing conversations. For more information, refer to Playbooks.
- Create Playbook with Assertions — the setting starts a new Playbook with assertions for in-depth testing. For more information, refer to Playbook with Assertions.
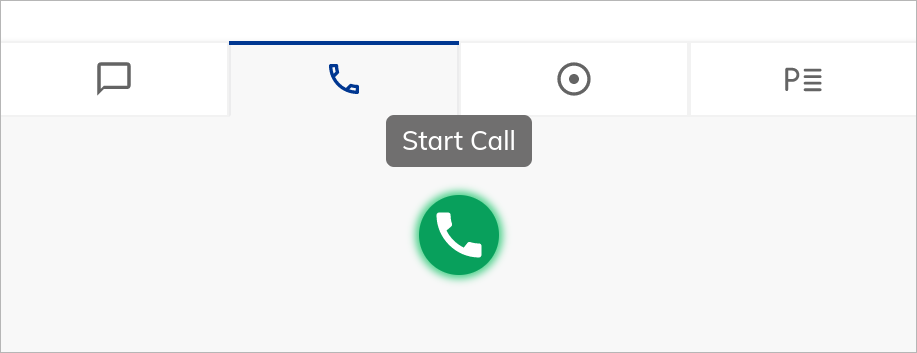
Voice Call
![]()
Feature availability
- If you use a SaaS Cognigy installation, contact the support team to activate this feature.
- If you use an on-premises Cognigy installation, activate this feature by adding
FEATURE_ENABLE_VOICECALL_WHITELISTinvalues.yaml. For example,FEATURE_ENABLE_VOICECALL_WHITELIST:<organization-1-id>,<organization-2-id>.
In Voice Call mode, the Interaction Panel lets you initiate a test call to hear how your voice AI Agent sounds.
Before starting a voice call, you need to configure a voice provider in the Voice Preview Settings of your Project.
- In the left-side menu of your project, select Manage > Settings.
-
Go to the Voice Preview Settings section and select one of the following providers:
2.1 Next to the Speech Connection field, click + to enter credentials.
2.2 In the New Connection window, fill in the following fields:
- Connection — specify a unique connection name.
- Api Key — specify an API key for Microsoft Azure Speech Services. Log in to the Azure portal, navigate to your Speech Services resource, and copy the API key labeled as Key1 from the Keys and Endpoint section. For more information, read the Microsoft Azure AI documentation.
- Region — this parameter is optional. Enter a specific region if necessary.2.1 Next to the Speech Connection field, click + to enter credentials.
2.2 In the New Connection window, specify a unique name for your connection in the Connection field.
2.3 Click Upload JSON File and upload the JSON file that you received from Google Speech Services. To obtain a JSON key file for accessing the Google Speech Services, first create a service account in the Google Cloud Console under IAM & Admin. Assign the appropriate roles, generate a JSON key file for the service account, and download this key.2.1 Next to the Speech Connection field, click + to enter credentials.
2.2 In the New Connection window, fill in the following fields:
- Access Key ID — specify an Access Key ID. Log in to the AWS Management Console, go to the IAM dashboard, select Users, and choose the IAM user. Navigate to the Security credentials tab, and under Access keys, create a new access key if one hasn't been created. Copy the Access Key ID provided after creation.
- Secret Access Key — specify a Secret Access Key. After creating the access key, you'll be prompted to download a file containing the Access Key ID and the Secret Access Key. Alternatively, you can retrieve the Secret Access Key by navigating to the IAM dashboard, selecting the user, going to the Security credentials tab, and clicking Show next to the Access Key ID to reveal and copy the Secret Access Key.
- Session Token — this parameter is optional. If you use temporary security credentials, obtain the token when using AWS STS (Security Token Service) to assume a role or federate users.
- Region — this parameter is optional. Enter the AWS region where your Amazon Polly resources are located, for example,us-east-1for the US East (N. Virginia) region. -
Click Create.
- To check the connection, click Test.
Based on the selected Audio Provider, the list of supported STT and TTS languages and voices will change. On the Settings tab, in the Voice Call section, you can select your preferred language and voice for your test call. After configuring the Audio Provider, language and voice, you can start the call by clicking the Start Call button.
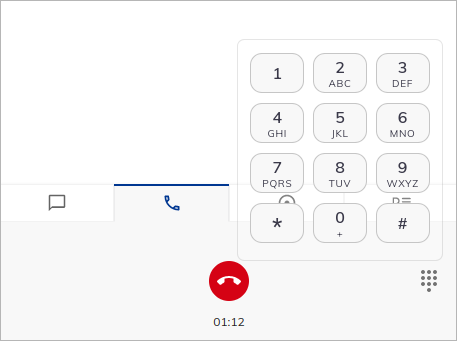
During a call, you can do the following:
- Monitor call duration. The call timer displayed next to the End Call button shows you how long your call has been active.
- Send DTMF tones. Use the Dialpad to send touch-tone (DTMF) signals during the call. These tones you hear when you click buttons on the Dialpad for entering codes or navigating menus within the call.
- Follow the conversation. View the real-time conversation transcript in the Interaction Panel to track the call.
- Automatically end a call on timeout. If you don't provide any voice input for a set period (timeout), the call will automatically end to prevent unnecessary connection time.
To see and analyze the payload of a recognized voice input, click ![]() indicated on the message fields.
indicated on the message fields.
Live Follow
In Live Follow mode, you can do the following:
- Observe conversations between AI Agents and users in real time.
- Debug Flows only after setting up an Endpoint for the specific Flow.
To use and test this mode, follow these steps:
- Go to Test > Logs.
- On the Logs page, find
userIdin theinfo Received message from userlog. If you do not see this log, navigate to the channel chat you created via the Endpoint, for example, Webchat, Teams, or Slack. Send a message to this chat, then go to the Logs page. To getuserIdfor Demo Webchat, refer to Manually defining the user ID. - Copy
userId. - Go to the Flow editor, then open the Interaction Panel by clicking in the upper-right corner.
- At the bottom of the Interaction Panel, click
 .
. - Paste
userIdinto the User ID field. - To start live following, click
 .
.
You can now view and track the user's real-time conversation from your Interaction Panel. To stop live following, click Stop Live Following.
Note
Human-agent messages are not shown in the Live Follow mode.
Playbook
Playbook mode helps save time, catch errors, and give clear details on your AI Agent's performance. Playbooks serve as scripts that run through conversations to ensure the AI Agent responds correctly.
To run a Playbook within the Playbook mode, follow these steps:
- At the bottom of the Interaction Panel, select the Playbook tab.
- From the Playbooks list, select the Playbook you want to execute.
- Click Play.
During execution, you can see if Playbook Step assertions passed or failed. Hovering your cursor over them reveals more details in a tooltip. For more information, refer to Assertions.
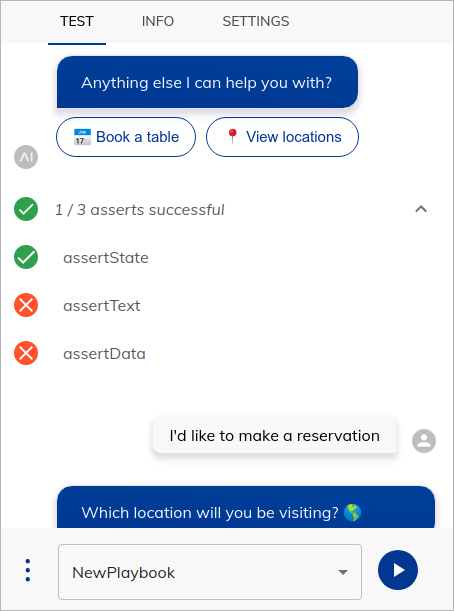
You can further configure the Playbook execution in the Playbook settings.
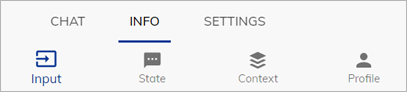
Info
The Info tab menu includes the following sections:
Cognigy.AI objects have a different life span depending on their type. For more information, refer to Cognigy Objects Life Span.
Input
The Input object is updated with every user interaction and holds a lot of relevant information about the user's input, such as the Intents that were found, the channel that the message was sent through and other relevant metadata. For more information, refer to Input.
Context
The Context object serves as the AI Agent's short-term memory, storing session-specific information, such as selected products or the user's current location. Additionally, the Context holds API responses relevant to the particular session. For more information, refer to Context.
Profile
The Profile object serves as the long-term memory of the system, storing user data such as names and emails and including user-specific information such as favorite colors. For more information, refer to Profile.
State
State can be used to narrow the set of Intents that can be triggered by actively excluding certain Intents from a specific state.
For more information, refer to State.
Settings
To configure the relevant settings for the Interaction Panel, click the tab Settings. The following table gives an overview of the available settings.
| Setting | Description |
|---|---|
| General | |
| NLU Connector | Provides a selection list. The default is the Cognigy NLU engine. |
| Text to Speech | Reads out messages from the system. |
| Expert Mode | Displays additional information about the Flow. |
| Channel Selection | Provides a selection list for Endpoint providers. |
| Chat | |
| Show Data Input | Displays data input. |
| Voice Call | |
| Language | Provides a drop-down list with available languages. |
| Voice | Provides a drop-down list with available female and male speakers. |
| Playbooks | |
| Repeat | Reruns a Playbook after it finishes executing. |
| Delay | Waits between Playbook steps. The default setting is 200ms. |
| Advanced | |
| Auto-Move Flow Editor | Switches and moves the Flow editor automatically based on the last executed Node. |
| Auto-Switch Target Flow Selection | Switches the target Flow automatically when another Flow is opened in the Editor. The target Flow will not switch automatically if there is an active session. |
General
The Interaction Panel can be configured with a number of settings across different sections.
Chat Input
The Chat Input setting lets you enable third-party NLU engines for use in the Interaction Panel. To install a new NLU engine in Cognigy.AI, go to Build > NLU Connectors and click + New NLU Connector.
For more information on how to manage NLU connectors, refer to NLU Connectors.
Chat Output
The Chat Output setting lets you customize how information is displayed in the Interaction Panel:
- Text to Speech — activate this setting to have system messages read aloud.
- Expert mode — activate this mode to view more details about the Flow execution.
- Channel Select — select the channels you want to display from the list.
Text-to-Speech
When the Text-to-Speech setting is enabled, an AI Agent will vocalize its responses using your browser's built-in Text-to-Speech (TTS) functionality.
Expert Mode
![]()
If the Expert Mode setting is enabled, the Interaction Panel displays more information about the Flow execution, including:
- Triggered Intents and their score.
- Triggered Yes/No Intents and their score.
- The name of the Flow that was triggered.

Channel Select
The Interaction Panel lets you filter messages by channels, such as Webchat, Voice Gateway, Slack, and more. The Show all option is selected by default, displaying outputs from all channels. You can change this option on the Settings tab. By default, outputs from all channels will be displayed, indicated by the Show all setting.
Chat
The Chat section lets you activate Show data input to enable the Data Input field for chat messages in the Interaction Panel. When the setting is active, an additional input field appears below the standard text input field, allowing you to enter JSON data.
Example:
Valid JSON input data could be {"firstName": "Max", "lastName": "Müller"}, which can be sent with or without a text message.
Voice Call
![]()
The Voice Call section lets select the language and voice to test voice calls from the Interaction Panel.
Configure the following options:
- Language. Select from multiple languages in a drop-down menu. The Custom option lets you use a TTS language, which isn't in the list. It defines the language of the AI Agent's output. The format depends on the TTS Vendor, for example, de-DE, fr-FR, en-US.
- Voice. Select a female or male speaker's voice. This setting applies to region-specific voices as well. The format depends on the TTS Vendor, for example, de-DE-ConradNeural.
Playbooks
This Playbooks section lets you to configure the Playbook executions in the Interaction Panel using two settings:
- Repeat. Run the Playbook repeatedly (until you stop it). This feature is helpful for testing use cases that need consistent behavior over many interactions.
- Delay. The waiting time between each Playbook Step execution. A delay of 200 milliseconds (ms) is the default value.
Advanced
The Interaction Panel offers two advanced settings to improve Flow editing:
Auto-Move Flow Editor
When the Auto-move Flow Editor setting is enabled, the Flow editor will automatically:
- Center and focus on the last executed Node in the current Flow based on user or AI Agent's outputs.
- Open and center the Node if it belongs to a different Flow.
The setting is enabled by default.
Auto-Switch Target Flow Selection
When the Auto-switch Target Flow Selection setting is enabled, the Flow selection in the Interaction Panel automatically switches to the Flow opened in the Flow editor. The setting is disabled by default.
Example:
A project includes two Flows, Flow A and Flow B. The process starts according to Flow A and will reach a certain step, at which point Flow B begins processing. Now active, Flow B is immediately displayed in the editor and the Interaction Panel automatically switches to Flow B as soon as it's opened in the Flow editor.