

- Determine a use case that aligns with your business objectives.
- Select a standard or custom model from a preferred LLM provider. Ensure that you have all the necessary API credentials to access the specific LLM you intend to use.
- Make sure to familiarize yourself with Cognigy.AI’s retry mechanism in case the model does not respond.
- (beta) Implement a fallback strategy to enhance the reliability of the model’s connection.
Use Cases
Explore key use cases that illustrate how LLMs can be utilized in Cognigy.AI, and learn about the features necessary to implement these use cases:Automate Routine Tasks
Automate Routine Tasks
In the Cognigy interface, LLMs help automate repetitive tasks that previously required manual effort from conversation designers:
- Generate Flows. LLMs can generate Flows based on the provided title and description, helping save time during conversation design iterations. To generate Flows, refer to the Generate Flows section.
- Generate Lexicons. With LLMs, you can build a list of Keyphrases for the language of your choice based on the title and description of the provided Lexicon. To generate Lexicons, refer to the Generate Lexicons section.
- Generate Intent sentences. With LLMs, you can build a list of Intent sentences based on the title and description of the provided Intent. To generate Intents, refer to the Generate Intent Sentences section.
- Generate adaptive cards. LLMs can create Adaptive Cards based on the prompt you provide in the description field for the Adaptive Card output type in the Say or Copilot: Adaptive Card Tile Nodes.
Improve AI Agent's Output
Improve AI Agent's Output
The AI Agent’s output often requires refinement to meet the high standards customers expect.
In Cognigy.AI, LLMs can enhance the performance of AI Agents in various ways:
- Generate Enhanced Output. By using LLMs, AI Agents can produce responses that are more comprehensive, nuanced, and in line with customer needs. This enhancement is important in handling queries that require a level of empathy or complex information processing. To generate enhanced output, add LLM Prompt Nodes within your Flow.
- Rephrase AI Agent’s Output. LLMs are good at rephrasing texts while maintaining the original meaning. This capability allows for smoother communication if the original output of an AI Agent lacks clarity or tone alignment. To use this capability, enable AI-enhanced rephrasing in Say, Question, or Optional Question Nodes by selecting the Rephrase Output option in the AI-enhanced output section. Also, you can generate dynamic reprompts for incorrect answers via Question Nodes.
- Train Intents and Find the Right Intent. To enhance AI Agents’ understanding of user inputs in various languages, use an external embedding LLM. Also, optimize intent classification accuracy by using LLM-based intent reranking, which prioritizes and selects the most relevant intent.
Use Retrieval Augmented Generation (RAG) with Knowledge AI
Use Retrieval Augmented Generation (RAG) with Knowledge AI
RAG (Retrieval-Augmented Generation) is an AI framework that combines data from information retrieval systems with LLMs. This AI framework makes AI-generated content more accurate and relevant by focusing on specific, up-to-date information.The Cognigy Knowledge AI feature is built on the RAG framework, allowing it to retrieve information from various knowledge bases, including PDFs, Word documents, PowerPoint presentations, web pages, and images. Knowledge AI assists both AI and human agents in providing better responses:
- Use Knowledge AI for AI Agents. Using LLMs integrated into your Project, AI Agents can access relevant knowledge sources, including articles from subject-matter experts, frequently asked questions, and diagrams. To create a first Knowledge Store, go to the Knowledge AI documentation. Then, retrieve data from the Knowledge Store and improve the AI Agent’s output by using the Search Extract Output Node.
- Use Knowledge AI for human agents. By retrieving data from different knowledge bases, LLMs reduce the burden on human agents, making information access quicker and more efficient. To let human agents use the knowledge base for solving tasks, add a widget to the Agent Copilot workspace using a Copilot: Knowledge Tile Node. The widget serves as a search tool, enabling human agents to enter questions and retrieve information from the knowledge base.
Extract Specific Entities from User Inputs
Extract Specific Entities from User Inputs
By using LLMs, you can extract specific entities from user inputs, such as product or booking codes and customer IDs.
For example, if a user input is 
I would like to book flight AB123 from New York to London,
the LLM can extract the booking code AB123 from this input.
This capability allows for dynamic, context-aware responses while improving accuracy and reducing manual data entry.
To add this feature to your AI Agent,
add the LLM Entity Extract Node within your Flow.Determine the Emotional Tone of the Conversation
Determine the Emotional Tone of the Conversation
Understanding the emotional tone of customer interactions is crucial. LLMs can analyze conversations in real time to determine customer sentiment.
With Agent Copilot sentiment analysis, LLMs can give insights, enabling human agents to adjust responses for a more effective interaction and improved service quality.
To let human agents use sentiment analysis provided by LLM,
add a widget to the Agent Copilot workspace
using a Copilot: Sentiment Analysis Tile Node. The widget monitors the conversation and displays the emotional tone (positive, negative, or neutral) of the latest user input in real time.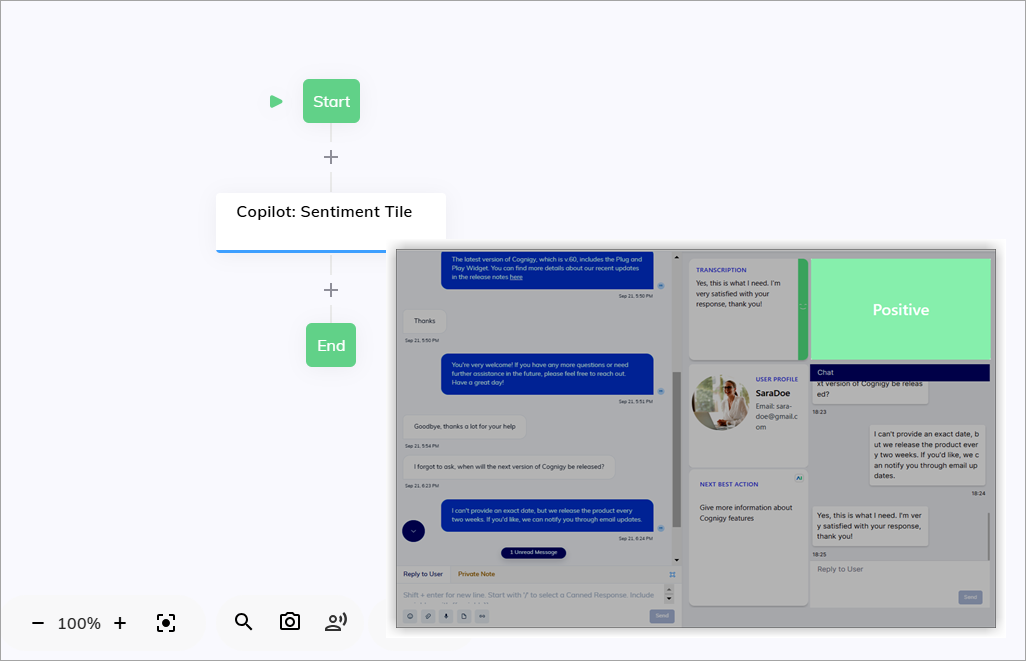
Ensure LLM Accuracy with Human Review
Ensure LLM Accuracy with Human Review
Even though LLMs are powerful, there are situations where human oversight is essential.
Errors in data retrieval or sentiment analysis can occur, especially with nuanced or complex information.
Human review can help minimize these errors.Agent Copilot provides plug-and-play widgets in the workspace, allowing human agents to review the output generated by LLMs before sending responses to customers.
This human-in-the-loop approach ensures that wrong or misleading information doesn’t reach customers.
Model Types
In Cognigy.AI, you can add an LLM from the offered LLM providers as either a standard model or a custom model.Standard Models
Standard models are predefined models in the Cognigy.AI interface. To use a standard model, select an LLM provider and model name from the list of predefined models. By choosing a standard model, you can ensure that this model is fully compatible with Cognigy.AI features. After selecting a model, you must enter the API credentials from the LLM provider that offers this model to get access to its functionality.Deprecations and Removals
Standard models that have become outdated and are soon to be removed by the LLM provider are marked with special icons in the Cognigy.AI interface. These icons help you stay informed about changes to the model availability and ensure your AI Agents continue to run smoothly.| Icon | Meaning | Recommended Next Step |
|---|---|---|
The LLM provider has stopped developing the model and plans to remove it in the future. Deprecation statuses may vary by provider, for example, Anthropic and OpenAI have legacy and deprecated statuses, while Microsoft Azure uses only deprecated. Cognigy.AI marks a model as deprecated after the LLM provider announces plans to stop providing support and updates. | Select an alternative model by consulting the LLM provider’s documentation and switching your AI Agent to it. | |
| The model is no longer available and can’t be used. If your AI Agents use this model, they might stop working. | Immediately switch to an available model with similar capabilities to prevent AI Agent interruptions or errors. |
Custom Models
Custom models are non-predefined models in the Cognigy.AI interface. To use a custom model, select an LLM provider and manually enter the model name instead of selecting from a list. While these models may not offer the same level of Cognigy.AI feature support as standard models, they can be helpful when you need a specific version and are familiar with its capabilities. Moreover, if LLM providers release new model versions, opting for a custom model lets you avoid waiting for Cognigy.AI to update its list of standard models. As with the standard model, you must enter the API credentials for your custom model from the LLM provider.Retry Mechanism
If Cognigy.AI encounters issues while trying to connect with LLM providers that don’t return a200 OK response code,
Cognigy.AI will automatically attempt to reconnect up to three times using a retry mechanism.
This retry mechanism is designed to improve the reliability and stability of the system when using certain Cognigy Nodes and features.
By attempting to reconnect multiple times, the retry mechanism increases the chances of successful communication, reduces disruptions and ensures smoother operations within the system.
The following Nodes and features are affected by the retry mechanism:
- LLM Prompt
- LLM Entity Extract
- Search Extract Output
- Question Node Slot Mapping (in case of using external NLU embedding)
- Question Node LLM Reprompting
- Sentiment Analysis
Retry Mechanism for On-Premises
Retry Mechanism for On-Premises
The retry mechanism can be customized using environment variables for on-premises installations.
By adjusting these environment variables, system administrators can fine-tune the retry behavior
to suit specific performance requirements and network conditions.