

Conversation Life Cycle
The conversation life cycle involves starting a conversation, keeping it open for active engagement, possibly putting it on hold temporarily, and finally closing or resolving it.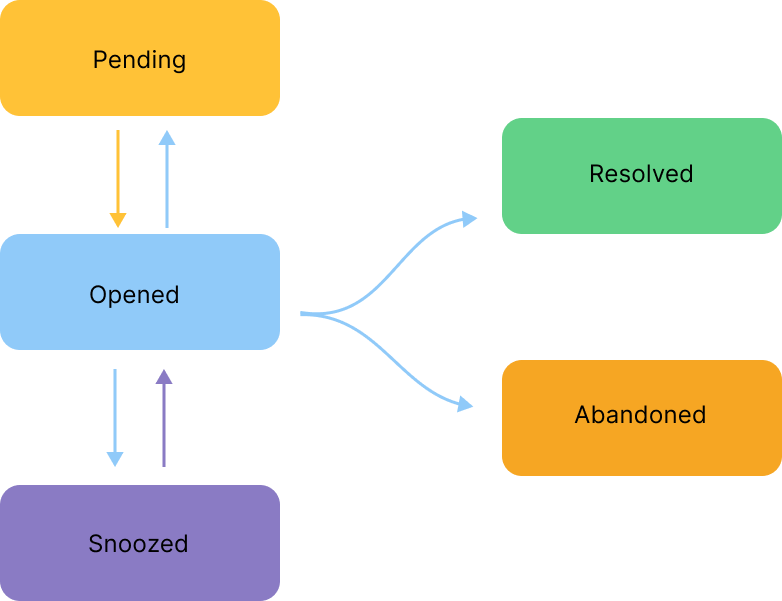
| Status | Description |
|---|---|
| Opened | This status indicates that a conversation is handed over to a human agent. The conversation can be opened by a user or reopened by a human agent. From this status, the conversation can transition in the following ways: - Move to Pending and Snoozed statuses. Can be returned from these inactive statuses to the Open status.- Move to Resolved or Abandoned statuses. If the conversation is marked as resolved or abandoned, it cannot be reopened. |
| Pending | This status indicates that a conversation is temporarily paused, awaiting a response from either the customer or a human agent. To mark a conversation as pending, in the upper-right corner of the Conversation page, next to the Resolve button, click |
| Snoozed | This status indicates that a conversation is temporarily suspended until a time trigger or customer response trigger was activated. To mark conversation as snoozed, in the upper-right corner of the Conversation page, next to the Resolve button, click - Snooze Until Next Reply — the issue will be set aside for now, and the status will change to Open upon the next customer reply.- Snooze Until Tomorrow — the issue will be set aside for now, and the status will change to Open the next day.- Snooze Until Next Week — the issue will be set aside for now, and the status will change to Open next week. |
| Abandoned | The status indicates that a conversation is closed because the user left the conversation. To mark a conversation as abandon, in the top right corner of the Conversation page, click Resolve and select Agents with the Administrator role can activate the following options in the Account Settings:- Automatically abandon conversations. - Automatically delete abandoned conversations. |
| Resolved | This status indicates that a conversation is closed because the user’s problem has been fixed. To mark a conversation as resolved, in the upper-right corner of the Conversation page, click Resolve. Once a conversation is marked as resolved, its state cannot be changed back to open or pending. Agents with the Administrator role can activate the following settings in the Account Settings.- Automatically resolve conversations. - Automatically delete conversations that were resolved. |
Conversation Assignment Statuses
A conversation with theOpened status in Live Agent can have one of the following assignment statuses:
- Unassigned — a conversation is not assigned to a human agent.
- Assigned — a conversation is assigned to a human agent. The assignment occurs either manually or automatically.
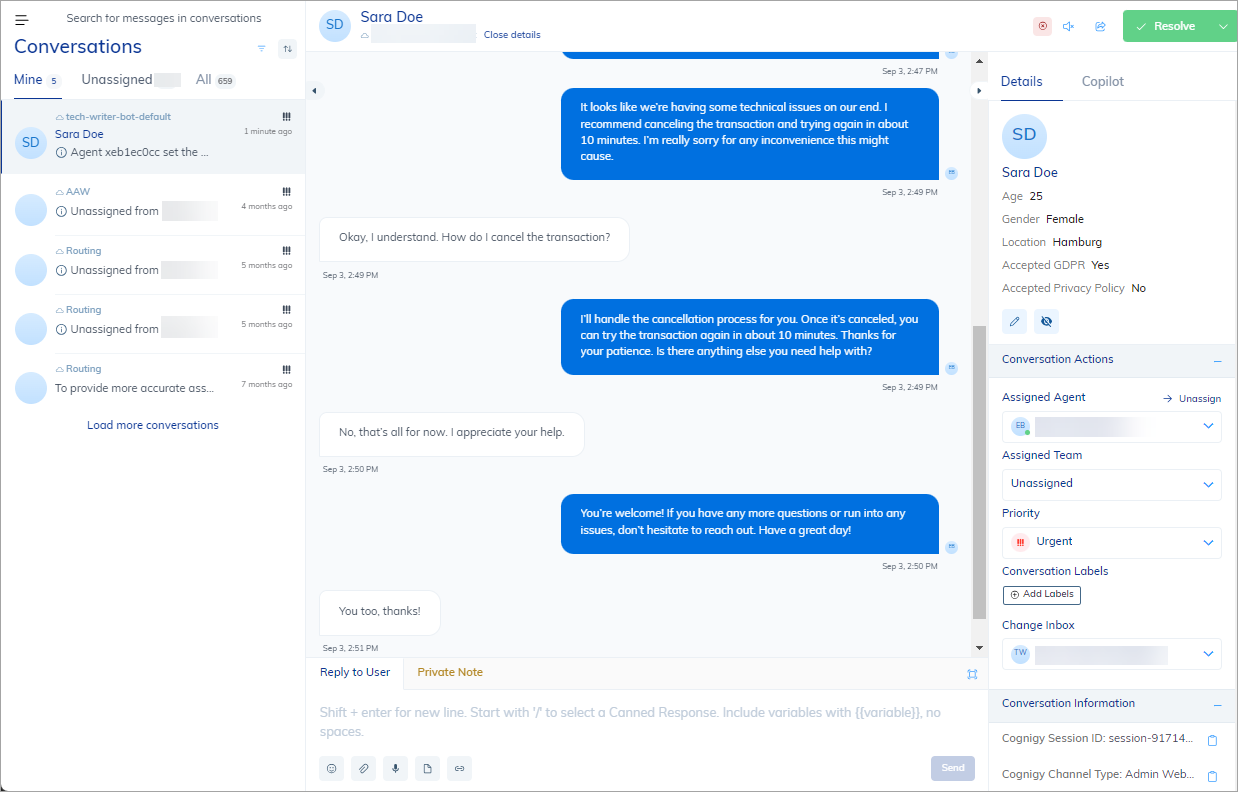
Conversation Details
When you select a conversation, conversation details appear on the right side of the Live Agent interface. These details include the following conversation information: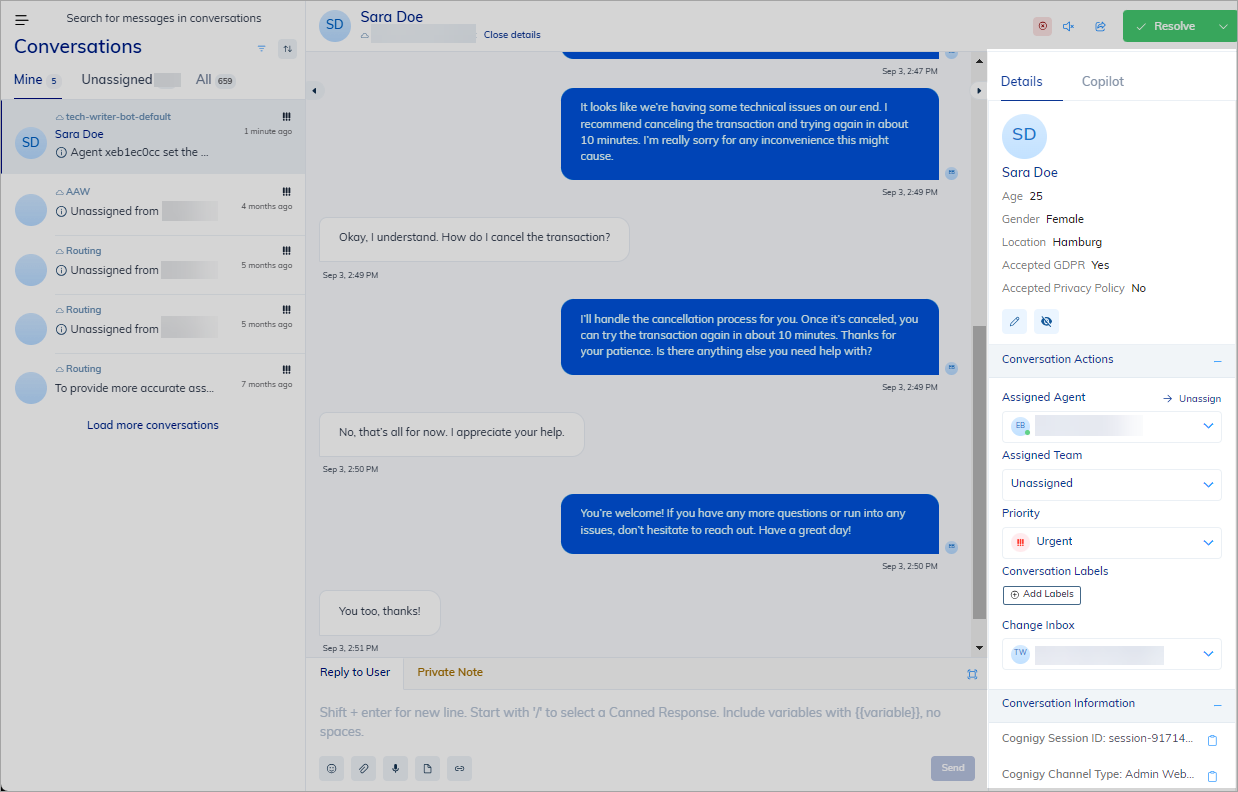
Contact Profile Details
The Contact Profile information is shared at the beginning of the handover process. Live Agent does not store private data to comply with GDPR regulations. Instead, Live Agent only retains a reference to Cognigy.AI. When a human agent enters the conversation, Live Agent requests data from Cognigy.AI. If the human agent doesn’t leave the conversation page, they may miss contact profile updates. To view profile updates that occur on the Cognigy.AI side, the human agent must reenter the conversation. This can be done by switching to another page within Live Agent and then returning. The following table represents data that can be edited within Live Agent and stored in the Contact Profile.| Contact Profile Details | Description |
|---|---|
| First Name | User’s first name. |
| Last name | User’s last name. |
| User’s email address. | |
| Gender | User’s gender. |
| Age | User’s age. |
| Birthday | User’s birthday. |
| Location | User’s location. |
| Accepted GDPR | Accepted General Data Protection Regulation. |
| Accepted Privacy Policy | Accepted the privacy policy terms. This field is applicable to Webchat v3 when a user accepts the Privacy Notice. |
| Tasks | Tasks are the user’s intention or task. |
| Profile Picture | When available, the URL address of a user’s picture. |
Change Contact Profile Details
To change the Contact Profile, follow these steps:- In the left-side menu of the Live Agent interface, select Conversations.
- Select a conversation from the list.
- On the right side of the page, navigate to Conversation Details.
- On the Details tab, click
 to change the Contact Profile.
 - In the Contact Profile window, fill in the fields and click Submit to save your changes.
COGNIGY_CONTACT_PROFILE_CACHE_TIME variable in the Live Agent values.yaml file and specify the value in seconds.
View Hidden Fields in Contact Profile Details
By default, only fields that contain values appear in the Contact Profile. To view empty fields, follow these steps:- In the left-side menu of the Live Agent interface, select Conversations.
- Select a conversation from the list.
- On the right side of the page, navigate to Conversation Details.
- On the Details tab, click
 to view the empty fields. To hide them again, click
  .
.
Conversation Actions
Within a conversation in Live Agent, a human agent can do the following:- Assign other agents to the selected conversation.
- Assign a group of agents defined in a team.
- Define the priority for handling the customer’s request in the conversation.
- Assign one or more labels to make the overview of the listed conversations easier for the agent at a glance.
Conversation Information
Conversation information includes the following details:- Cognigy Session ID — a unique identifier associated with a session in the Cognigy platform. In the context of Cognigy.AI and the Live Agent interface, a session refers to the collection of user inputs and agent replies within a conversation.
- Channel Type — a messaging platform through which users can interact with the AI Agent. Each channel is associated with one or more Cognigy Endpoints, allowing users to communicate with the AI Agent through various interfaces. Cognigy channels include platforms like Webchat, Facebook Messenger, Slack, WhatsApp, and other messaging or communication platforms.
- Cognigy User ID — a unique identifier for authorized access to Cognigy.AI and Live Agent.
Previous Conversations
After a conversation has been marked as resolved, the next time the same customer starts a new conversation, the previous conversation associated with this customer will be shown in the Previous Conversations menu. This will help the agent understand the history of the customer’s issue.Assistants
Cognigy provides three assistants for giving human agents support in their service conversations. You can choose the installation that best suits your requirements:View Conversations
To open a conversation in Live Agent, follow these steps:- In the left-side menu of the Live Agent interface, click Conversations.
- In the upper-left corner, select All Conversations.
- On the Conversations panel, choose one of the following tabs:
- Mine — displays conversations assigned to you.
- Unassigned — shows conversations without a designated owner.
- All — shows all conversations in the system. Agents, by default, cannot view all conversations, but administrators can grant access through the Inboxes settings. For more information, read the Configure Agent Access to all Inbox Conversations.
- Select a specific conversation from the chosen tab. The conversation will open, providing additional details and actions in the right-side panel.